Showing posts with label Ai fabric. Show all posts

Tuesday, May 23, 2017

Tuesday Threads with Karen Day

Hello Ai Sewing fans!
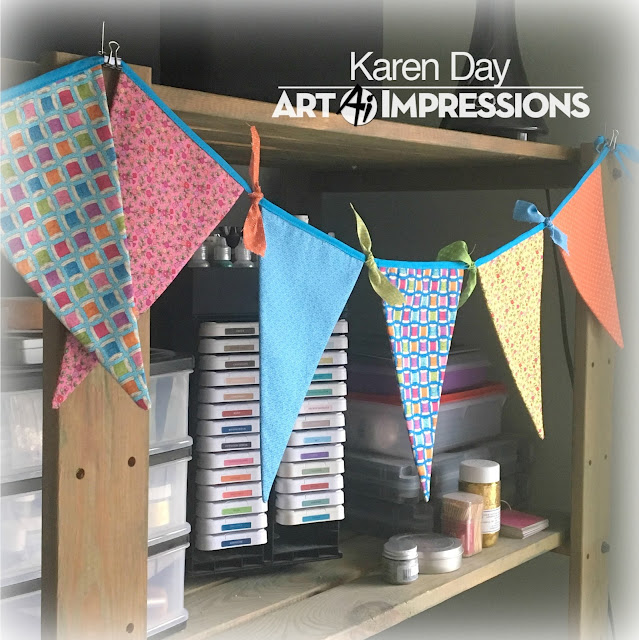
 I've had a creative long weekend, gardening, card making and sewing up several projects.  I have one of them to share with you today.  When I first saw the wonderful Shop Hop fabrics designed by Bonnie Krebs, I had the idea to make a fabric bunting to show off all of the different prints in the collection.  And while I've only used ten of the fabrics (there are 18 in the collection!), you get the idea of how pretty these are.
 I have a large shelving unit in my craft room that is right behind where I stand at my drafting table, with all of my supplies on it.  It was looking a little blah... so the bright Shop Hop fabrics will jazz it up a little.
 I drew my pennant shape on a piece of paper (each pennant is 6" x 9") and added a 1/4" seam allowance.  Then I cut two of them out of each fabric, and one of a medium weight fusible interfacing that I ironed onto the backside of one of each print.
I sewed a 1/4" seam on the two long sides of each pennant, turned them inside out and ironed them flat.  The Therm O Web medium weight fusible tricot interfacing gives them the perfect amount of body to hang nicely:
I kept an inch of space between each pennant, and sewed them all onto an 8 foot length of turquoise seam binding.  I cut a bunch of 1" x 6" strips of the different fabrics and tied them along the bunting between each pennant.
The Art Impressions Shop Hop fabrics are available through Henry Glass & Co. - happy sewing everyone!


Tuesday, January 17, 2017

Tuesday Threads with Karen

Hello Ai fabric fans!
I'm back with the January edition of Tuesday Threads with Karen... and this is the most fun that I've had sewing in a while!  I came across this idea on Pinterest, and knew that these little fabric boxes would be amazing in the Art Impressions Shop Hop fabrics that are available through Henry Glass Co.


I intended to make just one... and ended up with four!  Trust me, if time wasn't an issue, you'd be seeing about a dozen of these.  I started with the largest, and just kept making them smaller!

I'm not going to give you a full tutorial, just a bit of info - if you're interested in making some of your own, just do an internet search for "fabric boxes" and there are some very helpful, easy-to-follow tutorials out there.  But I've got lots of photos to share (they were just so cute... I kept snapping pictures!)
The largest box was made by cutting two 12" squares of fabric, and two of contrasting fabric for the lining.  I cut out 3"x 3" squares from the two bottom corners, and then ironed on Therm O Web's medium weight fusible tricot interfacing onto both lining pieces.  I sewed down the sides and across the bottom, then mitred the corners to form the box shape - on both the outer and lining pieces.  With right sides together, I sewed the top rim of the box to the lining, leaving a 2" opening to turn them inside out, which I then hand sewed shut.  Here's what it looks like:

 I rolled down the top edge to form a bit of a cuff, and to show off the contrast lining.
 Oh, the possibilites of what you could use these for in your sewing room!  Or your craft room... or the kitchen... or as gift packing...

 The largest started with 12" squares of fabric, and the others are 10", 8" and 6" squares of fabric respectively, with the corners getting smaller for each size.  Adding the Therm O Web interfacing to the lining worked really well, giving just the right amount of stiffness and support to the boxes.
I'll see you next month with another fun Ai fabric project.
Happy sewing!


Tuesday, December 13, 2016

Tuesday Threads with Karen

Hello Ai fans, and welcome to a new mini feature here on the Ai blog!
Did you know that Art Impressions has a line of quilting fabrics?  They shipped out this November through Henry Glass & Co. to a quilting store near you!  The collection is called "Shop Hop" - all your favourite Girlfriends images combined with a sewing/quilting theme are featured in 18 wonderful 100% cotton fabrics. (To see the entire collection, click here!)

Once a month on my regular Tuesday post, I'm going to feature "a little something" to show off this fun collection.

Now, these aren't exactly holiday fabrics, but 'Tis the Season, so I'm kicking off the new feature with a little gift giving idea and a matching card:
If you like to give a jar of something homemade to friends and neighbours, how about sewing a little elf shoe to put it in?  This is one of the subtle patterns in the collection, and it worked perfectly in this bright green paired with a black lining and bright pink ribbon.  I made a matching card using Ai's Christmas Wreath Set (Sku #4791) to give along with it.
 I'll give you a few quick instructions on how I made my shoe, and if you scroll down to the end of the post, I've included a pdf file with the pattern if you'd like to make your own.
I cut out two of the elf shoes in the green fabric, and two of the lining pieces from some plain black fabric.
I sewed around the shoe using 1/4" seams, leaving the top open, and clipped the seam allowances around the curves.  I did the same with the lining, leaving about a two inch opening, as this is how I'll turn it inside out.
  The toe of the shoe was lightly stuffed with batting that I carefully poked right in to the curled point, up to where I've indicated with the stick.  With right sides together, I attached the lining to the shoe by sewing the top edge together, and then turned it inside out through the opening that I left in the lining.
After a little light pressing, I added the ribbon and buckle to the shoe with some glue dots, and tied on a little tag.  In went my jar of jam, and voila!  My gift is ready for giving.
Click here to print out the elf shoe pattern: elf shoe
I'll be back in January with another fun sewing project!