I LOVE bees and celebrated by making a tiny little bee easel card in their honor.
My card nestles nicely in the Matchbook envelope.
I used the MB Template to create my easel by trimming off the side panels and gluing part of it closed. Follow along below if you'd like to give it a try.
I started by taking the MB template die and cutting my designer paper to fit the middle section vertically.
I trimmed the tiny bit off that hung over the edge.
Next, I flipped it over and glued the lower part down making sure that there was no glue on the tab. The tab will be popped up to keep the easel propped once that's added.
I then folded down the top portion after creasing the score lines.
Then I glued the little square panel I created, ONLY to the little scalloped section. You need the other part to bend so that it's propped up.
I stamped one of the little sentiments and my card was good to go. It fits perfectly into the MB Envelope because the base is cut from the MB Template die. Such a cute little card.
Is it starting to feel like Spring in your neck of the woods? If it is, would you PLEASE send some my way?? LOL! We woke up to more snow on Saturday morning! I'm trying to bring more Spring our way by making this fun easel card featuring 5792 Front and Back Bunny which is a new release at Art Impressions. Isn't he the cutest??!! I also used 5719 FB Fence and Window Set and 5723 Journal Cover and Bookmark dies. I sandwiched the fence die in between two of those beautiful frames from 5543 Journal Template Die Set. The sentiment is from 5733 Easter Sentiments Set. I stamped this cutie onto Cryogen white paper and colored him with Copic markers which are listed below. I decided I wanted to make an easel card so you can see both the front and back of this cute little guy! I really love how all the Journal dies work perfectly when making cards too!!
So you just stand up the top of the card and the Happy Easter sentiment keeps the card standing for display.
And this is how it looks when you have it on display.
This is what it looks like when it's all closed up. It folds flat for mailing or storing. I had to stand it on its edge to grab a picture, so it looks like it's poking out a bit in the middle. It doesn't look like that when it's laying flat.
Thanks so much for stopping by today and until next time - stay crafty!
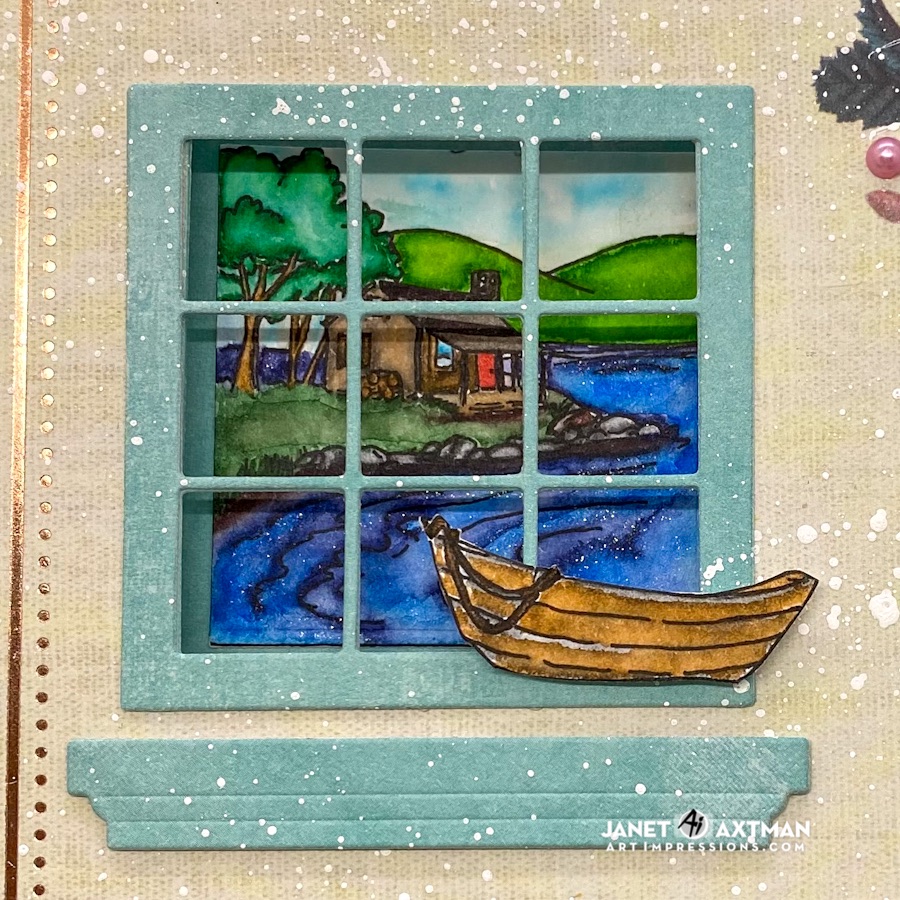
The boat and cabin scene is so peaceful and so easy to quickly color and work with. It's a mini scene that is great alone or combined with other scenes. The new releases include a Shadowbox Window die for a 3D element that can be used with any of the Window sets. The boat in this scene can be used in many ways to add dimension and perspective to the scene.
These little window scenes are perfect to color in any way you like. I chose to watercolor my window scene using Zig Clear Color Pens. I added shine to the water with a coating of clear Wink of Stella. The sparkle reminds me of lake water on a summer day. My little personal touch is the red door. My house has a red door so I usually color doors red as a nod to my own home.
Zig Clear Color Pens Used: May Green, Deep Green, Light Green, Green, Deep Blue, Persian Blue, Cobalt Blue Oatmeal, Light Gray, Mid-Gray, Dark Gray, Gray Brown, Black, Dark Brown, Beige
I have a video on this card and show you how to make a 5" x 7" easel card with basic supplies. You'll also see how easy it is to install the Shadow Box Window Die to create really stunning dimension.
Like many card makers, I love patterned papers and I try to use them to make my cardmaking a little easier. This 4 1/2" x 6 1/2" paper caught my eye and I've been waiting for an opportunity to use it. It has rose gold foil details and pretty vintage bird and floral images. I splattered the card with watered down white acrylic paint for additional rustic vibes. The window sets pair beautifully with the new Shadow Box Window Die 5408. It comes with the dies to recess your image behind the window frame and includes a window box. It lays flat when shut but pops up when the card is opened. It's a great way to add some unexpected dimension to your card.
I thought it would be fun to create an easel card with this so that the window would be at a perfect angle when displayed. I made my own 5" x 7" easel card base and used the Rectangle Double Stitched Dies to make a stopper and a birthday sentiment. When displayed, the box part of the die is free to pop up and provide the 3D effect it is designed for. I placed the boat on the outside of the window frame but it could also be used inside the shadow box or not at all. You get to decide!
Thanks for stopping by today. I hope you enjoyed this card and seeing the cool effect that the Shadow Box Window Die provides for your Window Accessories stamps.
This is something I colored up before Valentine"s Day this year and didn't get to finish it up and post it before the holiday. I used the Holiday Mansion Set and the HM Valentine Set! But I think you can use love themed cards any time of the year, don't you? I mean, how cute would this be to mail to someone you love no matter what time of year it is! This would be perfect for my Grandkids! I would just use a different sentiment with it! I just made a simple easel card.
Thanks so much for stopping by for a visit today! Until next time - stay crafty!!
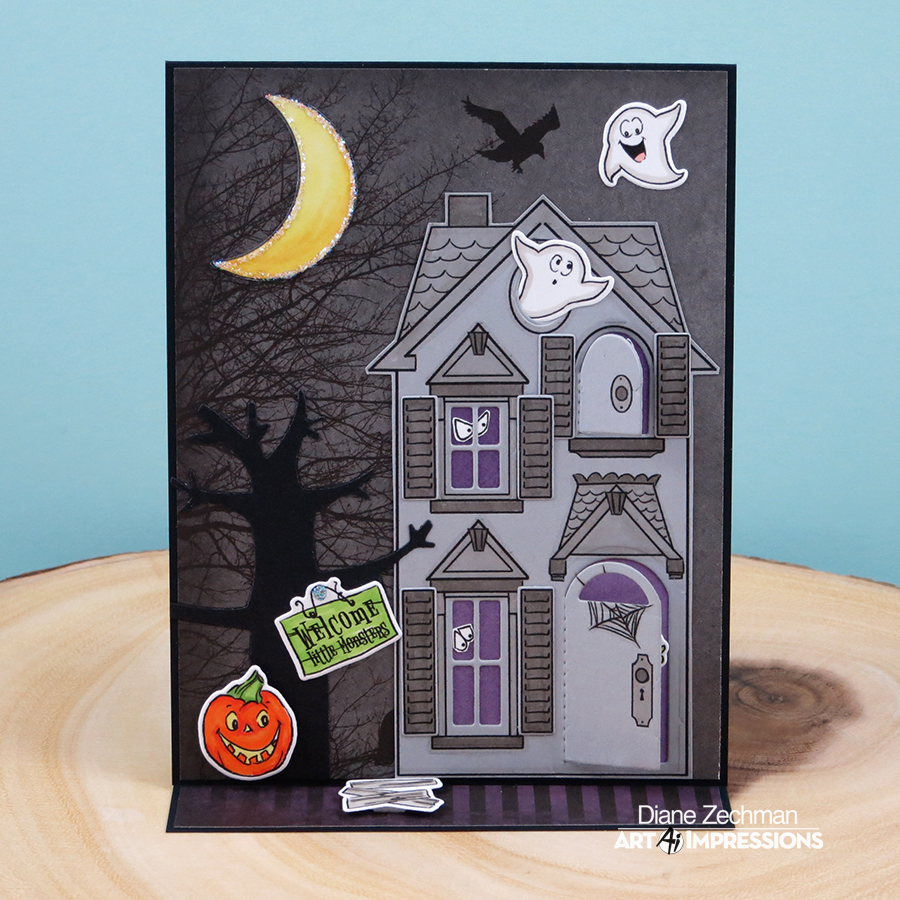
When we were making samples of the new releases for display at the trade show, I was asked if I could make a Halloween version of the mansion in an easel type card with a battery operated tea light behind it. What a fun challenge!
Since the mansion is quite tall, I kept the normal size of the card (4 1/4 x 5 1/2). To create the base for it to sit on, I added a piece of 4 1/4 x 9 inch cardstock, scored at 5 1/2. The 4 1/4 x 5 1/2 section of this piece was layered onto the card back (I just doubled the thickness of it). The smaller section folds to the inside when closed and has the die cut wooden boards image popped up to hold the card front when the card is opened.
To create tinted windows and an eerie glow inside, I sponged purple ink onto both sides of a piece of vellum. The windows and doors of the mansion were diecut and then it was held in place on the front with temporary tape so the openings could be traced. Once it was removed, the dies were lined up and cut a second time through the front layers. The vellum was adhered to the back of the mansion and then the mansion was lined back up to the diecut openings on the card base.
Smaller elements from the 4927- HM Accessory Set were added and the moon is from the 4784- Old Bat Set. Additional images and a sentiment were placed on the inside, along with the tea light.