Showing posts with label MTF. Show all posts

Monday, June 15, 2020

Wishing You A Bright Sunny Day! by Carol Hintermeier

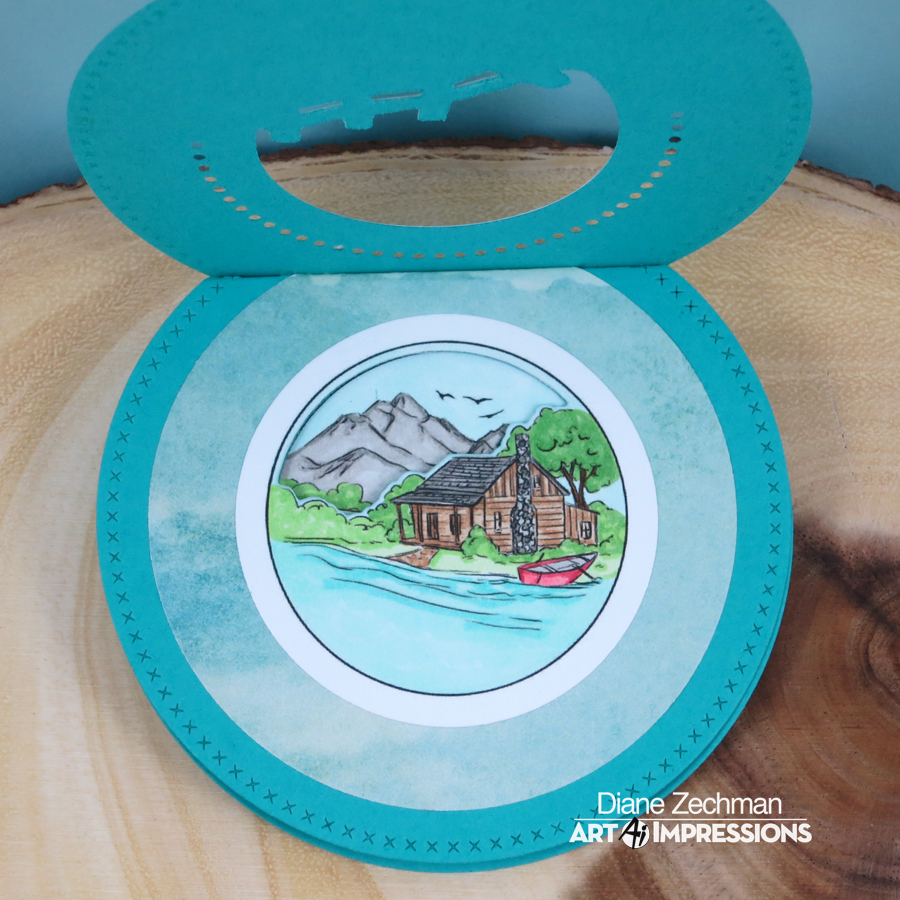
Happy Monday Ai friends!  Today I have another mini trifold card using the beautiful new Tropical Circlet MTF.  I love being at the beach and this sure makes me want to be there NOW!  Haha!


I used Neenah Desert Storm card stock for my card base.  I followed the directions on the back of the package for the size and where to score the card.  I added patterned paper layers (from my stash) to the card front and the middle layer.


Next I inked up the stamps in Copic safe ink and stamped them onto a piece of Neenah 80# card stock.  I was sure to space them out enough to have room to die cut them with a Circle Double Stitched die after I finished coloring them.  I also used a circle die to cut layers for them from Neenah Desert Storm card stock.  After I colored them, used a circle die to cut them out, and adhered them to the Desert Storm circles, I used the included dies to cut the openings in each one.  I also used the same dies to cut the openings in the top and middle card layers.


These tri-fold cards are just so fun as you open the card up!  


Thank you so much for stopping by today!  I hope you have a wonderful and fun crafting week!


Copic markers:
B26, B23, B21, C00, C1, C3,
Y19, Y18, Y13, Y11, Y00,
E35, E33, E55, E53, E51,
RV25, RV23, RV21
Leaves:
BG49, G18, G02
G28, G19, G07, G03
YG25, YG01
YG17, YG13, YG01

Monday, February 17, 2020

Pencil Coloring & Gardening Circlet MTF by Carol Hintermeier

Hello Ai fans!  My card today features the beautiful Gardening Circlet MTF set.  I had so much fun coloring these sweet images with my pencils!


This card is very easy to create as the directions for the card size, where to fold and stamp, are all included on the back of the packaging.  First I stamped the images and used the dies to cut the openings in the first two panels.

I decided to use my Prismacolor Pencils to color these as the images are a bit on the small side.  Keeping your pencils very sharp at all times makes the coloring very easy!


I love this row of birds!  The illustration reminds me of the sweet Chickadees that visit our backyard bird feeders.  I did a web search of images of them to use as a guide for my coloring.  Note:  you do not need to use as many pencil colors as I did--I just wanted to do a lot of shading.  The list of the colors I used are at the end of this post.


I used a sentiment from the Exclusive Hydrangeas Set and stamped it with black ink.  I definitely used my MISTI to stamp this since I sure didn't want to mess it up after all of my coloring!  Haha!


I hope I've inspired you to give these sweet mini trifold sets a try!  I'm always thankful for you taking a moment to stop by and take a look.  Have a wonderful, crafty week!


Prismacolor pencils:
Chartreuse, Spring Green, Apple Green, Lime Peel, Prussian Green, Kelp Green, Olive Green,
Dark Green, Mahogany Red, Magenta, Process Red, Hot Pink, Diox. Purple Hue, Parma Violet, Lilac, Indigo Blue, Cerulean Blue, Light Cerulean Blue, Blue Slate, Sky Blue Light, Terra Cotta,
Burnt Ochre, Mineral Orange, Goldenrod, Jasmine, Yellow Ochre, Canary Yellow,
Dark Umber, Chocolate, Light Umber, Sandbar Brown, Ginger Root,
Cool Grey: 90%, 70%, 50%, 30%, 20%; Black

Tuesday, April 24, 2018

Cabin Circlet MTF by Diane Zechman

Hello Ai friends and happy Tuesday! I am posting on Tuesday this week instead of Monday and today I have a masculine card to share using one of the new Ai Circlet MTF sets. Here I used the 4981- Cabin Circlet MTF set. I have already shared 2 ways that I used the new Circlets and here's the third card I made. I’ll share one more style later!


I wouldn't normally make a circle shaped card for a masculine card, but by incorporating some masculine papers and cross-stitched dies, I think it works. First, I stamped and colored each image. The first two were not fully colored where the matching dies will cut them.


Next, each image was die cut with circle dies and the inside of the first two were die cut with the dies included in the set. Then 3 blue layers were die cut. They are not attached yet here.


Some patterned paper layers were added to the first two and then the circle images were adhered. The matching dies were laid back inside the images and held in place with low-tack tape. These were run through the machine again to cut a window through the first two blue layers.


Now each layer is ready to be assembled. (I decided to add some paper scraps and die cut holes on that first one!)


Using my Scor-Pal, I scored a half inch line at the top of the SECOND and THIRD circles. I didn't want the top of my card to have score marks, for a nice finished look. Then I adhered the layers together using Scor-Tape on those top 1/2" scored areas.


I love how you can peek through from the top circle to the back one!


This circle card opens sort-of like a book.


Great masculine images!


Have a great Tuesday and… happy stamping!

Thursday, September 22, 2016

let us adore Him by Diane Zechman

Hello Ai friends and happy Thursday!
 
Today I am sharing a card using a NEW Mini TryFold set (which includes dies!).  Here I used the Nativity Mini TryFold (4809) .
 

The Ai Mini TryFold sets are soooo adorable the way you diecut each panel to peek through to the inside!  This manger scene is no exception...so sweet!  I stamped and cut out an extra sheep from the middle image to place on the front.


When the front panel is open, you see the sheep looking on...


When both sides are opened, the inside reveals baby Jesus...


Have a great day and… happy stamping!