Hi it's Maria.
Keeping in the theme of our weekly challenge from yesterday I made another type of gift card to share with you. This one is called a pop-up gift card and I thought I'd give you a little tutorial incase you haven't made one before. Hoping you will try this and enter one into our challenge this week!
Outside of Card
(Standard A2 Card)
Unfortunately, it is hard to photograph projects sometimes and you can't see that the brown frosting is all sparkles on the cake.
Inside When Card is Open
Start with a 8.5" x 5.5" piece of cardstock and score at 4.75".
This will be your card base--a regular A@ card.
You will then need a 6" x 5.5" piece of cardstock that you will score at 1.5", 3", 3.75", 4.75", 4.75" and 5.5". IMPORTANT--make sure you are scoring on the 6" side of your carstock. It won't work the other way.
Fold your lines as follows:
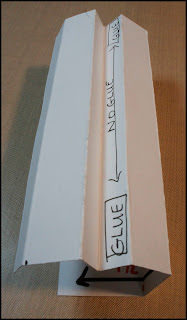
Add your adhesive as follows: you can see where my sticky tape is on the green paper.
Insert your pop up into your card!
Here's a sample I made in white to show you the finished inside. Card is flat when closed.
Enjoy your weekend!!!!
Stamps Used
Your Day (Sku#F4147)
Colored With
Copics
Faber Castell Pitt Pens
Sakura Gelly Roll Pens


7 comments:
I LOVE this! Your card is so fun - and what a great tutorial! I'm definitely going to try this. TFS!
Wow Maria! This is such a CUTE card. And I love the idea! Queen of tutorials over here! :)
Awesome card Maria and, great directions! I dig her hair do'. :o)
Take care and STAY POSITIVE!
Such a great tutorial. Must try this one day:) Thanks
Now I want to go and buy a gift card and give it to someone just so I can make this card!!! Your construction is genius!!
Great tutorial !! I love Eunice !!!
Your card is so fun..I am definitely going to do this along with Gift Card envelopes.
Post a Comment