Happy Wednesday Ai Fans!!!
Watch video tutorial here!!!
Today we will be using the brand-new Ai FREEBIES Village Series Stamps! The little village FREEBIES collection includes several different village houses/shops including a schoolhouse, cafe, hotel, candy shop, bakery and pet shop. Here's the fun part ...there are three add-on sets that will coordinate with these FREEBIE stamps and they include the Village Vehicles (5889), the Village Accessories (5890) and the Village Signage (5891).
One of these FREEBIES will be free with each $30 purchase and the add-on sets can be purchased as a bundle or individually. The bundle set will be at a discounted price. I will list all of these options for you down below!
Let's start by creating the front panel for our card using the Ai Rectangle A2 Double Stitched Die Set (5063) using some Strathmore Bristol Smooth 100lb Cardstock.
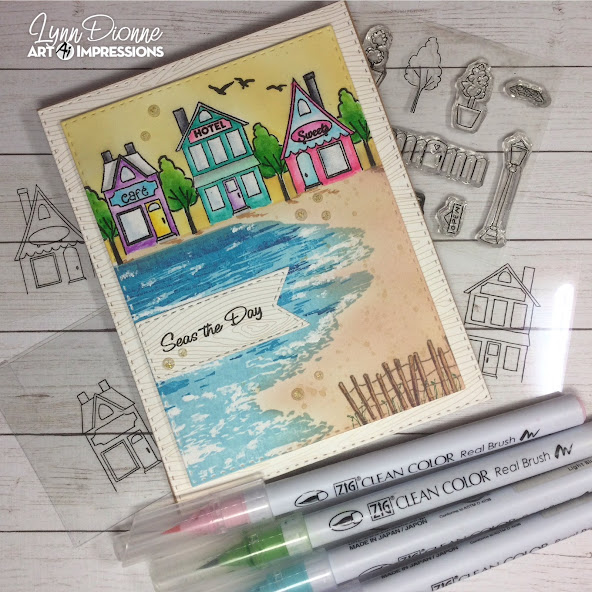
Next, we can create the background for our scene. We will be using a two-part stamp to create the ocean. For inks, we will be using the Tim Holtz Distress Oxide Inks in Chipped Sapphire, Mermaid Lagoon, and Tumbled Glass. For added interest, we will use the white bleed proof ink and a small brush to tap some white ink onto the tops of the waves.
Once the water is stamped let's add a bit of sand using the Oxide Inks in Antique Linen and Tattered Rose. We can also spatter the sand with a little bit of ink.
Next, we can stamp three of the little shops along the top of the sand and stamp a second time onto some masking paper. Let's then mask the houses to that we can stamp a pretty tree in-between each of the shops ... this tree image is from the Ai Village Accessories Set (5890). This will make the trees look like they are tucked in behind the houses.
Now we will have to stamp the trees again onto the same masking paper. Now all of our images will be masked so that we can ink blend the sky. For the sky, we will ink blend some more Oxide Ink using the Scattered Straw and Wild Honey.
Let's remove the masks and color in all of our images using the Zig Clean Color Real Brush Pens in the following colors: Blender, Lt Pink, Peach Pink, Yellow, Lt Blue, Turquoise Green, Lilac, Lt Violet, Haze Blue, Lt Green, Green, Beige, Mid Brown, Lt Gray, Gray.
For some added interest and fun, we can use the Ai Village Signage Set (5891) to stamp the signs on each of the buildings ... love this little set so much!!!
Let's add a beach fence to the corner of the card using the Ai WC Seagull Set (5473) and with this same set let's add some birds in the sky! We can also add a bit of foliage around the fence using the Ai WC Foliage Set 4 (5126).
Going back to the same rectangle die set let's die cut the larger panel for the card using some woodgrain cardstock from the Ai Gnome PP 6"x6" (5832). We will use this same paper to stamp the sentiment from the Ai Gull-friends Set (5399) that will say "Seas the Day". To die cut the sentiment we will use the Ai Flag Double-Stitched Dies (5133) and then attach it to the front of the card.
Finally, we can assemble the card and for a finishing touch we will add some pretty gold dust gems!
If you enjoyed this Village collection you may want to check out the video that I did last week where I used the Ai Village Vehicles Set (5889) in a fun and different way and I will link that below:
Thank you so much for joining me today! Have a fun and crafty day!!!
Ai Village Accessories Set (5890)
Ai Flag Double-Stitched Dies (5133)
Ai Rectangle A2 Double-Stitched Dies (5063)
Post-it Labeling and Cover-up Tape
Dr. Ph Martins Bleed Proof White Ink
Wink of Stella Clear Glitter Pen


2 comments:
What a fabulous card, Lynn! I love how you've been using the freebies!
What a beautiful scene Lynn! Your water is so inviting, I’m ready for the beach!
Post a Comment