Showing posts with label Exclusive Poinsettia Set. Show all posts

Friday, December 11, 2020

Embossed Pointsetta Christmas Cards | By Jessica Shier

 Hey Ai fans!

Happy Friday! We are getting close to Christmas Day and I'm always in need of some quick and easy cards to give out. I love the detail in the Poinsettia set, so I let it do all the work and heat embossed over some colorful ink blending. You can find this set from Art Impressions exclusively on the Scrapbook.com website. 


For the ink blending of the red and green cards I used the following Distresss Inks.
Red: Aged Mahogany, Fired Brick, Barn Door
Green: Forest Moss, Mowed Lawn, Twisted Citron


I also used Black Soot to really darken those edges. All ink blending is done on Bristol Smooth cardstock.

For the blue and Teal cards I used the following Distress inks.

Blue: Blueprint Sketch, Salty Ocean, Weathered Wood
Teal: Pine Needles, Evergreen Bough, Tumbled Glass

A fine embossing powder is ideal to really showoff all the beautiful detail of the Poinsettia set. I also used Versafine Clair Nocturne ink to stamp the sentiments and added some bling with coordinating sequin colors.


Sunday, November 8, 2020

Soft Snowflakes by ReneƩ Matarese

Hello Ai fans!

Today I'm sharing a soft and sparkly wintery card with you.
I used 5353 – Large Snowflake Dies and Art Impressions - Clear Photopolymer Stamp Set - Watercolor Poinsettia.


Here you can see a little of the sparkle from the paper I used.


For my tag I used a die from 5133 – Flag Double Stitched Dies
The poinsettia was fussy cut.


On the inside I used more of the snowflakes and another image and verse from the Poinsettia set.


Copics used:
G24, G43, RV000, RV10 RV69, RV91, RV95


Wednesday, March 18, 2020

NEW VIDEO! Scrapbook.com Exclusive Sets

Hello Ai Fans!

Welcome back, Watercolor Wednesday fans!

NEW VIDEO! Watch Bonnie demonstrate how to color our new EXCLUSIVE Scrapbook.com sets! There are five sets in this partnership with Scrapbook.com: Cherry, Hydrangea, Poinsettia, Daisies, and Roses. All of these available ONLY at Scrapbook.com!


View on YouTube: 


View on YouTube: 


View on YouTube: 


Tuesday, January 7, 2020

Poinsettia Thank You cards by Jil Lebel

Hello Ai fans!

Art Impressions and Scrapbook.com have joined up to create exclusive watercolor flower stamp sets.  So far, they have put out two sets, but they will be coming out with more set in the future.  I used the Poinsettia set along with the thank you from the Hydrangea set to make my Christmas Thank You cards.  I just love how they came out. These beautiful floral sets are only available at Scrapbook.com.
I started by stamping the image from the Scrapbook.com Exclusive Poinsettia Set onto Spectrum Noir Ultra Smooth paper with Gina K Designs Black Amalgam Ink and colored them with my Copic markers.  The colors used are listed at the end of this post. I then cut the image with the second largest Hexagon Double Stitched Die.  I cut the largest die out of matte gold paper and attached both to the card base with foam tape.  I used the BoBunny Father Christmas 6x6 paper collection on the card front.  I stamped the Thank you sentiment from the Scrapbook.com Exclusive Hydrangeas Set onto small piece of white paper and attached it over the colored image. 
Copic Colors Used:
Poinsettia - YR21, R81, R83, R85
Leaves - YG61, YG63, YG65
Sprigs - BG72
Berries - R05, R37, YG17

Thanks for stopping by and Have a Great Day!

Wednesday, December 18, 2019

NEW VIDEO! Scrapbook.com Hydrangea Exclusive!

Hello Ai Fans!

We have a special Watercolor Wednesday featured video today!

If you've kept an eye on our emails and Watercolor Weekend blog posts, you know we have been releasing some stunning florals, exclusively with our friends at Scrapbook.com! Bonnie created this tutorial video on how she watercolors the SBC Exclusive Hydrangea Set (the Art Impressions way!) to create quick and stunning focal images! You will love this set, along with our Poinsettia Set, both available only at Scrapbook.com!

We hope you enjoy this video and wishing you a very Merry Christmas and holiday season into the New Year!


View on YouTube: https://youtu.be/sdwpGnL2KVk


Sunday, December 15, 2019

I'll have a blue Christmas and ReneƩ's Top 10 of 2019

Hello Ai fans!

Today I'm sharing a beautiful new Art Impressions set that's a Simon Says Stamp exclusive.


This set is so pretty.

I love non-traditional colored holiday cards so I made my first card with this set in blue.


There are very few things that say Christmas more than a poinsettia.  I will cherish this set for years to come!


And now for my Top Ten of 2019


Succulents


Dare to Be Fabulous!
There are 2 versions of this but I'm partial to this one that I modeled after my friend Charmaine.


Sports Fan Shaker


Easter Circlet


Wood you be MINE??


Woodland Tree Cubbies


It's been another wonderful year here at Art Impressions.  I can't wait to see what new designs lie ahead!  I hope you'll join us in our challenges when they resume again in 2020!  Happy Holidays, Merry Christmas and Happy New Year!


Monday, December 9, 2019

Merriest of Christmases by Carol Hintermeier

Happy Monday Ai Friends!  Have you seen the beautiful new Art Impressions Exclusive Poinsettia Set?  It's only available at Scrapbook.com and is a must-have for your floral cards, I think!  There are four main beautiful floral images in the set with several sentiments to choose from.


I stamped this image with Versamark ink onto some 80# Neenah Solar White.  I heat embossed it with some gold embossing powder.  Then I used my Prismacolor Premier pencils to color it.  (I've listed the colors below.)  Next I stamped it again onto some masking paper and fussy cut it out.  I didn't cut around the fern images as these are embossed and will resist the ink.


Next I used a background blender brush and inked on some Tumbled Glass Distress Oxide ink.  Be sure to use a clean, dry towel to buff the Oxide Ink off of the embossed areas, then remove the mask.    I stamped the sentiment with some Versafine Onyx Black ink.   I die cut it out with a Rectangle Double Stitched die.


I added this piece to a gold layer I created by embossing the edges with the same gold embossing powder.  These were adhered and added to a pink cardstock layer and all layers are adhered to an A2 top-folding card base.  My last step was to add some NUVO Bright Gold Crystal Drops here and there for an extra bit of shine.


Thank you so much for stopping by today!  I hope you're not to busy with holiday happenings to get in some crafty time this week!


Prismacolor pencils:
Pomegranate, Tuscan Red, Magenta, Process Red, Pink, Blush Pink, Deco Pink,
Dark Green, Grass Green, Prussian Green, True Green, Apple Green
Spring Green, True Green, Black, White

Saturday, December 7, 2019

Watercolor Weekend Roundup - Exclusive Poinsettia Set! Available Only at Scrapbook.com!

Hello, Ai Fans! Happy Watercolor Weekend! We are here with three fabulous projects featuring inspiration from our NEW Poinsettia Set! This 6"x 8" set is filled with a variety of poinsettia images and holiday sentiments! It is perfect to stamp with water-based ink to pull the color from the lines like our watercolor technique, or stamp with a permanent waterproof ink (like Staz-On) and watercolor. It can also be stamped and colored with your favorite coloring technique, be it colored pencils or markers, and looks fantastic embossed! This set is extra special because it is exclusively available at Scrapbook.com! Be sure to grab yours here in time for Christmas crafting!
Without further ado, let's take a look at what our Watercolor Guest Design Team created with this gorgeous set!

Dot Freel - Instagram - Blog - Pinterest
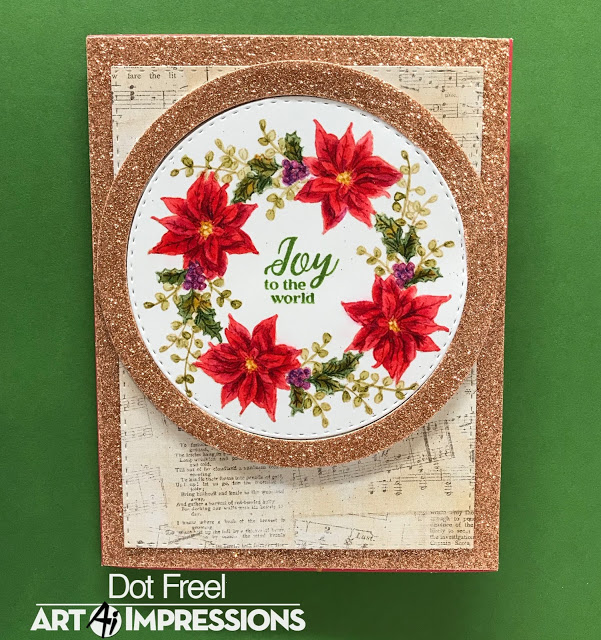
Hello, My favorite artist Bonnie Krebs, Art Impressions owner/creator designed this large, beautiful 5209 - SBC Exclusive Poinsettia set which is available exclusively from Scrapbooks.com. I love using the sentiments on all of my Christmas cards. I made this one by stamping the wreath in Memento Desert Sand on Bristol smooth paper. I watercolored the poinsettias first using Ranger Distress ink in candy apple on a palette. I didn't use the usual #4 brush, I used the #1 brush as the images are pretty small. After the poinsettias were dry, I used 757 to make the darker areas. I used 993 on the centers of the poinsettias then after they dried, I added 026 for the darker areas. I used 249 on the holly leaves and then after they dried, I added 026 to the holly. I watercolored the berries in 827 and after they dried, I added 606. I stamped the sentiment in the center of the wreath using leaf green Archival ink. I stamped the sentiment on the inside with the same ink. I cut out the circle using the 5064 - Circle Double Stitched Dies and cut out a frame for it of that rose gold die paper. I cut out the background pieces using the A2 Rectangle Double Stitched Dies


Karen Day - Blog - Facebook - Pinterest
I used the largest image in the set, stamping it twice on my Canson XL Watercolor paper with Versafine Onyx Black ink, and then embossed them both with clear embossing powder. For this project, I used my Tombow Dual Brush markers - scribbling them onto my palette, and picking them up with a damp paintbrush after mixing varying amounts of water. I use a "glazing" technique, starting by colouring each section of the image with the lightest colour, then layering on more colours, getting darker each time. All the poinsettia petals got a pale wash of #991 Light Ochre, and then I began adding three different layers of #837 Wine Red - a pale pink layer, and then 2 more, concentrating the colour near the veins. I wanted to warm up the tips of the petals even more, so I added #946 Gold Ochre, which gave them more of a peachy glow! The leaves were done in the same manner, starting with #991 to give a yellow undertone, then layers of #158 Dark Olive, #249 Pine Green, and finally a mixture of #565 Deep Blue #249 Pine Green for the darkest tones. I kept the holly greenery light & bright using #991, then #126 Light Olive. I used my artistic license to colour the holly berries with #533 Peacock blue and shaded with #565 Deep Blue (red berries just wouldn't look right!) Since the image is stamped in black, it meant that all of the ferns and delicate foliage remained black, so I painted a pale green wash behind them to suggest greenery, and then continued to paint a wash of blue & green, just to break up the plain background a little. I used one of the sentiments from the set, and stamped it with my Misti. The image is matted with some metallic blue cardstock which really picks up the colour of those berries! I adhered it to a moss green card base using 3D pop dots.


Tricia O'Bin - Blog - Instagram - YouTube - Pinterest - Facebook
WOW! December came in like a hurricane up here in the New England Region. These poinsettias were the perfect pop of color amidst all of the glorious snow. I loved watercoloring these beautiful flowers. They are quick and easy so you can make lots of beautiful Christmas cards. I hope you will try your hand at watercoloring these amazing images created by Bonnie Krebs at Art Impressions.

COLORING DETAILS
Using my MISTI stamping tool, I positioned the poinsettias in the middle of a 4.5 x 6 inch piece of watercolor paper. I inked the poinsettias and the berries up with 925. Next I inked the foliage up with 177. I stamped it down on the watercolor paper (similar to watercoloring with the AI watercolor stamp line). I used my brush and added water to the lines, remembering where the darkest areas would be. After the first layer dried, I added some additional color from my palette. I continued to add color to the areas I wanted the darkest until I was satisfied with the result. I did go in with my fine tip and darken some additional areas.

Next I moved onto the foliage. I dabbed my brush around to soften the color and give the branches some depth. Once that was dry, I added some 569 around the bottoms of the poinsettias and leaves for a shadow. As a final detail I threw a little bling on the poinsettias with my Wink of Stella pen.

CARD DETAILS
Using a method that I saw on Jennifer McGuire’s site, I did partial die cutting around the pointsettias. I wanted the stitched look to continue without cutting into the hard work I did on the flowers. I fussy cut out anything that didn’t get cut with the partial die cutting. I placed the piece back into the MISTI and lined up the sentiment. Using Gina K Designs Amalgam ink, I stamped it along the bottom right of the poinsettias.

I added the watercolor piece to a mat of Gina K Designs Christmas Pine card stock cut to 4 x 5.25. I secured it to a card base made out of Neenah Solar White 110 lb card stock. 

This card was so easy to make that I am going to enjoy creating some beautiful cards with these designs. I would love to see what you come up with. Tag me on Instagram (@tobin0971)! Happy stamping!


Thanks, team! These projects sure are inspiring! There are just so many ways this set can be colored! Each way is so jolly for wintertime!

If you love this set, you can hop over to Scrapbook.com to buy it, as it is only available at Scrapbook.com! 

Happy Stamping!