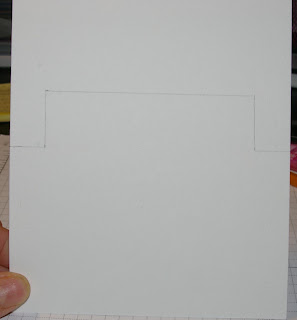
Today, I am going to show you how to make charming Easter cards using Art Impressions front and back stamps. First cut a piece of paper 5 inches by 6 inches. Measure up 3 inches on the 6 inch side and draw a light line across with erasable pencil.
On that line... measure in 5/8of an inch from each side on the line that you just drew. Next, measure up one inch from the 5/8 inch mark.connect with another light pencil line.Cut the 5/8 inch line and the top line across and fold the card with the sign sticking up.
Next, I used a stamp positioner to stamp the front bunnies so the sign that says EASTER will line up on the sticking up part. Color the bunnies to suit your design.
Next, I used the stamp positioner on the inside of the card to stamp the back of the bunnies and the Easter part of the sign. I used the stamp positioner again. Color the bunny's backs to match the bunny's fronts.
As you can see on the card below, I used Art Impressions water color stamps to add flowers and grass so my bunnies did not look like they were floating. I also used some stickles on the flowers too.This is the front of my card and when you open it...
Here is the back...
CUTE, EASY... FUN!!!
I hope that you enjoyed this tutorial and if you decide to give this a try... Please link your creation in the comments section so that we can see your work too! Thanks for popping in!


3 comments:
Thank you for the tutorial. I love it!
Sooo cute! Thanks for posting the tutorial.
Oh, that is cute!
Post a Comment