
Hello Ai fans!

It's Watercolor Weekend and our Design Team has some spectacular cards for you today!
You won't believe the beauty and creativity!
Today we're kicking things off with Dot.
Hello,
I really don't want to live in the hot desert of Las Vegas anymore so I decided to color up my dream property which includes some of my favorite things - red barn, red flowers, trees, and water to fish in nearby. I'm very patriotic as well, so I had to include a flag. Hope you give this one a try. You could definitely send it for a 4th of July card or party invite.

Start by stamping the scene from the brand new 5526 - Foot bridge Simple Scene inked in Tombow pens 565 and 969. Then stamp the barn from the 5371 Barn Set inked the same way. Stamp only the house at the end of the brand new 5522 Country Village the inked the same way. Then stamp the middle house the same way. You don't have to ink all the houses, just the ones you want to use. Pull the color out of the lines the way Bonnie Krebs always shows us how to do in her tutorials. Stamp the trees from the 5372 Mini Foliage Set inked in 158 for the leaves and 969 for the trunks. Ink the leaves in 173 and stamp them again so you get that brighter green, also. Use 969 to darken the tree trunks and add more branches. Color the barn roof 969, the barn 856 and then add shadows with the 565. Use the Dr. PH Martin's bleed proof white to paint the frames on the doors and windows. Darken all the windows of all 3 buildings with the blue Tombow TwinTone fine tip pen. Color the roof of the back house with 969 and the door and the roofs of the front house with the 856. Use a pencil to draw the flag and flagpole then use the #1 paintbrush to color the pole with 969 and use the 856, 569 and the bleed proof white to color the flag. Use 969 to color the brick pattern on the chimneys and then color the bridge slats and road with the #4 paintbrush. Use a mix of 565 and 569 to color the water leaving some white areas. Then use 158 to fill in some of the white spaces. Use 565 to add shadows under the trees and under the bridge. Stamp the mini grass from the Mini Foliage set then use the red pen to add the flowers. Use the bleed proof white to add some white spots to the flowers. Cut it out with the 5063 Double Stitched Dies and then cut out the back ground pieces and attach it all to a card base.

Start by stamping the scene from the brand new 5526 - Foot bridge Simple Scene inked in Tombow pens 565 and 969. Then stamp the barn from the 5371 Barn Set inked the same way. Stamp only the house at the end of the brand new 5522 Country Village the inked the same way. Then stamp the middle house the same way. You don't have to ink all the houses, just the ones you want to use. Pull the color out of the lines the way Bonnie Krebs always shows us how to do in her tutorials. Stamp the trees from the 5372 Mini Foliage Set inked in 158 for the leaves and 969 for the trunks. Ink the leaves in 173 and stamp them again so you get that brighter green, also. Use 969 to darken the tree trunks and add more branches. Color the barn roof 969, the barn 856 and then add shadows with the 565. Use the Dr. PH Martin's bleed proof white to paint the frames on the doors and windows. Darken all the windows of all 3 buildings with the blue Tombow TwinTone fine tip pen. Color the roof of the back house with 969 and the door and the roofs of the front house with the 856. Use a pencil to draw the flag and flagpole then use the #1 paintbrush to color the pole with 969 and use the 856, 569 and the bleed proof white to color the flag. Use 969 to color the brick pattern on the chimneys and then color the bridge slats and road with the #4 paintbrush. Use a mix of 565 and 569 to color the water leaving some white areas. Then use 158 to fill in some of the white spaces. Use 565 to add shadows under the trees and under the bridge. Stamp the mini grass from the Mini Foliage set then use the red pen to add the flowers. Use the bleed proof white to add some white spots to the flowers. Cut it out with the 5063 Double Stitched Dies and then cut out the back ground pieces and attach it all to a card base.

Next up we have Tricia. She and Karen were on the same wave length and both used the new teddy bear planter. We're so glad they did. It shows just how versatile these images are. Their cards are so different and both SO adorable!!
Here's Tricia's sweet version.
Here's Tricia's sweet version.

Let me tell you how I created this cute project. I started out inking up the entire stamp with 969. I added a bit of 569 to just the Bear not the pot.
First, I added some 947 to the bears ears, snout and foot. I added some additional layers to create depth. Next, I pulled the color out of the bear and added some additional layers of 969 and 569 from my palette. Make sure you are creating some shadows in this step. Once you get a good foundation of black, I added some flicks with my brush to add some hair. I kept layering (making sure each layer is completely dry) until I was happy with the color. Remember to leave white space to create separation. I darkened in the eyes and nose with my black TwinTone marker. I added some 856 to the bow along with some bleed proof white to add a bit of shine.
Using my pencil, I added some bumps to the sides of the pot, to give the illusion it is a bee hive, a back to the hive, and guidelines for creating the shape of the hive. I used my Molotow pen to save a spot for the opening and the bee.
I create the honey, I started out by layering a variety of colors. This will give your honey a rich color. First I added a layer of 055, followed by 025 and 993. To darken underneath the drips, I added some 969 below and to the right of the drips and to the back of the hive. Make sure to build slowly and leave lots of light color to shine through. I removed the Molotow and colored in the opening. I drew in the bee with a fine liner.
Using some 969 and N49, I added some color to the hive. I used my paintbrush to create brush strokes to give texture to the hive. To give depth, I added darker color to the sides of the hive.
I used a mask to cover the bear, and using my positioner, I stamped the weathered stump underneath the bear. I pulled the color out of the lines and added some additional color from my palette. Using the birch trees stamp, inked up with 969, I stamped it off and then stamped it behind the hive. I pulled the color out of one side of the tree.
For the leaves, I stamped the small vine several times around the branches with 249. I created the grass with 177, and the large grass stamp. I added water and pulled the color out adding some additional 969 for the ground. To finish up, I watered down some light blue to create clouds in the sky. I was really careful to not touch the trees, putting a little color between them.
I used the small alphabet inked with 969 to stamp YUM! below the bear. I just love how this fuzzy little Honey Bear came out. I hope you give this project a try. Don't forget to tag us on Instagram and use the #AIWatercolor. Thank you so much for spending time with me today, I hope you have a creative day!

Lastly, we have Karen's cute version of the bear planter.
Hello Ai Watercolour fans!
Hope you're enjoying seeing projects with some of the new Watercolour sets! I couldn't resist doing another card with the sweet 5521 - WC Animal Planters Set:

I coloured my image with Tombow Dual Brush Markers in #565/969, and stamped it on Canson XL Watercolour paper. I added layers of #993 to the pot, and started with #992/969 on the bear, starting soft and building layers of colour, keeping the darker shades where the shadows are. While masking the pot, I added two of the tulips from 5475 - WC Flower Set 6 in #177/703, and the smaller sprigs from the set in #553/158. I added the small foliage stamps from 5474 - WC Flower Set 5 in #076/177 spilling over the edges of the container. After lightly touching the bouquet with a damp brush, I filled in some spaces, using the markers directly on the paper, and then added shadows to my painting with #565. The bow was painted in shades of #703. To finish it off, I cut out my image with 5061 - Square Double Stitched Dies, and mounted it to my base with 3D foam adhesive.


Thank you to all of our amazing designers.
Your talent is beyond measure and you provide us all with so much inspiration.
Did you see?
Earlier in the week Art Impressions had a new release!
There are 3 fabulous new sets.


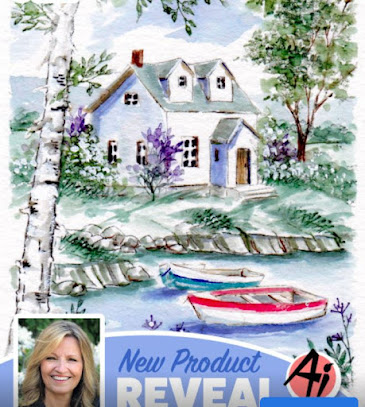
You can see Bonnie's latest Watercolor Wednesday Live video by clicking the photo below.
She creates a beautiful lakeside scene as well as revealing these fun sets.
We hope you all have a wonderful and crafty weekend. See you in two weeks for our next Watercolor Weekend!

No comments:
Post a Comment