Showing posts with label Tricia. Show all posts

Sunday, May 12, 2024

Alice Journal and An Announcement


Hi watercolor fans, welcome back to Watercolor Weekend here on the Art Impressions Blog. Today I have my Alice in Wonderland journal and I have an announcement. I will start with the announcement, which is, after a lot of soul searching, it is bittersweet that I have decided to retire from my Watercolor Design Team position. I have been so blessed to have been part of this amazing watercolor team since Bonnie’s vision of expanding the regular line design team in 2017.

I started using Art Impressions stamps in 2016 after I attended a scrapbook show and thought it looked fun. I have always been drawn to watercolor. I jumped in FULL FORCE. It was also my first experience with social media (Instagram).  I set a goal to work with Art Impressions and in July of 2017, I was invited to be a part of the New Art Impressions Guest Design Team. I was beyond excited!

Well, it’s been 7 years and this watercolor community has grown in leaps and bounds. It has been such a pleasure watching you all blossom into your art and encourage each other along the way. I have been inspired, lifted up and humbled by all of you. I sincerely wish each and every one of you joy in your journey and know that I will still be around watching and encouraging you. I am so proud to be part of your tribe.

For now, my heart is telling me that I need to move forward. I will continue to make art in all forms and continue on my journey to see what my next chapter looks like. I wish you all the love and happiness in the world. Thank you for joining me on this wonderful journey!

Alice in Wonderland Journal


Here is the complete Alice journal that I created a while ago.  A couple of the dies are not released yet so I have blurred them here.  I hope you enjoy!

Cheshire Cat / Alice


I started out inking the Rugged Tree and stamping it diagonally to create a tree branch for the cat to sit on.  I used my positioner to place him perfectly on the tree. Next, I added long vines and leaves.  I did this in a couple of layers to get some depth and interest.  I pulled the color out of the tree and added some additional darker values.

For the cat, I pulled the color out of the lines first to create the shadows. Next, I drew in the stripes and face with a pencil.  I stayed with the contours of the cat.  I used my palette to add color.

For Alice, I used the standing Angel stamp without the wings.  I stamped her in brown stamped off to get a light image.  I added color to her from my palette. I extended her hair down, tip: Do her hair first so you don’t fill in color where you want hair.  I grounded her with gray using a back and forth stroke.

Finally, I added in the sky.  To get the really blurry look, use more water than normal.

Dormouse


I started out by stamping in the peeking mouse.  I then masked him off and using my positioner stamped the teapot (inked with blue and brown and stamped off).  I pulled the color out of the where the shadowed areas would be.  Once it was dry, I added the flowers and leaves free hand along with the lace below.  I pulled the color out of the mouse and added some additional color from my palette. To finish it off, I added some brown for the table and blue for the sky.

I used 1 10x14 piece of watercolor paper to create all the paintings. I cut them out with the journal template dies.  I picked some coordinating papers and cut those as well.  I assembled the journal and printed the parts of the story I thought went well with the paintings.  

This was so much fun to do and I loved stretching my stamps.  I hope you have been inspired to create a journal too!

 Here is the entire journal:


Again, I have been so blessed these last 7 years and I am so excited to see what the next chapter brings. Have a great day!


 SUPPLIES:

Thursday, February 1, 2024

All Creatures Great and Small with Guest Designer Diane Zechman

Hello everyone!

I'm so excited that our very first Guest Designer challenge is now
complete and we have our first winner!

Gennette stepped up and was our first Guest Designer since we didn't
have a winner yet. She made us two beautiful cards.

Our entrants followed our color challenge and we selected
Ginger McNally!

She used the recent 5868 - Daffodil & Tulip Set along with the 2016 Bunny Freebie that was a recent Throwback.  If you're wondering what a Throwback is, it's a set or sets that have been retired but has been re-released for a 3 day period.  There is no other company I know of that re-releases sets that they have retired. Art Impressions values their fans and loves giving new fans a second chance at stamps they may have missed out on. 


Congratulations Ginger!
 

Please contact Leah at Feedback@artimpressions.com
to claim a free stamp set of your choice and she will give me your email address so that we can 
begin brainstorming for our March challenge when you will be our Guest Designer!

Now for our Lucky Random Winner who will receive the super sweet EXX5582 Exclusive Bear Freebie.


Congratulations Tasie!

You've won this stamp!


 Please contact Leah at Feedback@artimpressions.com with your email and address so that 
I can get this little cutie in the mail for you. 

Now that we have our winners from our first Guest Designer challenge, let's see what our second Guest Designer, Diane Zechman has created!

Her challenge was All Creatures Great and Small.

She needed to use an animal on her card.

Let's see what she made!

----------------------------------------------------------------------------------------------------------


Hello friends! I was previously on the Art Impressions Design Team and although I have taken some time now to care for my grandkids, I am still in love with Bonnie's stamps. They are timeless, classic, and oh so FUN! When I was asked to Guest Design for February and told that the Theme is All Creatures Great and Small (Animals), I immediately thought of the Llama Set from the Funny Farm Series which I purchased a while back but hadn't used yet. It's an awesome set!


This cute llama needed some bright and fun papers, and I colored the images with Copic markers to match. I cut some strips of the patterned papers, each about 2" wide, then taped them together on the backside. This long piece was then die cut with one of the slimline dies to create the background. Then I offset 3 of the flags and the stitched hexagon die cuts were placed on a diagonal for a bit of whimsy. The second photo has a close-up showing the pot of flowers and cacti popped up with foam tape.

For the inside of the card, I added another one of the sentiments in the set and stamped the 2 llamas with orange ink.

I hope you join this month’s challenge and I am looking forward to seeing all of your creatures, great and small!

--------------------------------------------------------------------------------------------------------

Hey everyone!

It's Reneé.

I want to thank Diane for her beautiful card and for being part of our Guest Designer challenge for February. She is missed on our Daily Design Team.

I hope you like this month's challenge and will join us!
The winner will be announced in the first few days of the following month.  The challenges end on the last day and a new one begins on the first but I may not always have time to announce the winner on the first, when the new challenge premieres. I appreciate your patience.

A few of our DT Members also are enjoying playing along with this challenge.

Check out their beautiful and adorable creations!

Jami


Sharon

Lynn


Tricia


Tasha


I also have a little bonus prize!

For as long as I have duplicate stamps I will choose a random winner.
These will be for U.S. residents only since these will be mailed by me personally
and not Art Impressions.

This month I have the Exclusive Frog Freebie EX5584 from 2022.
You will be automatically entered to win when you upload your project to the challenge.

Good luck everyone!

I can't wait to see what you create.

Here is the fine print:

✻ Please make a new card or handmade crafty creation.
✻You can make any item you wish; this is not limited to cards!
✻ Limit two submissions per person. 
✻You MUST use Art Impressions stamps or dies! You may use other companies products but the main focus should be on Ai items.
✻If you win, you will receive one free stamp set of your choice. In return you will create a brief write up explaining how you made your item and email it to me. (Reneé) and you will mail your project to Art Impressions at your expense. (cheapest method possible is fine) International winners may submit photos through email. We will share your creation on Art Impressions social media.
 ✻Please include your first name and last initial on your submission.
✻We love to comment on your entries, but keep in mind if you use a private group or a platform that you need to sign up for, we probably won't be able to.
✻ The Ai Challenge is open to everyone, international submissions are welcome!
✻ Include a link back to the Ai Blog or grab our button on the top right of our sidebar!
✻ Share the Ai love if you can, by clicking and commenting on your fellow crafters.
✻ Make sure to get your link up by the deadline to enter your creations.
✻ Good luck and happy crafting!


You are invited to the Inlinkz link party!

Click here to enter

Saturday, September 16, 2023

Watercolor Weekend 9-16-2023

 Hello and welcome to Art Impressions' Watercolor Weekend!


Today we have three very unique and amazing cards from our Watercolor Design Team.
This week it's Diane's turn to share first.  Let's see what she made!

*******************************************************

Hello Ai Watercolor Fans! Who is ready for fall? I’m looking forward to cooler temperatures, the leaves changing colors, sweater weather, apple cider, and pumpkin spice! One of our favorite things to do in the fall is to visit our local pumpkin patch for an afternoon of fun and food. When our son and daughter were little, we always made sure to get a photo of them sitting on straw bales, surrounded by pumpkins and other fall decorations. Today’s card is inspired by those memories. I’ll be using Art Impressions 5776 – FB Sitting Girl, 5777 – FB Sitting Boy, 5594 – Harvest Scarecrow Set, 5598 – Harvest Set, and 5507 – Harvest Together Set to create this adorable fall scene.


For this card, some masking is required – but nothing too complicated. When I have a scene that uses multiple image stamps, I will create a “blueprint” of sorts to follow. This way I’ll know what order to stamp each image to create the scene. When it comes time to stamp the images onto your Canson XL watercolor paper, you can place your blueprint into a Misti Stamp Platform and align your stamps in the proper positions. Or you can use a clear block and stamp positioner where necessary.


I started off by making masks of the girl and boy from 5776 and 5777, making sure to cut all around them and between their feet. All images where stamped in 969 (you could use 565/969 instead). Remember to stamp off before adding to your watercolor paper! I used the blueprint to guide where to stamp the girl and boy. I covered the kids with the masks and then stamped the straw bales from 5598, aligning so as to make it appear they are sitting on the bales. Next, I used a small piece of Post-It tape to mask the straw bales. With the masks still in place, I stamped the basket of pumpkins, gourds, and apples between the girl and boy, just back a bit, so it will appear to be behind them. Next I stamped in the sunflowers from 5594. And finally, I stamped the scarecrow into the basket of fall produce and removed the masks. With a damp brush, I pulled out some color from the stamped images to add contours and shadows.


I used the following colors to paint each image:

Girl – skin (850, 910), cheeks (touch of 856), hair (969), shirt, shoes and hair ties (856), overalls (565)

Boy – skin (850, 910), cheeks (touch of 856), hair (025, 026), shirt (158), overalls (990, 969), patch (933, 993) and boots (969)

Straw bales – straw (026), twine (969)

Sunflowers – flowers (025, 026), leaves and stems (249)

Produce Basket – basket (990, 969), red band (856, 847), green band (249), orange pumpkins (933, 993), blue pumpkin (312), yellow orange pumpkin (993), red apple (856, 026), green apple (173­­­, 177), stems (969), and gourd (850, 910)

Scarecrow – face (850, 910, 969), nose (933), straw hair and hands (026), shoes (969), shirt (933), overalls (947), hat (158, 177), patches (856, 933, 565), pole (969) and robins (969, 856)

I used 969 for the ground, and I added more layers of 969 to darken the shadowed areas. I brushed in a watery sky with 526. Next I stamped the “Hay Friend” sentiment from 5507, in the upper left area. As a final touch, I added back any details where necessary with a brown TwinTone. To finish the card, I die cut the painting with a rectangle from 5724 – Nested Rectangle Dies and mounted to an A2 card base.


I hope you’ve enjoyed this little taste of the coming season! Thank you for joining us for another Watercolor Weekend and until next time – Happy Painting!


Now let's see what Karen made.  She has a different type of card than you're used to seeing from her and we know you're going to love it!

*******************************************************

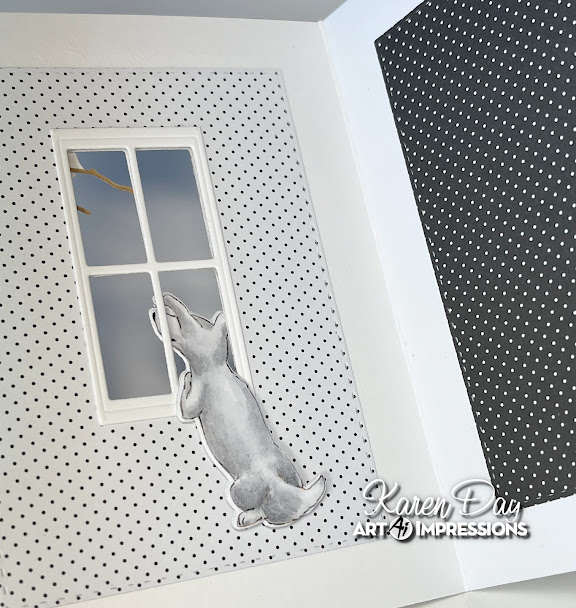
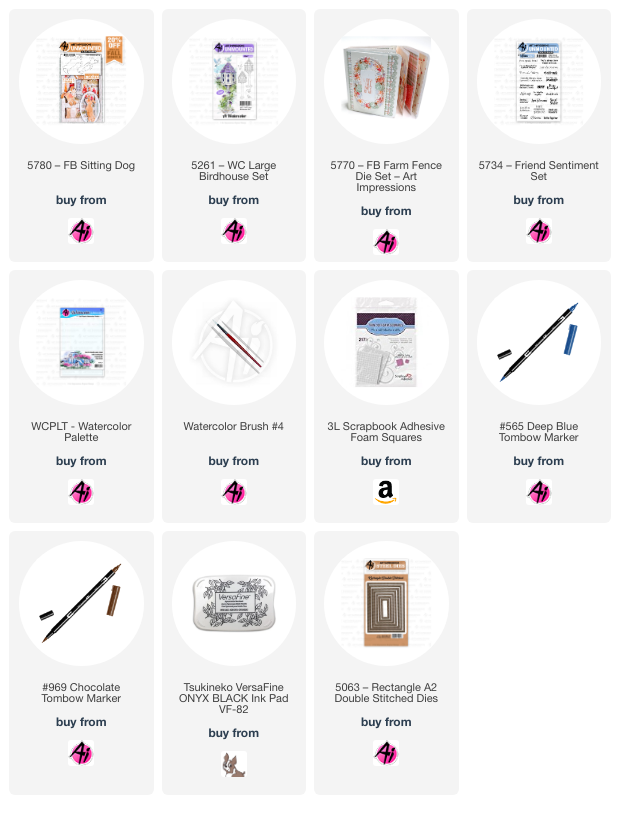
I stamped the little 5780 - FB Sitting Dog onto some Bristol Smooth Cardstock using Tombows 565 & 969, and painted him with N55, adding layers where he needed to be darker.  I went over his features with my Black Twintone marker, then cut both the front and back out with the matching dies.  I did the same with the bird from 5261 - WC Large Birdhouse Set, painting him with 533 and fussy cutting him out.


To create the window, I cut the window frame from 5770 - FB Farm Fence Die Set in white cardstock - twice, and cut the shutters out in black.  It's a little hard to see in the photos, but I cut 1/2" strips of pale blue cardstock, and glued them all together to mimic the wood siding on a house.  I ran this panel through my machine with the 5063 A2 Rectangle Double Stitched Die, then cut out two black & white polka dot rectangles as well.  The black one was glued inside my card to be the 'inside' of the house, and the white polka dot piece was glued to the inside of the window.  Once I had created my layers for the front of my card, I used the rectangle die that cuts out the window, then glued the two window frames on the inside and outside of my card.

The pup was glued together and placed with his head sticking out the window to look up at the bird.  The dies that cut him out also cut out under his paws, which allowed me to let them perch on the windowsill.  I cut out my Memory Box Twig die in some kraft cardstock and glued it to my card so that there would be a good spot to have the bird standing on one of the branches.  The sentiment from 5734 - Friend Sentiments Set was stamped in Versafine Onyx Black ink.


Even though this is an easy card - it required a lot of planning!  You have to think before you glue things together, making sure you're not missing a step.  It's also important with a Front & Back card to have the inside look nicely finished - so I made sure to have some patterned paper on the reverse of the front panel to not have the dog sitting there on his own.


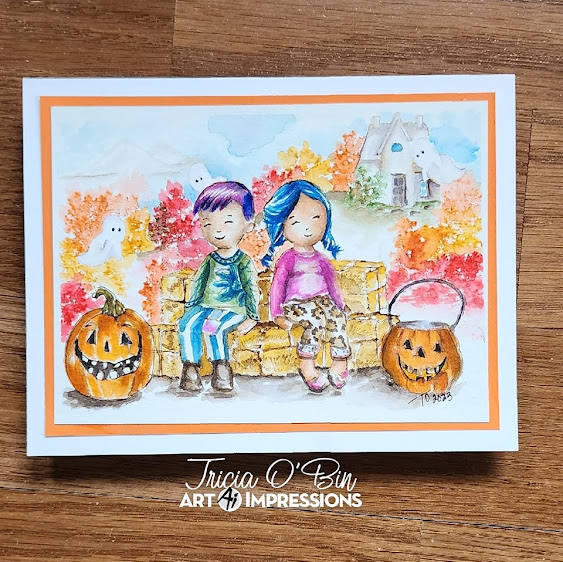
Tricia did something a little different this week too in the form of how she is presenting her card.  She created a step by step slideshow to help you recreate her card.  You can pause this slideshow to follow along with her.

*******************************************************


(Hey there!  This is Reneé chiming in on Tricia's card.  Do you know I was so fascinated by the two children and how incredible they are that I didn't even notice the ghosts haunting them until the third or fourth time I looked at this?? lol! What a focal point.  The details around them are just a huge bonus)


Thank you amazing DT!!  You always have such gorgeous art to share with us.

Remember, if you create something using Art Impressions products be sure to tag us on IG or FB. @ArtImpressions

We'll see you back here on October 7th.
WOW!! Can you believe it's almost October??


Thursday, September 7, 2023

Feeling Blue Week #2 and the 2023 Simon Says Stamp Exclusive STAMPtember® set!

 Hello everyone and welcome to Week 2 of our Feeling Blue challenge.

Did you see the big announcement earlier today?

It's here!  The 2023 Simon Says Stamp exclusive set from Art Impressions!

SSE23A Apple Cider Set

Get yours NOW because these will sell out fast and once they're gone, they're gone forever.
Scroll back earlier today to see all of the fabulous Design Team inspiration.  Both our Daily and our Watercolor Team participated so you'll see marker and WC cards and tags.


Last week, Nina was our Featured Artist for our Feeling Blue challenge.  She came up with two beautiful blue cards!

To hear all about how Nina created her cards and what sets she used, visit our Week 1 Challenge post HERE.


Now for the rest of the DT.  This week our WC Team played along with the challenge as well.


To hear what sets Diane, Karen and Tricia used and to find directions how to make these cards, visit our Watercolor Weekend post HERE.


Link up your blue project below for the chance to win a free stamp set of your choice.
Good luck!  We can't wait to see what you make.

✻ Please make a new card or handmade crafty creation. You can make any item you wish; this is not limited to cards!
✻ Limit two submissions per person. You will receive extra votes if you use Art Impressions stamps!
 ✻Please include your first name and last initial on your submission.
✻We love to comment on your entries, but keep in mind if you use a private group or a platform that you need to sign up for, we probably won't be able to.
✻ The Ai Challenge is open to everyone, international submissions are welcome!
✻ Include a link back to the Ai Blog or grab our button on the top right of our sidebar!
✻ Share the Ai love if you can, by clicking and commenting on your fellow crafters.
✻ Make sure to get your link up by the deadline to enter your creations.
✻ Good luck and happy stamping!

Join our challenge by linking up below.

You are invited to the Inlinkz link party!

Click here to enter