Hello Ai fans!
It's time for a new challenge here on the blog and this time we're feeling the love.
You're My Everything!
Cards for someone you love or Valentine's cards.
(or crafts...it doesn't have to be a card)
Before we see what our fabulous feature is from Sharon, we need to announce the winners of our last challenge which was Windows to the World.
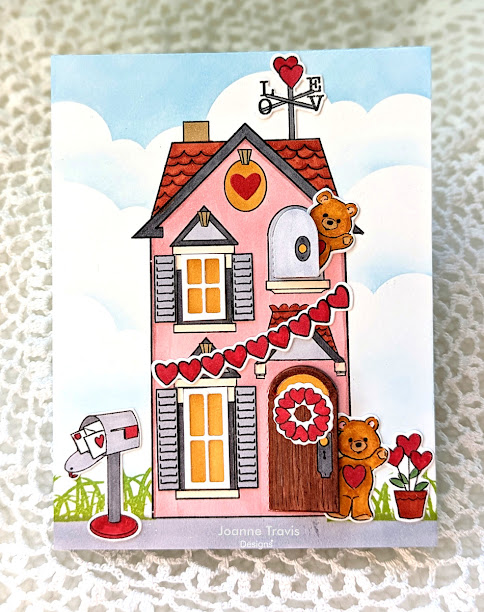
For our Top Spot we selected Joanne Travis for her beautiful "Love Shack" card using
4926 – Holiday Mansion Set
4977 – HM Valentine Set
Please contact Leah at Feedback@artimpressions.com
to claim a free stamp set of your choice!
Also, be sure to grab our badge to display on your blog, Facebook or Instagram!
 Now for our Lucky, Lucky Random Winner!
The random number generator selected
Annie Ito.

Please contact Leah at Feedback@artimpressions.com
to claim a free stamp set of your choice!
Also, be sure to grab our badge to display on your blog, Facebook or Instagram!
Now on to Sharon's wonderful feature and tutorial!
She used several brand new sets that were released yesterday!
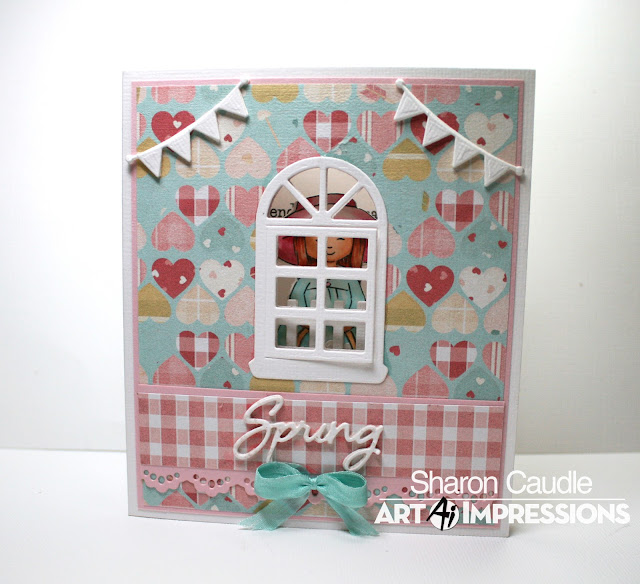
Hello AI Fans!!
I'm SUPER excited to be able to showcase some of the brand new sets released by Art Impressions just yesterday!!! It's time for Valentine's Day and then spring! I'm featuring lots of hearts and love in my card today! As you can see, I kind of made up my own type of card for this one because I wanted to use both the new Window and Fence F&B dies. I'll explain more below as you go through the pictures. So for this card, I used a number of the new sets starting with Little Girl FB, FB Fence & Window Set, Friends Sentiment Set, Nested Heart Dies, and I also used #5543 Journal Template Die Set. So here we go with a bunch of pictures. Grab a cup of goodness and let's get started!
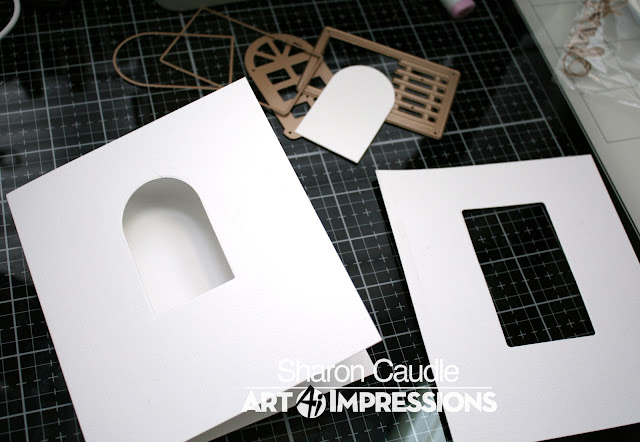
So I knew I wanted a 3 paneled card, but I wanted it to open differently. So after making my card base, I cut another panel the same size but added 1/4" to the width and scored it. I did trim a hair off the width so it would fit inside nicely without sticking out when the card was closed. I could just glue it into the center portion of my card, but to make it easy, I did all the die cutting first. I used both the window and the fence from the new die set. I wanted the window in the front of the card and the fence in the center page. I then cut my layered mats of pink and my printed papers. First I glued the pink mat on and then inserted the window die into the already cut portion on the back. That held my die in place and allowed me to cut multiple layers easily. I did the same with each layer of paper. In other words, I would add one layer of paper and then cut the window out before adding another layer. Hope that makes sense.

This is the result after adding first the pink mat and then the printed paper mat.
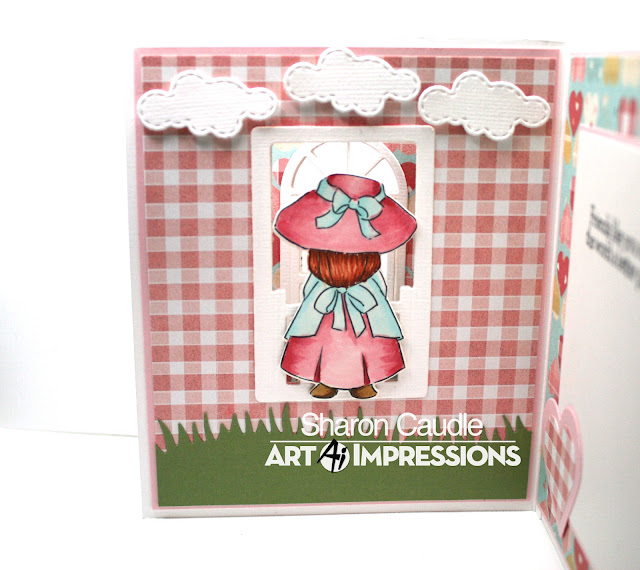
After cutting out the center portion to my window and fence dies, I went ahead and glued the center panel into my card base. I used the window and fence dies to make the frames and glued them onto each side of my panels for a finished look.
After stamping and cutting out this adorable little girl, I die cut her and glued her front and back together. Because I wanted it to look like she had hearts in her basket, I stamped her front again and colored her hands and basket and then fussy cut those out. I used the little heart dies that come with the Window and Fence FB Die Set to get 3 little hearts to fill her basket. I glued those in place and then glued the extra hands and basket on top of that.
I love dimension, and I really like making my own chipboard pieces. All you have to do is cut multiple die cuts and glue them together! I usually go with four or five. I did that with both the Spring word and the banner die, both which come with the Window and Fence FB Die Set.
After cutting a decorative panel for the top of the card, I added the Spring and banner chipboard pieces and a small silk bow (of course).
On the middle panel I added a panel of grass and a few white puffy clouds just for fun. I added them to both the front and back of that center panel.
And to finish it all up, I added a panel with a sentiment from the new Friends Sentiment Set along with a heart cut from the brand new Nested Heart Dies!
I hope you enjoyed your journey through the making of this card! Thanks so much for stopping by for a visit and until next time - stay crafty!!

Copics used:
skin: E000, E01, E11
Basket: E51, E53
Shoes: E55, E59
Hair: E08, E13, E18
apron: B000, B00
dress: R81, R83, and a smidge of R85

Art Impressions JUST released several new stamps, dies and paper yesterday.
These can be purchased as a bundle to save you money or individually if you only want certain sets.
In addition to all of the beautiful new releases that Sharon used, there were new Watercolor sets released last week. Just click the photos to be taken to the sets.
Now for the new challenge rules.
You're My Everything!

This means cards for someone you love. They don't have to be Valentine specific but should reflect that you love the person receiving the card somehow.
If you'd like to join in our challenge be sure to link your project below...
✻ Please make a new card or handmade crafty creation. You can make any item you wish; this is not limited to cards!
✻ Limit two submissions per person. You will receive extra votes if you use Art Impressions stamps!
✻Please include your first name and last initial on your submission.
✻We love to comment on your entries, but keep in mind if you use a private group or a platform that you need to sign up for, we probably won't be able to.
✻ The Ai Challenge is open to everyone, international submissions are welcome!
✻ Include a link back to the Ai Blog or grab our button on the top right of our sidebar!
✻ Share the Ai love if you can, by clicking and commenting on your fellow crafters.
✻ Make sure to get your link up by the deadline to enter your creations.
✻ Good luck and happy stamping!


2 comments:
Very nice work DT
Thanks for the lovely inspiration! You have an amazing design team.
Post a Comment