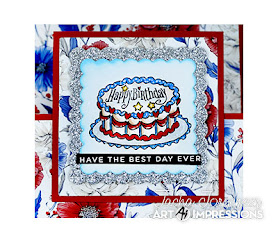
After enjoying Tasha's absolutely incredible card, scroll down to see who won our Spritz, Splatter and Paint challenge.
-----------------------------------------------------------------------------------------------------------------------------
After coloring, I cut two scalloped squares; one from white cardstock and the other from silver glitter paper. I ink blended the white scalloped square with blue ink to give it a pop of color. I really love how the ink highlights the scalloped edges!
Next, I created the card base using red cardstock and layered on the pretty floral paper from the new Patriotic Pack. To add some dimension, I used foam tape to attach the cake to the card. I also love that this card stands up for display but folds flat to fit in an envelope; so easy to mail!
To finish it off, I added the sweet sentiment “Hooray! It’s Your Day!” from the 5735 – Birthday Sentiment Set. It’s such a fun way to complete this cheerful birthday design.
I hope you enjoyed today’s project and feel inspired to join in on the “Let Them Eat Cake!” Challenge!
Box Stand-Up Card Tutorial
Step 1: Cut and Score the Card Base
Cut a 4-1/4” x 10-1/2” piece of cardstock. With the 10-1/2” side across the top, score at 1/2”, 1-3/4”, 3-3/4”, and 5”.
Cut a second piece of cardstock measuring 3” x 5” . With the 5” side across the top, score at 1/2” and 1-3/4”.
Step 2: Add Patterned Paper to the Card Base
Position the 4-1/4” side at the top, with all the score lines at the bottom.
Attach a 4” x 4” piece of patterned paper to the top section, making sure the top and side borders are even.
Fold all score lines to crease them, then flatten the base again.
Turn the piece over so the score lines are at the top.
Add a strip of strong adhesive along the narrow top flap.
Attach a 4” x 1-3/4” piece of patterned paper to the center of the third section (from the top).
Step 3: Form the Base Box
Fold the third score line from the bottom upward so the 1-3/4” patterned panel is visible at the bottom.
Remove the adhesive backing from the narrow flap, fold it back, and press it down to secure it to the card base.
Push down gently on the folds to form a rectangular, box-like shape.
Step 4: Decorate and Prepare the Second Piece
With the 3” side at the top (score lines at the top), attach a 2-3/4” x 3” piece of cardstock or patterned paper to the bottom section.
Fold both score lines, then flatten the piece again.
Add strong adhesive to the top narrow flap.
Flip the piece over (score lines still at the top) and add a strip of adhesive along the bottom edge.
Step 5: Attach the Second Piece to the Base
Flip the piece back over so the score lines are at the top.
Remove the adhesive backing from the top flap.
Fold the bottom score line back and line it up with the top edge of the card base, centering it side to side. Press to adhere.
Step 6: Finish the Fold and Secure
Lift the top section of the smaller piece and remove the backing from the bottom strip of adhesive.
Flatten the bottom box section.
Fold the top score line of the top piece down and line it up with the top edge of the card base, just like before.
Press down to secure the bottom edge to the flattened box.
Step 7: Add a Back Panel
Cut a 4” x 5-1/4” piece of neutral cardstock.
Stamp or write your message if desired.
Attach this panel to the back of the card base.
Step 8: Decorate and Display
With the card flat, decorate as desired using stamped images, die cuts, or embellishments.
Then pop it back up to display your finished card.


For those of you that didn't win, please try again! You never know. Try our new challenge or hop on over to the Monthly Challenge where there is no theme. You might be our next winner!


3 comments:
How exciting to have my card included. Thank you!
Tasha I just love your card!
Congratulations to Laura and Lynn!
Vert nice work DT
Post a Comment