Showing posts with label WC Cottages Set. Show all posts

Wednesday, June 26, 2019

Watercolor Throwback - Cottage & Fence Dies

Hello Ai Fans!

We have a Watercolor Throwback for Watercolor Wednesday this week! One of the most common questions we get at our retail shows is how to use our WC Fence Dies. We love this design by Bonnie and thought it was worth bringing back from October 2017!


Bonnie used both our WC Fence Dies and WC Cottages Set in this video! She starts by die cutting one of our fences with a Stamping Mask Paper and adhering to her watercolor paper. She then overlays our small and large grasses and vine from our Foliage Set 1, then adding flowers from our Flower Set 1. Bonnie then removes the mask and adds more vines and flowers over the posts on the left side. She also adds some small sprigs at the base of the fence posts. From there, she uses sticky notes to mask the foreground and our Stamp Positioner to perfectly place the cottage. She pulls color from the lines and adds brown from her palette and finishes the image with some climbing vines on the sides.

We have had quite a few people contact us on how to get new upload emails from YouTube and want to help! Once you have clicked "subscribe" on our channel, click the "bell" next it to receive emails as soon as a new video is available! We always appreciate a thumbs up on any video you like, as well!


We hope you enjoy this new video and our latest releases! Happy Watercolor Wednesday!


View on YouTube: https://youtu.be/zLII41jei2U


Saturday, May 4, 2019

Watercolor Weekend Roundup - Homey Inspiration!

Hello, Ai Watercolor Fans! We have three more fabulous projects for you from our Watercolor Guest Design Team! We hope you enjoy these outdoorsy house scenes from Dot and Karen, as well as a colorful floral wreath by Tricia! Let's take a look!

 Dot Freel - Instagram - Blog - Pinterest
Hello Friends,

I was inspired by my camping/fishing weekend in Utah to make a card for my son's birthday. I stamped the boat from the 5057 - WC Boat Set in both 86 African violet and brown 969 and then I pulled the color out of the lines. Next I stamped the shed from the 5121 - WC Garden Shed Set again first using African violet and then the brown. After pulling the color out of the lines, I used the brown to color in the roof, shingles and door knob area. I used African violet to color the windows, add shade under the roof, on the door, and the water around the boat. I used the brown to watercolor the oars, the bench and the top of the boat. I used the brown to watercolor the ground on the other side of the boat and the walkway from the shed. I stamped the tree trunks from the 4960 - WC Fir Trees Set in brown, then I stamped in the branches using green 249. I added 75 sky blue to the palette to color in the sky. I stamped the grass from the 4051 - WC Foliage Set 1 in with 27 olive brown. I stamped the tall grasses from the 5007 - WC Foliage Set 3 also in the olive brown. I stamped the flowers by the boat from the 4868 - WC Flower Set 2 using green 177 and orange 885 for the flowers. I stamped in the heart flowers by the cabin from the 4868 - WC Flower Set 2 in the same orange color. I cut out the picture and a background piece using the 5063 - Double Stitched Rectangle Dies. I used my Copic pen to sign and date it.

The birthday card below is the first card I made which I will give to my second son Chad and then I made the other version for the Art Impression's Watercolor Weekend blog post. Give it a try!

Karen Day - Blog - Facebook - Pinterest
To create my scene today, I've paired up one of the cottages from 4958 - WC Cottages Set (this is SO typical of historic homes in my area!), with the footbridge from the just released 5122 - WC Bridge Set, inking them both with Tombow #969 Chocolate. Using the smaller tree from 5010 WC Tree Set 1, I stamped it several times on each side of the cottage with my #969, then softened all the lines with a damp #4 paintbrush, pulling out the colour on the tree trunks, and on the footbridge. I coloured my #177 Dark Jade marker onto the tiny foliage sprig in the 5009 WC Mini Flower Set, stamping it repeatedly to get 2nd & 3rd generation foliage in the trees, and creating shrubs around the house. Also from the Mini Flower Set - I used my #533 Peacock Blue to colour the tiny floral cluster (it looks like dots!) stamping it around the shrubs to suggest purpley/blue flowers. Dabbing at them with my damp brush softened the images, and intensified the colours. I initially drew the tufts of grass directly with my #076 Green Ochre marker, but since it is quite a yellow/green, my scene had a bit of a fall feel to it, and I was aiming for spring! So I picked up the #177 green off of my palette, and painted a wash of green grass, darkening up the grasses directly with the marker as well. I painted the pathway with #992 Sand, and added #491 Glacier Blue onto the roof & door. I painted a touch of #856 Chinese Red onto the chimney, then went in with the fine point of it to sketch in the bricks. I picked up #565 Deep Blue with my brush to paint in the stream, and then added the shadows to the windows, pathway, around the house & trees, and finally painted in the sky. With my scene complete, I always walk away for a few hours (days?) and come back with a fresh eye. I did want to darken things up a little, so I went back in with both my 177 and 565 markers, adding grasses and flowers in the deeper tones.


Tricia O'Bin - Blog - Instagram - YouTube - Pinterest - Facebook
Hey there! Welcome to another Art Impressions Watercolor Weekend! Today I am sharing my "Enjoy The Day" spring wreath. 

Step 1: Start off by lightly tracing around a circle die. This can be any size you like based on how big you want your wreath to be. Make sure you leave space around the circle for your leaves and flowers.

Step 2 : I chose a larger branch from the 4964 - WC Branches Set and inked it up with 969-Chocolate. I stamped it along the circle, trying to keep the largest part of the branch on the traced circle. I stamped it a couple of times, then re-inked it. You don't need to add any water to the branches, they are more of an accent stamp.

Step 3: I inked up the leaves from the 4605 - Spring Basket with 177-Dark Jade. You can use either one. I inked it up and stamped it several times on each branch. I added water to each of the leaves. The water may cause the color from the leaves to mix with the brown from the Branches but this is OK, unless you don't like that. I actually think it creates more interest and depth.

Step 4: I inked up the flower from the 4604 - Chest of Flowers with 443-Turquoise and stamped it around the wreath. I added water to each bloom. Next, I inked up the small dots flower from the 5009 - WC Mini Flower Set inked with 725 - Rhodamine Red and stamped them alongside the flowers. I added water to the blooms and then stamped them again using 606 - Violet.

Step 5: Using my MISTI, I inked the Enjoy The Day sentiment with the Rhodamine Red and Violet. I re-inked and double stamped it. I carefully added a small amount of water using a #1 paintbrush. Lastly, I signed and dated it.

Check out my blog for more details on how I put the card together. Check out the other design team members inspiration over on the AI Blog. Tag us on Instagram with #AIWatercolor.


Thanks, team! These projects really are beautiful and perfect for giving to a loved one this spring. We are always searching for inspiration for structure scenes, and your projects with stepping stones, bridges, trees, and water is just so pretty! Also, the floral wreath has some really lovely flower stamps tucked in some of our favorite mini sets!

We'd love to hear what you think about these projects, drop us a comment below! Did these cards give you ideas for your projects this weekend?

Happy Stamping!

Saturday, January 5, 2019

Watercolor Weekend Roundup - Happy New Year!

Hello, Ai Watercolor fans! Welcome to the first Watercolor Weekend of 2019! The team is back with fresh ideas for the new year, let's take a look!

Dot Freel - Instagram - Blog - Pinterest
Happy 2019!

I always feel hopeful and excited to start a brand new year. I am ready to get back to more crafting, now that the busyness of the holidays is over, also. I made this card for the Art Impressions Watercolor Weekend using the 5014 - WC Window Set that I stamped in sepia first, then in the African violet. I did stamp it off on paper first. I pulled the color out of the lines then added some of the African violet to the palette to darken the windows. Next I stamped the little pot from the 4869 - WC Small Container Set. I added brown and sepia to the palette to color in the pot. I added the leaves by stamping the ivy from the 4867 - WC Foliage Set 2 in olive green and the flowers from the 5009 - WC Mini Flower Set in scarlet and then added water to them. I stamped the birds in sepia from the 4966 - WC Bird Bath Set and the stamp positioner to add the birds to the window, then added more sepia, steel blue, and a little bit of the brown to their beaks from the palette. I used the fine tip of the sepia to darken the eyes and the legs.
I stamped the cat in sepia from the 4873 - WC Cats Set then made a mask for it and using the stamp positioner, I stamped the bench in sepia and African violet from the 5055 - WC Sitting Places Set. I pulled the colors out of the lines on the cat and bench then used sepia from the palette to color spots on the cat. I inked up the small grass in olive green from the 4051 - WC Foliage Set 1 and stamped the grass on the legs of the bench. I used pine green to ink the bottom of the flowers from the 4868 - WC Flower Set 2 and I inked the tops of the flowers in the steel blue and stamped them on either side of the bench. I used water to soften the flowers and the grasses then I used African violet from the palette to make the shadow under the bench. Next I used a tiny amount of sepia on the palette and a lot of water to color in the background. I used the 5063 - Double Stitched Rectangle Dies to cut out the picture, and a background piece of paper and then mounted it all to the card base.


Tricia Kennedy - Instagram

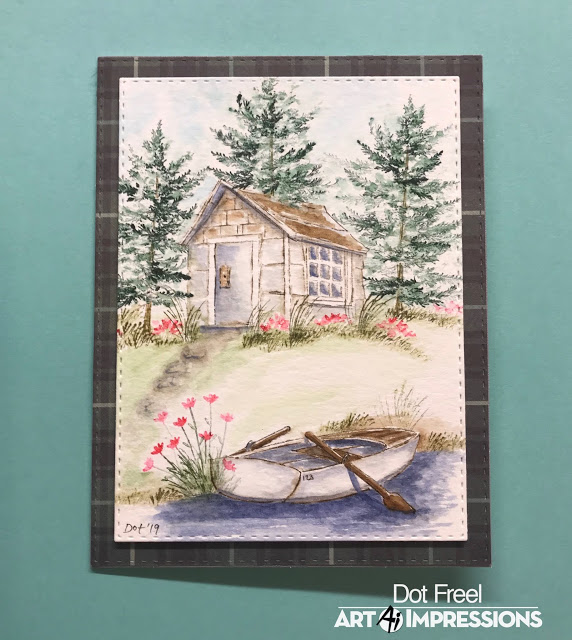
My card for today’s Art Impressions Watercolor Weekend is a pretty little winter scene. 

Begin by inking up a home from the WC Cottages Set in 86 African Violet. Stamp a few pine trees from WC Tree Set 1 in 72 Pine Green around the home. Watercolor the Art Impressions way by pulling the color from the lines with a paint brush and water. Scribble a little 45 Sepia onto your palette and brush onto the roof. Add a bit of 28 English Red and 82 Mustard to your palette and brush onto the door and windows. Next brush 86 African Violet onto your palette to build up the sky and snowy ground. Add detail to the base of the trees and in the top window using the fine tip of 45 Sepia. And darken up the door knob with the fine tip of 86 African Violet. Use an A2 card base, tag, cardstock, jute and Xyron Mega Runner to finish off the card.

Marvy Le Plume II Markers: 28 English Red, 45 Sepia, 72 Pine Green, 82 Mustard, 86 African Violet
Other Products: Post-It Notes, Xyron Mega Runner, A2 card base, tag, cardstock and jute

Tricia O'Bin - Blog - Instagram - YouTube - Pinterest - Facebook
Step 1: I inked only the hat from the WC Snowman Set with Tombow N25. Using the stamp positioner, I placed the hat cocked to the left. I created a mask with the Post-It Adhesive Roll. I covered the hat with the mask. 

Step 2: I inked up each of the San Serif Letters (H, N, Y) using Tombow 569. I wiped off some of the ink. I stamped them next to each other. I created masks for each letter. Next, I inked up some of the stones from the WC Wall Texture Set using the Tombox N25 & 569 markers. I stamped it off and then stamped it to the left of the “H”. I repeated this process several more times stamping between the letters and to the right of the “Y”.

Step 3: Pull the color from the hat (on the sides working into the middle). I added some additional color from my palette. Next, pull the color from the left side of the letters only. Add water to the stones behind the letters. 

Step 4: I inked up the sm leave cluster from the WC Foliage Set 3 with Tombow 249 and stamped it around the letter “H”. I then inked the vine and added it to the “N” & “Y”. Pull the color out of the lines.

Step 5: I added the small leaves from the WC Foliage Set 2 inked with Tombow 565 to the “H”. Next, I inked up the small dots from the WC Mini Flower Set with Tombow 676 and added flowers to the “N”. Add the inked the same flowers with Tombow 725 and added flowers to the “Y”. I added water to the flowers.

Step 6: Using my palette, I added some darker shadows to the letters. Using a fine black pen, I added the 2019 to the hat and Happy-New-Year below the letters. I die cut the watercolor piece out with the Stitched Oval die. I added some Distress Ink in Espresso to the edges of the piece and added some water. 

Thank you so much for checking out the watercolor projects on our first Watercolor Weekend project of 2019. I hope you had a wonderful holiday season and here’s to the new year! 

Tombow Markers colors I used: 569, 249, N25, 725, 565, 676


Thanks, designers! These cards are so lovely! Love all the different approaches you can take with simple stamps, markers and a brush! Do you like what you see? Leave a comment below, we always love to hear your thoughts!

Happy Stamping!

Wednesday, July 11, 2018

NEW VIDEO! Mountainside Cottage Watercolor

Hello Ai Fans!

Welcome to a NEW Watercolor Wednesday video! This week, Bonnie creates a beautiful mountainside cottage with blooming, wild daisies near a pond. Bonnie simply stamps the top half of our WC Cottages Set image and surrounds it with dots from her Molotow Masking pen. She completes the image with mountains in the background, distant bushes, tall daisies, and a simple water feature in front. She removes the masking fluid and adds tiny yellow dots to the daisies.

Don't forget to subscribe to our YouTube channel for all the latest watercolor videos, plus new release previews coming soon!

Happy Watercolor Wednesday!


View on YouTube: https://youtu.be/vx2R2nvEZNw


Thursday, February 22, 2018

Challenge 226 Anything Goes WEEK 2!


Hello, Ai Fans!

We are here with some seriously fun inspiration for our "Anything Goes" challenge! That's right, this week you can create anything for our challenge! The sky is the limit! Let's take a look at what our designers created this week. Find more information on each card by clicking the designer's name to go to their blog. Plus, all the stamps they used can be found at artimpressions.com!

Cheri with Birdie & Eggnus and Anything New?


Sharon with various WC Sets featuring WC Cottages Set
Thanks, team! Always so fun to see all your different styles and diverse sets you choose for these Anything Goes challenges!
Now it's your turn! Show us your crafty creations, and you just might win! Joining is easy, simply post your photo online and link it our InLinkz below!

Here are the Challenge Rules
✻ Please make a new card or creation. You can make any crafty item you wish; this is not limited to cards!
✻ Limit two submissions per person. You will receive extra votes if you use Art Impressions stamps!
✻ The Ai Challenge is open to everyone, international submissions are welcome!
✻ Include a link back to the Ai Blog or grab our button on the top right of our sidebar!
✻ Share the Ai love by clicking and commenting your fellow crafters.
✻ Make sure to get your link up by Wednesday, February 28 at 5:00 p.m. PST to enter your creations.
✻ Good luck and happy stamping!


Saturday, February 17, 2018

Watercolor Weekend Roundup - Changing Seasons

Welcome back to another Watercolor Weekend! Twice a month we bring you a bundle of inspiration from our Watercolor Guest Design Team that you won't want to miss out on! This week, be inspired by three different seasons - Winter, Spring and Summer! One of our favorite parts about our watercolor technique is by using different combinations of stamps and colors, you can create a scene for any season, whether it looks like the weather outside your window or of a place of your dreams! Take a look at our team's creations!

Dot Freel - Instagram - Blog - Pinterest
Hello Watercolor Friends,

Spring has arrived here in Las Vegas. I made this card for the Art Impressions Watercolor Weekend roundup using some pretty spring colors. I used a house from the 4958 - WC Cottages Set and two of the branches from the 4964 - WC Branches Set to make the trees. The grass and leaves are from the 4051 - WC Foliage Set 1. The tiny leaves from the 4867 - WC Foliage Set 2 were used to make the bushes by the house. The flowers were from 4052 - WC Flower Set 1. The fence was made using the 4967 - WC Fence Dies as a mask. 


Tricia Kennedy - Instagram
The tropics are calling for today’s Art Impressions Watercolor Weekend. It’s “Tiki Time”!

This is a two-part project – the main design and the mat. Start by creating the main design. Stamp the bungalow from 4110 WC Structures in 45 Sepia in the center of your watercolor paper. Mask off the roof of the bungalow using a Post-It Note or masking paper. Stamp the palm trees from 4269 WC Tree Set with 45 Sepia and both 15 Olive Green and 11 Lt. Green. Then stamp the foliage from 4867 WC Foliage Set 2 on both sides of the bungalow in 15 Olive Green. Pull the color from the lines using your watercolor brush and water. Scribble a little 45 Sepia onto your watercolor palette and brush onto the bungalow. Add 60 Salvia Blue to the palette and brush into the sky. Add 101 Tropical to the palette and brush in for the ocean. And, add 36 Manganese Blue to the palette and brush into the windows. Darken up any lines on the bungalow and add cross-hatch detail with the fine tip of 45 Sepia. Dot in 28 English Red for flowers onto the foliage. I used a 2½ x 2½ inch die to cut out the design and matted with a slightly larger piece of kraft cardstock. 

To create the mat, cut a 5½ x 5½ inch piece of watercolor paper. Lightly trace the matted design with a pencil in the middle of the 5½ x 5½ inch piece of watercolor paper. Using leaves from 4867 WC Foliage Set 2 and 4761 WC Watering Can, stems from 4963 WC Fall Set and flowers from 4606 WC Cottage by the Beach, stamp in a random square pattern around the pencil line in various greens - 11 Lt. Green, 15 Olive Green, 48 Leaf Green, 102 Jade Green. Pull the color from the lines using your watercolor brushand water. Erase the pencil lines and mount the main design onto the mat using foam tape.

Marvy Le Plume II Markers: 11 Lt. Green, 15 Olive Green, 28 English Red, 36 Manganese Blue, 45 Sepia, 48 Leaf Green, 60 Salvia Blue, 86 African Violet, 101 Tropical, 102 Jade Green
Other Supplies: Lawn Fawn Stitched Square Die, Design Your Life 3D Foam Tape, Post-It Notes, Kraft Cardstock

Tricia O'Bin - Blog - Instagram - YouTube - Pinterest - Facebook
Happy Watercolor Weekend!! This weekend I chose to do another winter project. I used the Covered Bridge stamp along with the birch trees and a branch from the Branches set.

I used my positioner to place the trees where I wanted them. Instead of using the entire stamp, I chose portions of it. I also used my Molotow masking fluid to mask them off to protect them while I stamped the bridge.

I used my palette to color the bridge and to create the stream and snow banks. 

This was such a fun card to make. Visit my blog for all the details and check out my video on YouTube if you want to paint along with me.

Don’t forget to upload your projects to Instagram and tag us so we can check them out.

Marvy Le Plume II Markers: 45 Sepia28 English Red86 African Violet

What inspired you today? Tell us in the comments below! You also have a PERFECT opportunity to share your creations with us! Join our "Anything Goes" challenge by linking a project or two so we can see what you are watercoloring! Besides, you just might win a prize!

If you are just beginning your watercolor journey, be sure to visit our new beginner's guide for some great information! Happy Stamping!

Saturday, November 4, 2017

Fall Birch Trees by Sharon Caudle

Hello AI Fans!!! 

Hope you're having an amazing start to your weekend! I am on vacation next week, so I'm happy! LOL!  I'm going to scrapbook camp this week for five glorious days of coloring and having fun with my girlfriends! Does it get any better than that? No cooking, no cleaning, just relaxing and enjoying life!  I'm ready to go right this minute! LOL!  My card today is a watercolor card I created using a number of different stamp sets from Art Impressions.
4966 Water Color Bird Bath Set
4958 WC Cottages Set
4808 Covered Bridge Mini Set
4051 WC Foliage Set 1


Thanks so much for stopping by to visit today and hope to see you back again soon! Until then - stay crafty!!
Marvy colors used:
45 Sepia, 85 Mocha, 15 Olive Green, 43 Brilliant Yellow, 13 Ochre, 5 Yellow, 86 African Violet, 28 English Red, 75 Sky Blue

Wednesday, October 25, 2017

NEW VIDEO - Halloween Scene Watercolor

Hello Ai Fans!

Welcome to a spooky and sweet Halloween treat for Watercolor Wednesday! This week, Bonnie created a creepy cottage adorned with dry branch trees, cheerful jack-o-lanterns, and a barbed fence with spider webs. She starts by stamping the WC Cottage in the center and pulling the color from the lines and adding African Violet and Sepia from the palette for the darkened windows and doorways, plus a little ghost peeking out the top opening. From there she creates a dark sky around the cottage and stamps the WC Branches for the sparse trees. Next, she uses the Stamp Positioner to place the pumpkins from our WC Series 3 Set 1. She colors them with Terra Cotta from the palette and draws in their expressions. She also uses the positioner to place parts of the fence from our Old Barn Mini Set on either side of the pumpkins. For the final touches, Bonnie adds tiny grass around the base of the images and draws in cobwebs for the perfect Halloween effect.

We hope you enjoy this Halloween themed video! If you liked it, please give us a "thumbs up" over on YouTube and don't forget to subscribe and click the "bell" to be notified of new uploads!

Happy Watercolor Wednesday!


View on YouTube: https://youtu.be/4upQMPEcGgk