Challenge #403 Show Mom She's Special!
Create a handmade card or craft for a mom.
Be sure to grab our badge to display on your social media too!
Our Lucky Random Winner was April J.
Be sure to grab our badge to display on your social media too!
---------------------------------------------------------------------------------------------------------------------------------------------------
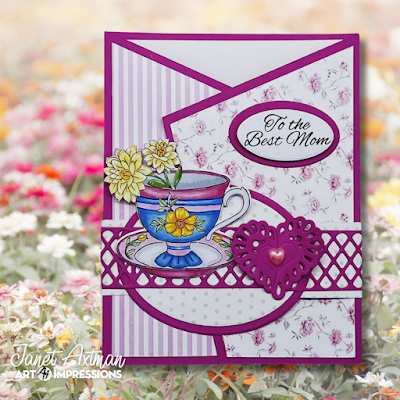
Now let's see what Janet has created. Though her cards are always gorgeous, I think that this is one of the prettiest things she's ever created! The colors are beautiful and the layout is so unique. What wonderful inspiration for your Mother's Day card.
Mother's Day is the perfect time to brew up something special for the amazing women in our lives. This year, let's go beyond the usual and create a beautiful handmade fancy fold card featuring charming tea images and sentiments from the 6024 - Tea Time Set.
This design adds a touch of elegance and surprise, making your heartfelt message even more memorable. So, grab your crafting supplies, and let's get started!
Step 1: Creating the Fancy Fold Base
We'll be making a simple yet elegant gatefold card with an added angled twist.
- Cut your main cardstock: Cut a piece of pink cardstock to 5 1/2 inches x 11"
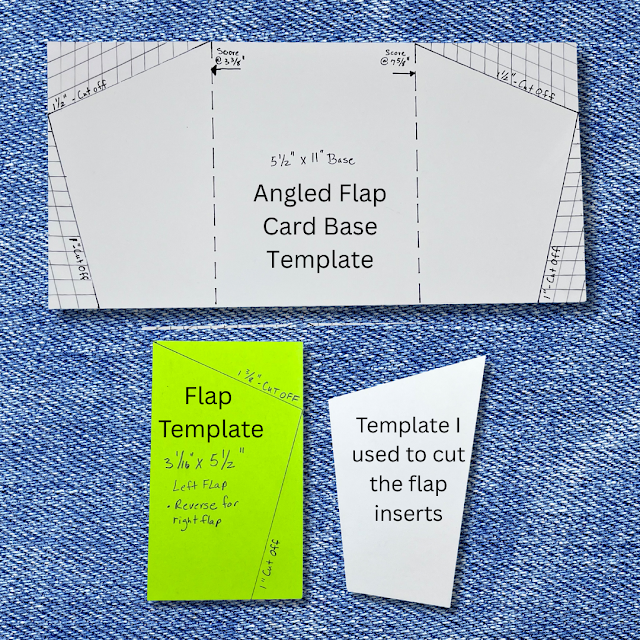
- Score the cardstock: Place the 11-inch side along your scoring board. Score at 3 3/8" inches and 7 5/8 inches
- Fold the card: Fold along the score lines to create two flaps that overlap in the middle. This is the gatefold.
- Add the gatefold "Twist" - Trim Flaps: Now, on each flap, mark cut lines with a pencil as indicated by the photo and then trim with a scissors. This creates the angled flaps for the card. See diagram below.
- Cut patterned paper inserts for each flap: Cut inserts using the measurements shown below. I chose patterns from 6052 - Mother's Day Cover PP. Be sure to change the angle to fit the angles on the left and right flap. I made a template out of cardstock and used it to mark my lines as I found that helped me assure that I cut the inserts correctly.
- Glue the inserts on each flap: Leave an even border around each insert.
- Cut an inside panel: Cut a piece of white or light-colored cardstock for the inside of your card where you'll write your message (approximately 5 3/4 inches by 5 3/4 inches).
- Stamp the teacup: Stamp the cup with the flower on it onto a piece of alcohol marker friendly cardstock.
- Stamp the tea tray: Stamp the image in the bottom left corner of the center insert.
- Stamp the sentiment inside: Stamp Happy Mother's Day above the tea tray on the insert.
- Stamp the flower sprig: Choose your favorite flower from the 5917 - Floral Bouquet Set.
- Stamp the card front sentiment: Stamp in black and cut it out with the smallest oval from 5727 - Nested Oval Dies. Cut another slightly larger oval from pink cardstock. Stack the two pieces together using foam pads between the sentiment and the pink oval.
- Color your images: Bring your teacup, flower sprig, and tea tray to life with your chosen coloring medium. I chose vibrant pink and blue but also think about using soft, spring-like colors that evoke a Mother's Day feel. You can add details like lines or patterns on the cup. Use shading to make the flowers and cup more dimensional. I've included a list of COPIC markers I chose at the end of this post.
- Fussy cut and die-cut: Once you're happy with your coloring, carefully fussy cut around the flower spray image and use the included die to cut out the teacup image.
- Cut an insert slit in the teacup: Use a craft knife to make a slit in the edge of the teacup. This allows you to insert the flower stem so it appears to be inside the cup. Glue the flowers in place.
- Cut out Journal Clasp: Using the heart clasp die included in the 5806 - Slim Journal Template set out of pink cardstock cut the two clasp pieces from pink cardstock.
- Cut two nested ovals: Cut smaller oval with polka dot paper from the PP. Cut a larger oval from pink cardstock.
- Glue the nested ovals together: Leave an even pink border around the edge.
- Cut a support strip for the belly band: Cut a strip from the long side of the cover paper at 1 1/4 inches.
- Glue the clasp pieces to the strip and the oval: Glue the patterned strip to the lattice heart clasp. Glue assembled band to the oval, shaping it around the card and folding it to fit snugly (but not so tight you can't slip it on or off easily). Glue so that the heart clasp is to the far right of the oval. The embellished belly band will keep the card shut until it's opened.
- Arrange teacup & flower image on the oval: Place the teacup to the left of the heart clasp.
- Add a gem to the heart clasp: I chose a pink heart pearl to add to the center of the heart clasp.
- Adhere the card front sentiment: Glue the front sentiment on the right flap.
- Slip belly band on card.
B24, B23, B21
Y35, Y06, Y13,YR02
YG61, YG17
R81, R83, R85
0, C0, C1, C3
Share Your Creations!
We'd love to see your beautiful challenge cards! Add photos of your creations to our Show Your Mom She's Special challenge post. You might just win a free stamp set for your efforts. Though not required to participate in our challenge, we love you to also share them on your social media using the hashtag #ArtImpressions to tag us! Happy crafting, and Happy Early Mother's Day to all the wonderful mothers and grandmothers out there!
You are invited to the Inlinkz link party!


1 comment:
This is beautiful Janet! I love that you added detailed instructions on how to make the card!
Congratulations to Andrea and April!
Post a Comment