Happy Watercolor Weekend, Ai Fans! We are so happy to share three wonderful projects from our WC Design Team today to kick off November in a big way! Let's take a look at what Tricia, Karen, and Dot have created today!
Can you believe it's already November? I can't. I'm working away on Christmas cards. I made this one with yet again, my favorite new stamp set from Art Impressions - 5197 - WC Winter Kids Set. I stamped the lamp post and little girl and fussy cut them out after I watercolored them. I painted the light post in N15 and 026 which is the prettiest shade of yellow! I used the stamp positioner to add the bird from the 5056 - WC Fairy Doors Set because the bird was the smallest one I could find. I colored the bird in with blue 528 and brown 969. I stamped the little girl in with brown (stamped off first) and then watercolored her in with 565, 969, 026, 177, NO 77 pastel peach and NO 67 bubble gum pink. I used the fine tip of the brown Tombow TwinTone pen to draw in some details, her eyelash and her hair. I added a pompom to her hat with a glue dot. I cut out a white piece of Bristol Smooth Paper using a 5063 - Rectangle A2 Double Stitched die and then I used distress inks and round sponge daubers to make the light circle and the sky background. I stamped the trees on the sides from the 4960 - WC Fir Trees Set using the brown 969 and two greens, the 249 and then the 177. I added very little water (mostly to the trunk area) so the branches would stay more detailed. I cut out the snow bank with a die and adhered it with foam tape. Then I used foam tape to adhere the lamp post and the little girl. I used 565 to add the shadows under them. I cut out that frame by using the two largest rectangle dies taped together. The last thing I did was add the snow drops using a stylus and white Gouache paint. It takes a bit of time to dry.

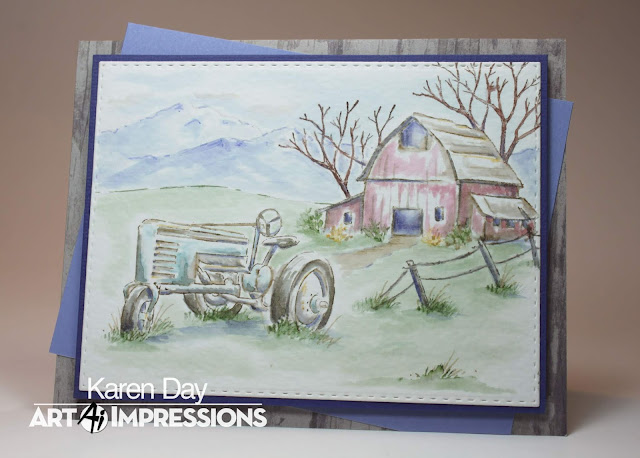
I wanted to make a masculine card, so I placed the barn from #4807 Old Barn Mini Set and the tractor from #5059 WC Harvest Set together on a large acrylic block. I coloured them both with my #969 Chocolate Dual Brush marker from Tombow, stamped it off on scrap paper, and then onto my cardstock. (I had pre cut my Canson XL Watercolor Paper with one of the #5063 Double Stitched Rectangle dies already!). I used my damp #4 paintbrush to soften the lines and pull out the colour. With a pencil, I sketched in my mountains and the hillside, and after masking the barn, I coloured the tree image from #4807 Old Barn Mini Set in #969 and stamped it twice behind the barn. I scribbled #837 Wine Red onto my palette, and picked it up with my brush, adding streaky colour to the barn, leaving lots of white areas for a weathered look. I went over it a second time on the shaded sides of the barn to darken them. I went in directly with the fine point of my #992 Sand marker to draw in the individual barn boards. #992 was also used to paint in the path to the barn. I used #N57 Warm Grey to add darker colour to the tires and seat of the tractor, and to darken up a few of the fittings on it. Then I mixed the grey with #346 Sea Green to create a teal-y shade to paint on the tractor. With my stamp positioner, I added the fence from the Old Barn set to the side of my scene, colouring it in #969 and stamping off on scrap paper first. I made a pale wash with #158 Dark Olive and painted the grassy hillsides, then with the small grass from #4051 Foliage Set and the tiny green from #4867 WC Foliage Set 2 New, I stamped in grass and some greenery around the barn. I switched to #076 Green Ochre to add in fall shrubs around the barn also. Picking up #565 Deep Blue from my palette, I used it to paint in the mountains, and to add shadows to the windows and doors of the barn, going in several times to add darker layers. I used it to add shadow lines on the fence posts, under the roof and on the undersides of the tractor. And finally, I added a few longer grasses by directly using the fine end of my #992 marker on the paper.
Tricia O'Bin - Blog - Instagram - YouTube - Pinterest - Facebook

Welcome Back watercolor fans! Can you believe it is already November? I can’t. I decided to create a simple Fall Bridge with some foliage to show off the colors of Autumn. This is such a versatile card. You can add any sentiment to it and it would work fabulously. I love cards like that. So thank you for stopping by and I hope you get lots of inspiration.
Project Details
I inked the large bridge from the Bridges Set with 969. I stamped it off and then stamped it in the center of my watercolor paper. I created a mask for the bridge. I inked the tree from the Church set with 969 and stamped it behind to the right side of the bridge. I removed the mask and, using my #1 paintbrush, pulled the color out of the lines.
Next, I inked the small vine from the Bible Journaling Foliage set with 177 and stamped it several times around the center of the tree. I added water to the leaves and let them dry. I cleaned the stamp (because I used green) and inked it up with 856 and stamped it several times along the outside of the green leaves. I added water to the leaves. Using my Chocolate Twin Tone marker to extend the trunks through the openings in the bridge. I also darkened up the shadows on the bridge.
I inked the small grass from the Bible Journaling Foliage set with 177 and added it to the right of the bridge and in front of it. I used my #4 paintbrush and pulled the color out of the lines. Next, I added 925 to the medium dots from the Bible Journaling Flower set and added them to the tops of the grass. I added a small amount of water to them.
I masked off my bridge and inked up the small bush from the Bible Journaling Foliage set with 177. I stamped it several times on the left of the bridge. I added water to soften them. I inked up the small dots from the Bible Journaling Flower set with 025 and stamped them several times in the bush. I added water to soften them.
I added some 569 to the water under the bridge. Once it dried I added some additional 565 to brighten it up. I added some 969 from my palette and pulled it out to the left and right of the bridge. I continue to add darker shadows mixing in some of the 969 with my 569. I added 177 and 856 to create a reflection in the water (still working on this…practice, practice, practice!).
Finally, I added 565 to my palette and using water created the clouds. Last but not least, I signed my work.
This was so much fun and I hope you got inspired! Let’s see your work. Tag us on Instagram! Hope you have a creative weekend! See you next time.

Thanks, team! Such a lovely collection of projects!
Did we inspire you this Watercolor Weekend? Let us know in the comments below! And remember, we love seeing your projects when you share them on Instagram with #AiStamps and #AiWatercolor! 'Til next time!
Happy Stamping!

Welcome Back watercolor fans! Can you believe it is already November? I can’t. I decided to create a simple Fall Bridge with some foliage to show off the colors of Autumn. This is such a versatile card. You can add any sentiment to it and it would work fabulously. I love cards like that. So thank you for stopping by and I hope you get lots of inspiration.
Project Details
I inked the large bridge from the Bridges Set with 969. I stamped it off and then stamped it in the center of my watercolor paper. I created a mask for the bridge. I inked the tree from the Church set with 969 and stamped it behind to the right side of the bridge. I removed the mask and, using my #1 paintbrush, pulled the color out of the lines.
Next, I inked the small vine from the Bible Journaling Foliage set with 177 and stamped it several times around the center of the tree. I added water to the leaves and let them dry. I cleaned the stamp (because I used green) and inked it up with 856 and stamped it several times along the outside of the green leaves. I added water to the leaves. Using my Chocolate Twin Tone marker to extend the trunks through the openings in the bridge. I also darkened up the shadows on the bridge.
I inked the small grass from the Bible Journaling Foliage set with 177 and added it to the right of the bridge and in front of it. I used my #4 paintbrush and pulled the color out of the lines. Next, I added 925 to the medium dots from the Bible Journaling Flower set and added them to the tops of the grass. I added a small amount of water to them.
I masked off my bridge and inked up the small bush from the Bible Journaling Foliage set with 177. I stamped it several times on the left of the bridge. I added water to soften them. I inked up the small dots from the Bible Journaling Flower set with 025 and stamped them several times in the bush. I added water to soften them.
I added some 569 to the water under the bridge. Once it dried I added some additional 565 to brighten it up. I added some 969 from my palette and pulled it out to the left and right of the bridge. I continue to add darker shadows mixing in some of the 969 with my 569. I added 177 and 856 to create a reflection in the water (still working on this…practice, practice, practice!).
Finally, I added 565 to my palette and using water created the clouds. Last but not least, I signed my work.
This was so much fun and I hope you got inspired! Let’s see your work. Tag us on Instagram! Hope you have a creative weekend! See you next time.

Thanks, team! Such a lovely collection of projects!
Did we inspire you this Watercolor Weekend? Let us know in the comments below! And remember, we love seeing your projects when you share them on Instagram with #AiStamps and #AiWatercolor! 'Til next time!
Happy Stamping!


3 comments:
Stunning projects from the entire design team! Dot's card is magical!
An outstanding job on all of the creations. Oh I love them all.
These are fabulous. [Bunny]`
Post a Comment