Hello Ai fans!
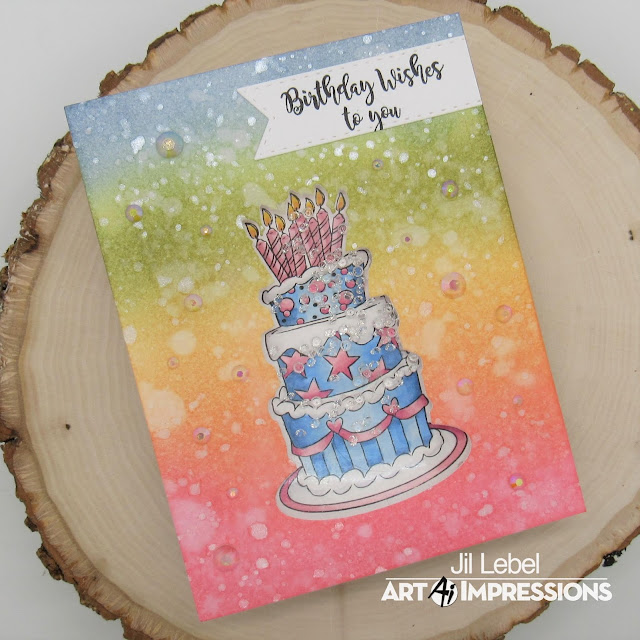
I used the Birthday Cake stamp set for this colorful shaker card. I ended up making two similar cards that have different colored cakes. The matching dies come in the stamp set and they made it very easy to make into a shaker card.
I started by stamping the largest cake image onto Spectrum Noir Ultra Smooth card stock with My Favorite Things Extreme Black ink. I then colored the image with my Copic Markers. The colors I used will be listed at the bottom of the post.
I used my Ranger Mini Blending tool with the foam pads to blend color onto a piece of Bristol Smooth paper. I used Stormy Sky, Bundled Sage, Scattered Straw, Dried Marigold and Worn Lipstick Distress inks. I added splatters of water over the entire piece of paper and let it sit for about 30 seconds before I lifted it with a dry paper towel. I also used Perfect Pearls colored Perfect Pearls Mist to add some sparkle. Once the paper was dry, I used the matching cake die to cut out the cake. I then adhered a piece of acetate to the back of the Bristol piece. I also added foam tape to the back of my paper. When you're making a shaker card, be sure to attach the foam tape all around the shaker window without any gaps.
I set the colored piece on my glass mat and added Queen & Co. clear gems over just the cake image. I took the foam tape off of the front piece and lined it up around the cake and pressed it down around the cake to hold in the gems. I've found this to be the easiest way to line up my shaker cards. I stamped the greeting onto the Spectrum Noir paper with Versafine Clair Nocturne ink and cut it with a Flag Double Stitched Die. I glued it flat to the card front. I then attached the shaker piece to a white A2 card. The last thing I did was add some Nuvo Pure Sheen Crystal Gems.
Copic Colors Used:
Blue - B32, B34, B41
Rose - RV11, RV32, RV43
Yellow - Y35, E13
Brish Yellow - Y06, Y08
Green - G20, YG61, YG65, YG67
Icing - N1, N00


3 comments:
The rainbow background with the image is awesome. That card is just so gorgeous. I have that stamp set coming and I can't wait....thanks for the inspiration.
Jil these are really gorgeous! What a great idea :o)
So pretty! I love the backgrounds!
Post a Comment