

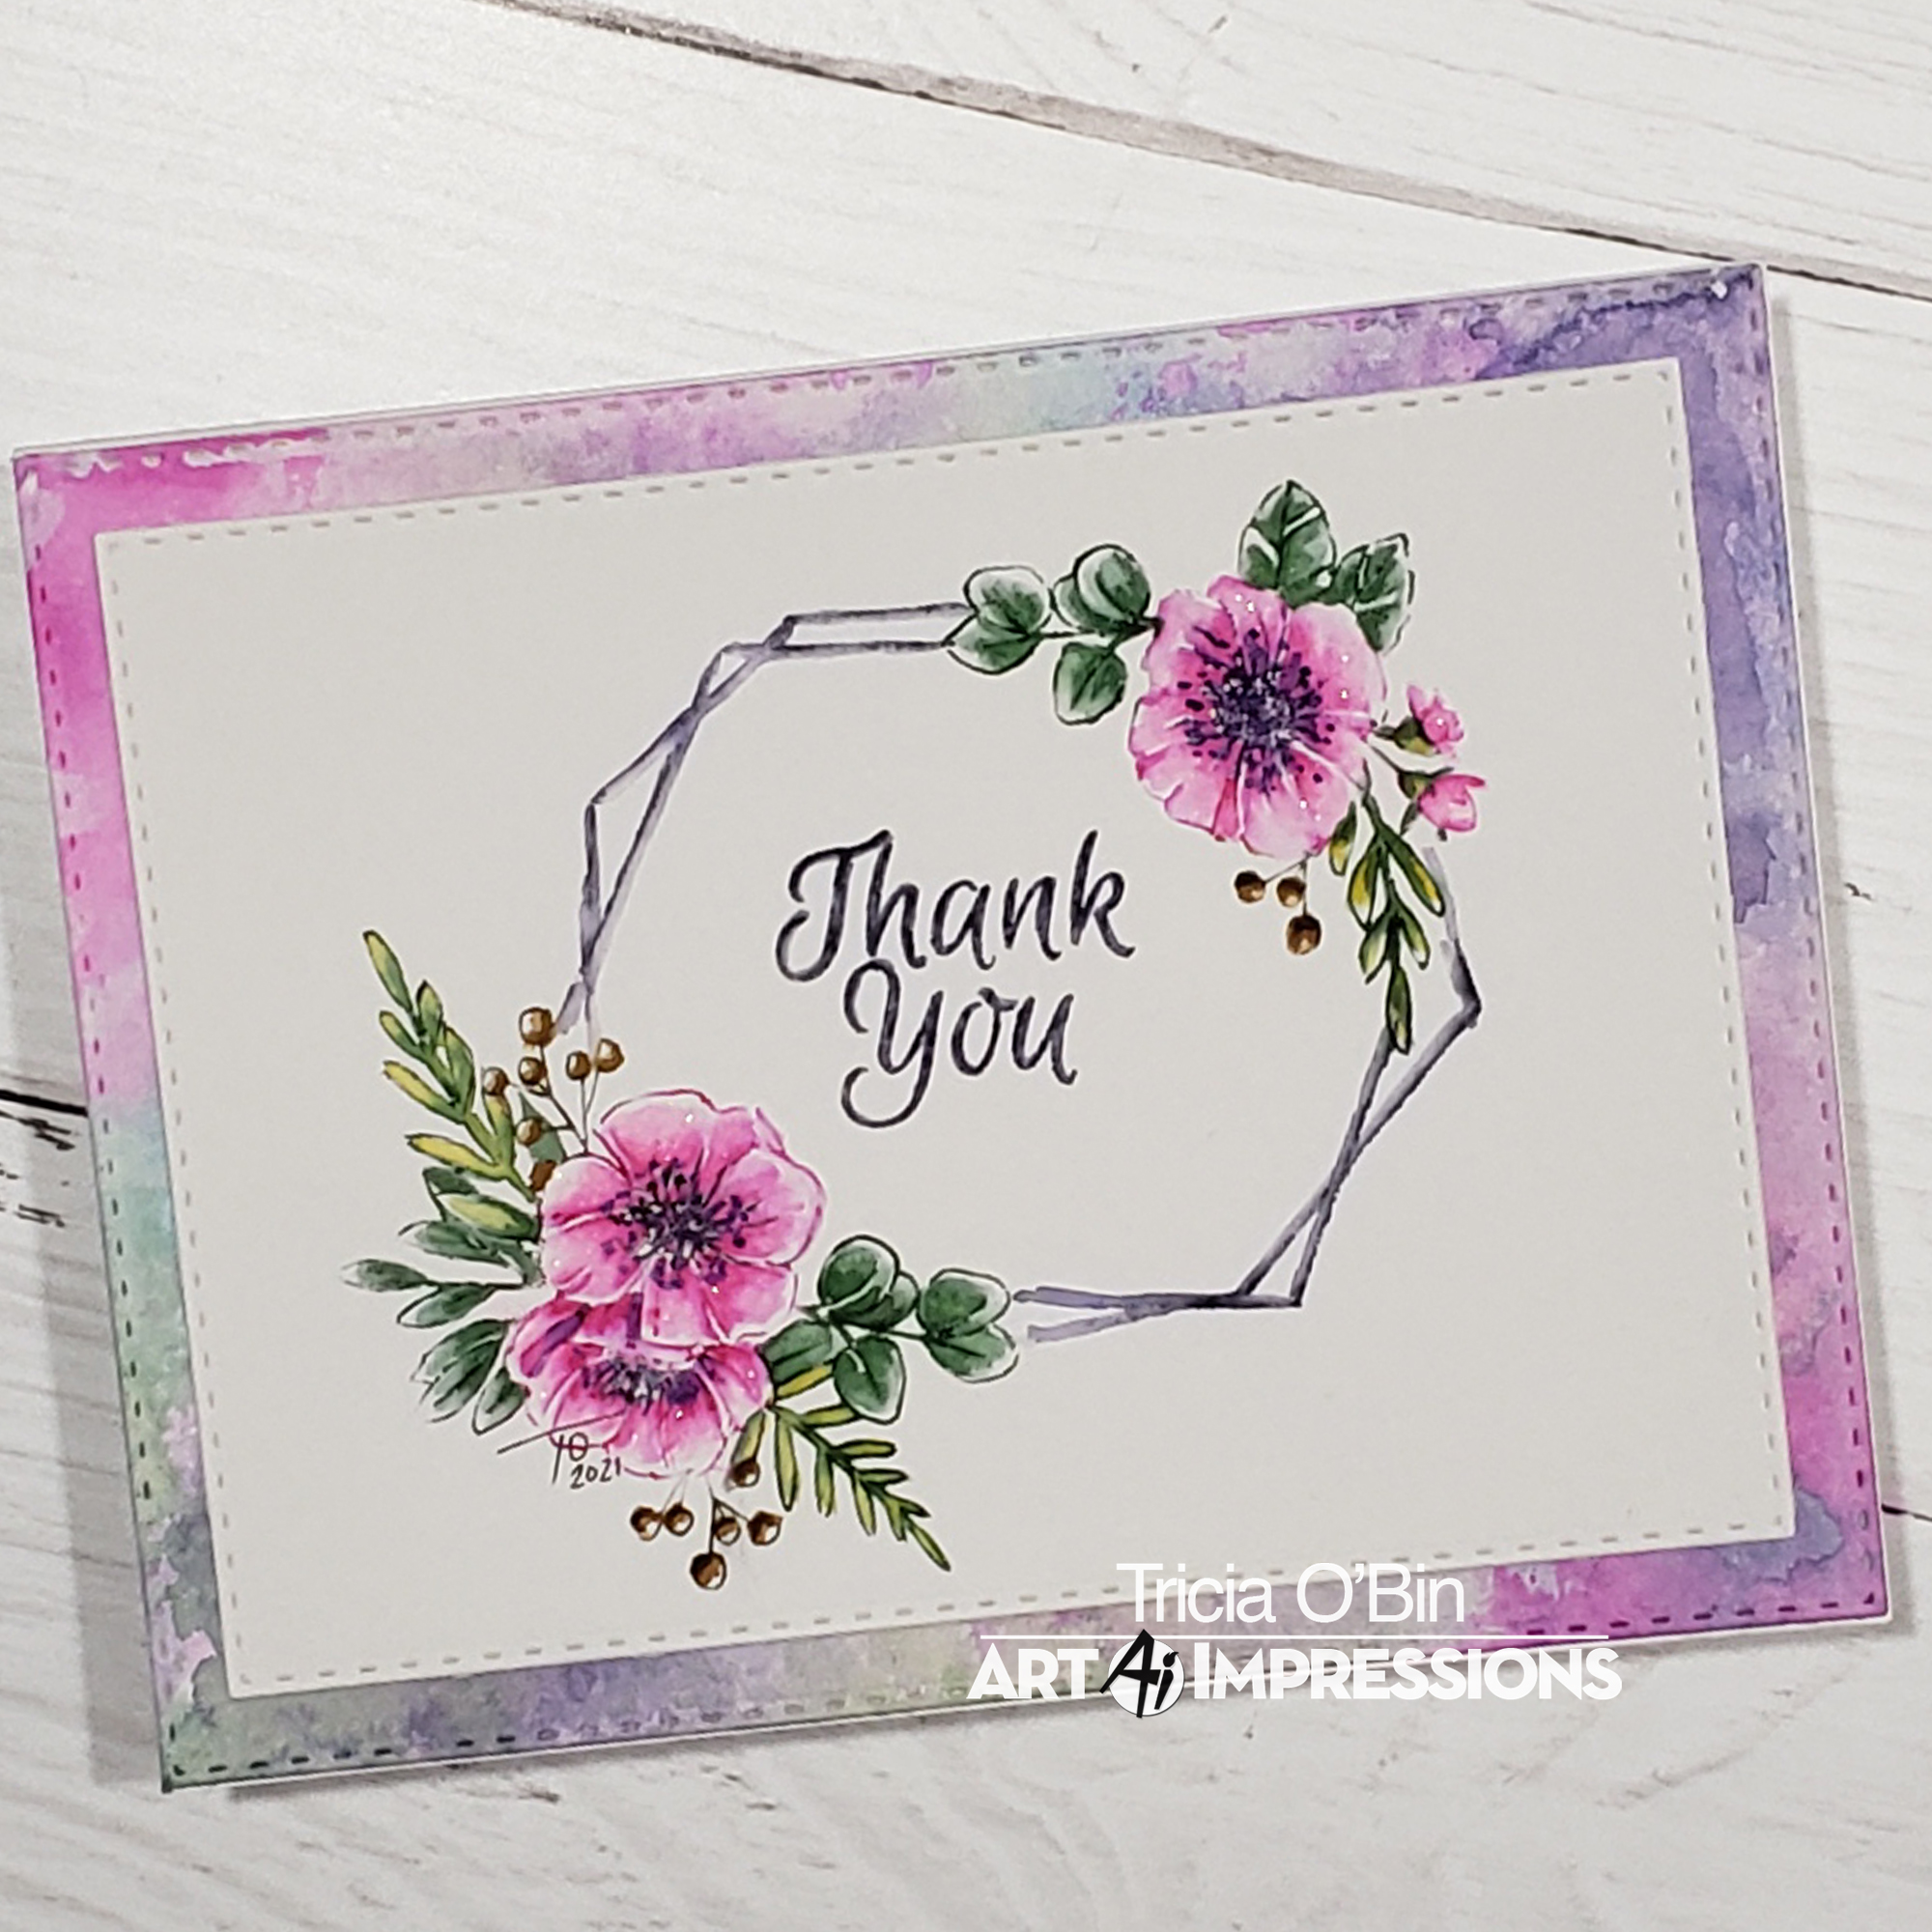
Welcome watercolor fans to this weekend’s watercolor weekend here on the Art Impressions Blog. We are so thankful you stopped by to see all the inspiration that we have in store for you. This weekend I chose to get out my Floral Invites set and have a bit of fun. I created this Thank You card with the frame and two of the side sprays. I love creating cards with this set, and you don’t have to use it for invites, you can use it for everything!
The Painting
I started off by inking the stamp up with the colors I wanted to use (so green for the leaves, pink and purple for the flowers and brown for the berries. To begin, I pulled the color out of the lines, starting with the leaves and berries and then the flowers. I added some yellow, brown, pink and green to my palette and added them to the painting with my brush to deepen the colors. I added a bit of yellow to the leaves to give them some interest.
Before I added the second spray to the right-hand side, I positioned my paper and frame in my MISTI so I could estimate where the second spray should go. I inked it up as I did with the first spray, stamped it down and did the same thing I did on the other side.
I masked off the sprays with some post-it tape, then inked my frame while it was still in my MISTI with my 569. I stamped it down and using my #1 paintbrush softened the line ever so slightly. Lastly, I placed my Thank You into my MISTI, inked it up with 569 and stamped it in the center of the frame. I softened the lines with a small amount of water. For a little bling, I added some Wink of Stella to the flowers. To finish up, I signed and dated my work.
Visit my blog for more details on the card assembly. That’s all folks, a quick and easy Thank you card or switch it out for any sentiment you need. I hope you are inspired to give this project a try. Make sure to tag us on Instagram and use the #AIWatercolor so we can see your work! I hope you have a crafty day and we will see you in June!


Hello Ai Watercolor fans!
I've been wanting to combine stitching with my watercolour scenes for a long time, and this week's theme meant that it was time to give it a shot! This took a little bit of planning:

I wanted the stitching to simply be an accent, not be all throughout the scene, so once I decided on a sunrise, I sketched it out on scrap paper, marking out the size of rectangular die I would use. I picked my cottage, stamping it on the scrap to determine placement, where the stream would be, and even how the sun rays would look.
I diecut my 5063 A2 Rectangle Double Stitched Die from Canson XL Watercolor Paper, and stamped my cottage from 4961 - WC Mini Cottages Set, colouring it first in #969 Chocolate, with #565 Deep Blue overtop. Next I sketched in my scene (you could definitely do this with one of the Ai scenes, but I used a pencil!). I painted the sun and some of the sky with #993 Chrome Orange, adding several layers to darken the sun. I added in #912 Pale Cherry and #451 Sky Blue to create my sunrise sky. Since the light is coming from the back of my scene, I painted #993 along the top of the hillsides, around the edge of the house, and into the stream as a reflection. It also meant that the front of the white cottage was in shadow, so I added shades of #565 to show that, and painted it into the stream also. Using my stamp positioner, I stamped the tree from 5010 - WC Tree Set 1 beside the cottage, and did two smaller trees from 5372 - WC Mini Foliage to the left of the stream.

I did my foliage in layers, starting with the very light #126 Light Olive, using the foliage from 5372 - WC Mini Foliage, and the row of shrubs from the same set, below the trees - and dabbed them with a damp brush. I stamped the foliage again in #158 Dark Olive, to add a few darker tones. A wash of #158 was painted on all the grassy hillsides. To balance the sun in the upper left, I stamped the spiky flowers from 5258 - WC Flower Set 4 in #993/#158, and added some foliage around the base of them. Before darkening in the door and windows of the cottage, I went in directly with my markers to add some dots as flowers in window boxes.

For the stitching, I used a very fine hand sewing needle, as my thread was a very fine gold fillament. I used my needle to pre-pierce all of the holes around the sun, and then did my long stitches to indicate the rays. I went over the small flowers with stitches, and on the taller wildflowers I did some french knots - and I'm pleased to say that I only had one re-do! My embroidery skills are a little rusty.
I mounted my scene on some matte gold cardstock, and adhered it to my base with 3D foam adhesive.

2 comments:
I love the card and nice touch adding stitching to sun and flowers. I have so much tread and looking for ideas to use on cards. Thanks for sharing.
Meant to type thread. 😁
Post a Comment