
Now that all of the new Summer 2021 watercolor stamps have been released we're back to our normal Watercolor Weekend Roundup routine. Our design team gets to create whatever they think would inspire you! Dot, Karen and Tricia never disappoint! They have 3 amazing cards for you today. From Christmas, to the farm, to a country stream, we know you'll love them all.
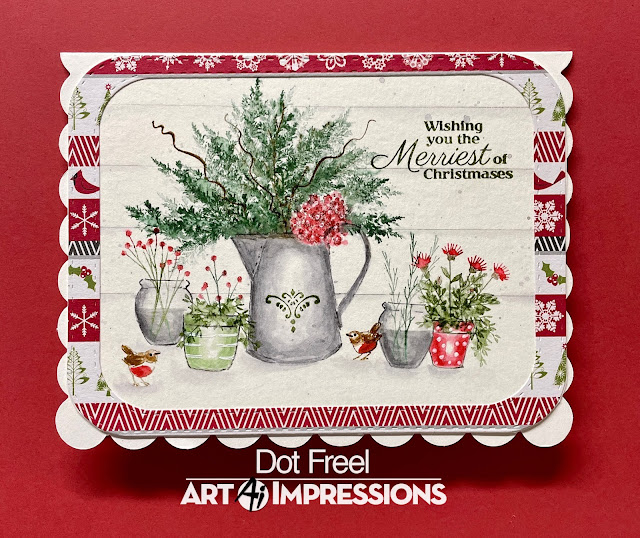

I like getting an early start on Christmas cards so I decided to make this one from a similar scene I saw on Pinterest. Hope you like it. If you want to make it, stamp the watering can from the 5123 Decorative Jar Set inked in Tombow N45. Use the 4960 Fir Trees Set inked in 249 for the foliage in the watering can. I also used the 4964 Branches Set inked in 969 after I added water to the greenery. The flowers inside the can are from the 4052 Flowers Set 1 inked in 856. The can itself is colored in N45 and the decorative element is stamped in the 177. The other four pots are from the 4869 Small Containers Set, also inked in N45. Be sure to mask off the ones in front when you stamp the ones in back. Color the water in with the N45. The bigger container is colored in with 177 and then I used a Signo white pigment ink gel pen to add the stripes. The other pot is color in with 856 and the dots are with the same Signo pen. Use whatever foliage and flowers you have for inside the pots. I used the 4963 Fall Set, 5258 Flower Set 4 and the small foliage from the 5126 Foliage Set 4. The birds are from the 4966 Bird Bath Set inked in 969, then colored in with 969 and 856. Don't forget to use the Tombow Twin Tone in brown to darken the eyes and beaks of the birds like Owner/Creator Bonnie does. Lastly, I drew in the shiplap wall using a pencil and t-ruler then used some N45 to make the shadows. The sentiment is from the 5209 SBC Exclusive Poinsettia Set inked in 177. I cut out the frame using the 5062 Rounded Rectangle A2 Double Stitched Dies set. Don't forget to use the #thedailymarker30day to play along with Kathy Racoosin's coloring challenge on Instagram.
Dot Freel - Instagram - Blog - Pinterest- YouTube


Hello Ai Watercolor fans!
I could paint a new scene every week with the Simple Scenes sets! I started by pulling out 5378 - WC Fenced Scene, stamped it on scrap paper, then figured out which 'buildings' would be the right scale to work on either side of the road. The one on the left needed to be a little larger than the one on the right that is set farther back:

I coloured my clear scene stamp in Tombow #177 Dark Jade, and stamped it on my Canson XL Watercolor paper. *I chose green as most of the image consists of hillsides, with the exception of the fence, which I coloured in #969 Chocolate. Using my stamp positioner, I stamped the barn & small fence from 5371 - WC Barn Set in #969/565, and did the same with the house from 4962 - WC Rustic Cabins Set. Then I placed the rocks from 5055 - WC Sitting Places Set, coloured in #N55 Cool Grey 7 in the foreground - and my scene was set. With my damp brush, I pulled the colour out from the buildings, concentrating it where shadows would fall, and adding colour to the roofs. I picked up #856 Chinese Red from my palette to add colour to the barn. I wanted the house to be white, so just added some shadowy bits, and darkened the windows on both buildings with #565. A wash of green was added to all the hills & fields, and a few darker stripes were painted in to look like crops. Using 5372 - WC Mini Foliage, Trees were added around both buildings, and a line of foliage along the hillsides.

My damp brush pulled out the colour on the fence posts, and I kept them lighter near the top where they would be weathered and highlighted by the sun. I added some foliage in and around them with the tiny grass from the Mini Foliage Set, and around the rocks as well. I picked up colours from my palette to add a few different shades to the rocks, and stamped the grasses from 5126 - WC Foliage Set 4 in #177/565. The tiny dot image from 5009 - WC Mini Flower Set was stamped in #565 around the house, barn and fence, and I went in directly with my #993 Chrome Orange marker to add a pop of yellow. I painted in the road with #992 Sand, and added the suggestion of paths to both of the buildings. A little stitching with my sewing machine attached it to a blue mat, and I added 3D foam adhesive to attach it to my card base. *I tried not to over-edit my close up photo. I have a very light hand, so the sky is faint, but it is there, and the overall feel of the card is quite light and pastel - which doesn't translate well in a photo!
Karen Day - Blog - Facebook - Pinterest - Instagram


At this point I will be sharing what you should do not what I actually did. I won’t share my boo boos but I would definitely do this next time 😊 Next, stamp the small tree from the WC Lg Tree Set with 969, stamp it off onto a mask, stamp it down next to the curve in the river above the bridge, and cut the mask out. Cover up the tree with the mask and ink the tree line stamp from the WC Mini Foliage set with green (any green will do). Follow the light gray lines and stamp it once on the line and stamp again behind the one you just stamped. Continue stamping along the hills.
Along the river, I added some of the small rocks. Next pull the color out of all of the lines along the river, the bridge, tree, rocks and the tree line. I made sure to drag some of the green into the valleys always leaving a highlight. I added some additional green. You can also add some brown to the tree. I added blue to the water using brush strokes to follow the curve of the water. This will give you some movement. Add darker blues around the rocks and under the bridge. Add some 969 under the bridge for a reflection.
Next, I added some leaves to the tree using green and our trusty vine stamp. I added water to the leaves to soften them but maintaining their shape. I added some grasses around the rocks and the edges of the bridge. You can drag some brown in front of the bridge for the idea of a path. I added a few of the thin grasses next to the bridge. To complete this serene scene, I added the bench from the WC Bench set inked with 969. I added a small bit of water with my number 1 paint brush. For flowers, I inked the small dots using pink and stamped it in several areas and added a bit of water.
Finally, using a tip I shared on the Art Impressions Stamp Group on Facebook. I cleaned my tree line stamp off, inked it with a light blue, stamped it off, turned it upside down and stamped it several times in the sky for the look of clouds. Using lots of water I softened the lines. Lastly, I signed and dated my work.
Check out my blog for all the details on creating the card! Remember to tag us on Instagram and use #AIWatercolor so we can see all of your work. That’s it!
Thank you so much for sticking around for that very long tutorial. I hope you will give this project a try. I love creating these scenes that are perfect for any occasion. As I have said in the past, I love cards that I can stamp a sentiment on for a quick card. I hope you will join us next time. Have a crafty day!


No comments:
Post a Comment