Hello Ai watercolor fans!
It's time for another Watercolor Weekend Roundup and this week we have new releases!
Dot, Karen and Tricia have been busy behind the scenes creating lots of wonderful new cards to help inspire your creativity.

You can find all of the latest releases
here.

Now for our fabulous Design Team's creations!
Hello,
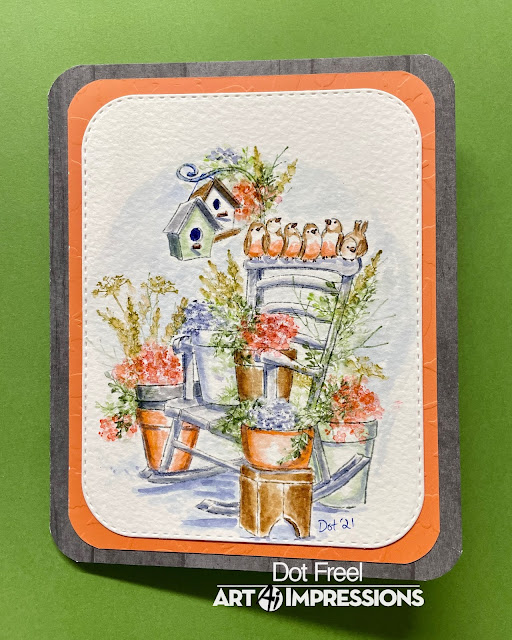
How can it be November already and how exciting is it that there are brand new Art Impressions stamps coming out? I used the new 5470 Foundations Rocker for this card.


Hello Ai Watercolor fans!
I'm excited to share a slimline card using the new 5469 - WC Foundations Watering Cans today!

With a large image like this one, I like to use my Misti, to ensure that I get a complete impression of my image. I die cut my Canson XL Watercolour paper, lined up the image in my Misti (leaving enough room for the sentiment at the bottom), then coloured the entire stamp in Tombow Dual Brush Marker #969 Chocolate, and #565 Deep Blue, and stamped it. After pulling out the colour from the stamped images, I picked my colour palette of #757 Port Red, #528 Navy, and #565 to paint in the watering cans, adding layers of colour where they would be darkest at the edges, and leaving highlights in their middles. I used the same three colours along with #761 Carnation to stamp my flowers, then used #177 Dark Jade and #126 Light Olive to add in some foliage. The stamp sets are numerous - so you can see them listed below. I added a few small branches in #969, and painted in the post in a combo of #992 Sand and #969. I added some grass in #177, and painted in a watery shade of #528 to suggest a sky.

The sentiment from the Exclusive Hydrangea Set was gold embossed on vellum, and adhered across the bottom, after I had matted the image in coordinating cardstock.
Hello AI watercolor fans! We are in the middle of a fabulous new release. Bonnie has gone above and beyond with this one. I am using the new Teapots and Flowers sets to create this Rainbow Teapots card.

STEP 1: STAMP THE TEAPOTS
Ink up the teapots with 969, stamp off and then stamp into the middle of a slimline card. Pull the color out of the lines. Work in your shadows along the sides of each pot.
STEP 2: ADD COLOR
Add each color to your palette, add color to the pots (make sure to keep outsides dark and paint the contour of the pots (and lids).
STEP 3: GROUND THE POTS
Pull color from beneath each pot in the same direction, I chose to have the light source in the top right so the shadow comes out on the left of each pot.
STEP 4: DECORATE YOUR POTS
This is a great way to add interest to your pots. This set has some great decorative stamps. I used them all here. I inked each one in the same color of the pot so it would be subtle. Some I just drew in some decorations. No need to add water! Play with textures and designs, so MUCH fun!
STEP 5: THE FLOWERS & FOLIAGE
Using post it tape, mask the top of the pot and stamp the flowers. Ink each stem with green and each flower with whatever color you like and stamp it several times into the pot. Vary the height and color of each flower to create interest.
Once all the flowers and foliage are stamped in, pull the color out of the lines. (TIP: be sure to keep your white spaces and highlights.)
STEP 6: THE SKY
I used some blue and a lot of water to build up the sky. Don’t let this intimidate you, push your brush around to create clouds. You can add more blue when it is wet to create a cool effect. (I tend to drop in darker color at the bottoms of my clouds.) Experiment by using different sky colors (sunset, sunrise or whatever you like).
STEP 7: SIGN AND DATE – ALWAYS SIGN YOUR WORK!
STEP 8: HAVE FUN!
This project was so fun and easy. It is a little more time consuming (by like 10 minutes LOL) and I just loved the final project. What will you come up with? Make sure you post your work and tag us on Instagram so we can drool with you! Thanks again to Art Impressions for an incredible release. Instagram tags (#AIStamps, #AIWatercolor and #WatercolorTheArtImpressionsWay.)
Have a crafty weekend, see you next time!

SUPPLIES:
We hope you've enjoyed these beautiful cards from our talented designers.
Stay tuned on Facebook and Instagram for a lot more inspiration from them.
Have a great weekend and happy stamping!


2 comments:
I love all of these! Just ordered the Foundations Rocker - can't wait to get it
Goodness these are lovely. [Bunny]
Post a Comment