Hello Ai Watercolor Fans!
We're kicking off another Watercolor Weekend today!

Before we get started we'd like to remind you of the St. Patrick's Day sale going on at Art Impressions right now. Coupon code expires at 11:59 PM PST on Sunday, 3-20-2022. Excludes sale items, while supplies last.

Today you'll see a lovely Lighthouse scene, a spiritual Easter card and a whimsical Easter card.
Enjoy the inspiration and be sure to #aiwatercolor or #artimpressionswatercolor so we can see what YOU create.
This week Karen is leading things off.
Hello Ai Watercolor fans!
I've once again enjoyed painting with the 5466 - Lighthouse Set:
I chose one of the larger images in this set, and paired it with a large cliff from 5465 - Cliffs Set.

I began by colouring the cliff in #565/#969 and stamping it on my Canson XL Watercolor Paper. I used my stamp positioner to place the lighthouse where I wanted it, using the same colours. Because the cliff was not quite large enough for how I wanted my scene to look, I used one of the rock images from 5415 - WC Large Rocks set, colouring half of it, and stamping it in the lower right corner - it perfectly extended my cliff, and I drew in the top edge with a pencil. I pulled out all of the colour from the stamped lines with a damp brush, then layered in shades of #N55/#969/#565 to create the browns, greys and shadows of the cliff. I painted shades of #526 mixed with #565 to create the water and sky, adding a few grey cloudy areas. #569 was painted in stripes on the lighthouse, and #837 added in the bright red roofs and accents. I painted #N55 to the lower edges of the stones around the base of the lighthouse, keeping the tops white to suggest the round shape of the stones. #177 was dabbed on to create a treed backdrop, and as a wash for the grass. The seagulls from 5473 - Seagull Set were stamped in #N55. I die cut my scene using the 5063 - A2 Double Stitched Rectangle Dies.

Hello watercolor fans and welcome back.
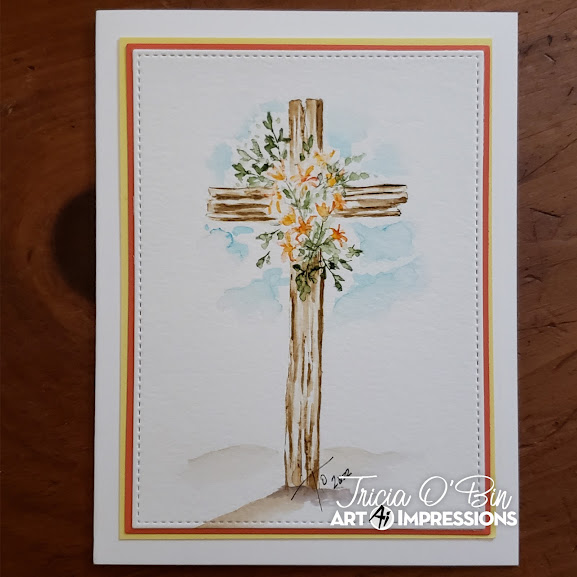
This weekend I decided to create this simple Easter Cross project. When I say easy, I mean easy.
Here is how I put this project together.
To start off, I inked the outsides of the cross, from the Rugged Crosses set with 969, leaving the middle open. This ensures that you don’t have to contend with the lines of the cross when you add the flowers and foliage. These are such awesome, natural looking crosses, perfect for your Easter cards.
I stamped it into the middle of the watercolor paper. As always our first step is to pull the color out of the lines. I try to only pull a small amount out to of the artist draw lines to make them the darkest. Next I added some additional color to the cross layering up the areas I wanted darker. I really wanted the background light so I added a small amount of color to the mountains in the background and the shadow underneath the cross.
For the flowers, I inked up the lilies from the original flowers set with yellow, it just happened that there was still some pink on the stamp (I cleaned it kinda well lol) and it made a really nice peachy orange color. I stamped it several times around the middle of the cross. Next, I used the small foliage from the foliage set 2 inked the top section with green and stamped it several times around the flowers. To create the sky, I added blue around the inside of the cross. I tried to keep the color away from the leaves. Also, I try not to go further than the ends of the cross, it creates the illusion of more sky. Sometimes less is better. I added water to all the flowers and then the foliage to make sure the flowers stayed yellowish. And the final step, that I sometimes forget, sign and date.
Thank you so much for spending some watercolor time with me today. I hope you give this project a try for your Easter Cards. You could add virtually any sentiment to this and send it to someone you love. Be sure to tag us on Instagram and use #AIWatercolor with all your projects. Have a crafty day!

Hello,
I definitely need to make some Easter cards, don't you? This was a fun one. You can definitely change it up with any colors and any flowers.

To make it, start by using the second largest of the 5065 Oval Dies to cut out the masking paper and stick it to your watercolor paper. You can then use the largest die to cut out your scene afterwards and it will have that pretty white border. Stamp the girl from the 5053 Little Girls Set inked in Tombow 969. Use a pencil to draw the egg under her. Use the stamp positioner to stamp the bunny from the 5425 Peeking Animals Set inked in 969 on her lap. Color the bunny with 969 and his ears and cheeks with 885. Color the girl's hair with 969 and her skin with 850. Her cheek, overall and headband are colored with the 885 but use some Molotow to make the dots first on the headband. Her shirt is 173, The egg is colored with 526 and 173. Use a little 565 for the shadow under the girl. Darken the eyes of the bunny and the girls eyelash with a fine tip black pen. Use the foliage from the 5126 Foliage Set 4 inked in 173 then inked in 177 to make the tree branches above the girl. Use the same colors on the vine from the 4051 Foliage Set 1 to make the leaves on the other side. Use the flowers from the 4868 Flower Set 2 inked in 177 and 885 for the flowers under the egg. Use the flowers from the 5475 Flower Set 6 inked in 526 and 177. They are my most favorite new flower. Awesome set. The sky is 526. I hope you give this one a try and tag me in it if you do.


1 comment:
Oh my goodness - these cards are amazing!
Post a Comment