Hello Ai fans!
We've just wrapped up a "Wheelie Awesome" challenge and have two winners to announce!
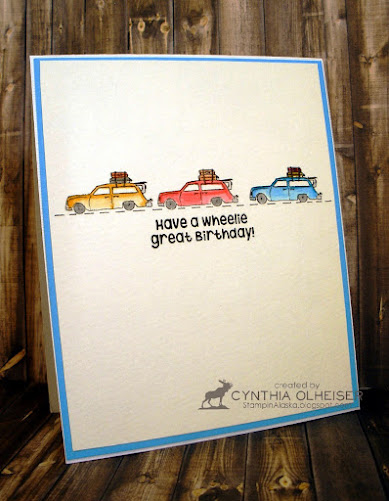
For our Top Spot we chose Cynthia's clean and simple card.
She used Road Trip 4931 and Enjoy the Ride 5186.
Grab our badge to display on your blog or social media.
Congratulations and please contact Leah at Feedback@artimpressions.com
to claim a free stamp set of your choice!
Congratulations and please contact Leah at Feedback@artimpressions.com
to claim a free stamp set of your choice!
Now that we've announced last weeks winners, let's introduce our new challenge and Tasha's fabulous feature!
The challenge for the next two weeks is Home is Where the Heart is!
to claim a free stamp set of your choice!
Now that we've announced last weeks winners, let's introduce our new challenge and Tasha's fabulous feature!
The challenge for the next two weeks is Home is Where the Heart is!

We want to see your creations that have to do with HOME. It can be a house, cottage, cabin, a room in a house or even something like Tasha did...these sweet little fairies home.
Now for Tasha's wonderful card and tutorial.
-----------------------------------------------------------------------------------------------------------------------------------------------------------------For my challenge card, I created a magical scene using the Ai 5345- Fairies Cubbies Set! I love this little fairy house and all the included fairy images!
To begin, I stamped the house with hybrid black ink and colored it with markers. I used shades of pink, gray, and brown to make the card bright, but still have the fairy garden look. I love the steps and all the little details!
After coloring, I used the coordinating die to cut the house out. The die cuts out the entire house and opens the doors and window areas. I think it's so cool when cards are interactive and the door opening allows plenty of space to add little stamped characters.
Hint: You can use wash tape to hold your die in place when cutting.
Here is a peek of what the image looks like after using the coordinating die. You can see the open windows and notice how it cuts around all the areas perfectly!
Next, I colored all the fairy images for this project and I used the included die set again to cut all the images out. I wanted each fairy to look different and since there are several characters, it was easy to give each one a unique look. I also added glitter to the wings for extra sparkle!
Now it was time to position the fairies around the house. I used yellow paper behind the open windows to resemble a lighted room, and attached the fairies with glue runner. I like that there are two fairy images that are sitting down, this way I could have one sitting on the front steps. I just love those steps!
Before attaching the house to the card front, I created a stenciled background. I used light blue ink for clouds and added green grass. I also stamped the sentiment directly on to the card using a matching light blue ink.
Lastly, I attached the fairy house and layers of pink glitter and lime green cardstock. The card was attached to a white card base and I adhered several glitter enamel dots to complete the design.
I hope you enjoyed today's project and will participate in the Home is Where the Heart is Challenge!
------------------------------------------------------------------------------------------------------------------------------------------------------------------
Thank you Tasha! Your card is so sweet.
Thank you Tasha! Your card is so sweet.
If you'd like to possibly win a stamp set of your choice, be sure to enter your crafty creation below.
Some of Art Impressions new releases are just PERFECT for this challenge.
Some of Art Impressions new releases are just PERFECT for this challenge.
Take a look at the new release category for Front Porches, Matchbook Rooms, WC Cottages and Towns and MORE!


1 comment:
I'm so excited to see my Wheelie Birthday card chosen this week! Thanks so much. Tasha's tree house card is so cute.
Post a Comment