Showing posts with label Fairy Cubbie. Show all posts

Friday, January 26, 2024

Have a Magical Birthday Card by Tasha!

 Hi Ai Fans! 

Tasha here, happy to share with you my latest card creation inspired by the current Art Impressions Challenge, "You're a Gem." When I heard those words, my mind immediately wandered to all things sparkling and magical, leading me straight to the 5345 - Fairy Cubbies and 5790-Fairy Houses Sets.


I began by stamping a delightful fairy house at the heart of the card, surrounded by three hot air balloons floating in the sky. But before diving into the background, I covered the images with masking paper to ensure they wouldn't get messed up when ink blending. Masking paper is awesome and a must have for card making.


To create the sky, I used a puffy cloud stencil and blue Distress Oxide Ink. I also did a similar technique to create the ground by using a grass stencil and green ink. I just moved the grass stencil around and added more ink to give a layered look.


Since the theme is "You're a Gem", I embellished with delicate enamel flowers and a shimmering row of miniature gems. I also attached two enamel hearts to the house and large balloon.

Lastly, I added layers of silver glitter paper, pink and black card stock, and a piece of Ai Valentine's Day themed pattern paper. All the pink & red colors look fabulous and I love how this design turned out!

Thanks for checking out my project and I hope you have a great day!


Sunday, August 27, 2023

Flying Fairy by Reneé Matarese


Flying fairies for Clara Dawn!

Hello everyone and Happy Sunday!

My friend's granddaughter is turning four in September and guess what she likes?  Pink, gems, unicorns and fairies.  Shocking!  lol!


Check out how the fairy really flies!


Here's the left side of the inside.


The right side of the inside.


I filled a little bag full of gems for my friend to give her with the card.


I put a little heart, star and butterfly inside the doors and windows that open up.


I made a second card to send to Ai which was created with the current All Wrapped Up challenge in mind.  Use either real or stamped ribbon or bows.


The right side of this one was done using all Ai stamps and dies.


Now I have two mini picture tutorials for you.

I've had a few people talk about not getting a stamp and die to line up.  (I'm not just talking about Annie, who has replacement dies coming)  Here's a quick little tutorial on how to get perfect stamp and die alignment.

BEFORE stamping, cut out the die cut.
Place the negative space in your stamping platform.


Place the stamp in the cut out space.


Close your platform cover to stick the stamp to it and then open it back up.


Place the die cut back into the cut out space.


Ink up the stamp, close the cover and stamp your image onto the die cut.
Viola!  You have a perfectly stamped and die cut image.


My next tutorial is on how to create the little flying fairy.  Last fall I made two cards with flying images.  One was a Halloween card with flying bats and one was a spring card with a bird and bee.  You can click on each photo to be taken to the original posts.


To make these little cuties fly is really pretty simple.  I cut a hole with a hole punch into my cardstock and into a little piece of acetate.  (I save all my packaging from everything to cut up to make clear cards, shakers and things like this) 


I use a brad to attach the acetate to the cardstock.  Make SURE that you don't close it tightly or your acetate won't swing.  Test it before adhering anything to the card base.  I prefer not to see the brad so I always create something to go over it.  Make sure not to use your foam tape in any area that will stop the little "pendulum" from swinging.


I've used a cloud and only put the tape at the top.


You'll need to pop up the back as well so that the brad can maneuver around.
More foam tape makes that happen.  That's it!  Just a hole punch, a brad and some foam tape.
Wouldn't this be super cute with an angel on a Christmas card?!


Enjoy the rest of your weekend and be sure to share if you decide to make something FLY!!!


5463 – Slimline Dies Set for left hand border on side of card and for inside of Madelyn's card for the sentiments.
5721 – Nested Heart Dies
5562 – Journal Letter Die Set for Clara and Madelyn's names.

Copics used:
G03, G14, Y02, RV02, RV06, N0, N2, N4, E00, E33, E1, E95

Twin Tones:
Lime Green, Yellow, Gray, Sky Blue, Turquoise Blue,
Coral Pink, Princess Pink and Pale Rose


Thursday, May 26, 2022

Home is Where the Heart is Challenge!

 Hello Ai fans!

We've just wrapped up a "Wheelie Awesome" challenge and have two winners to announce!
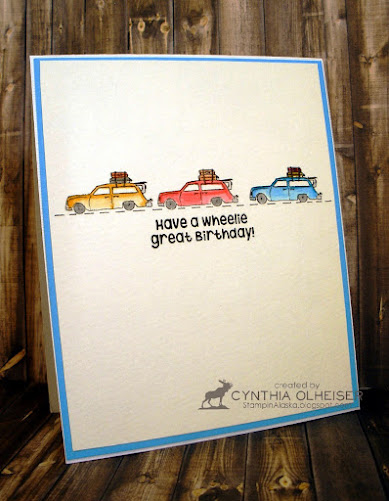
For our Top Spot we chose Cynthia's clean and simple card.
She used Road Trip 4931 and Enjoy the Ride 5186


Grab our badge to display on your blog or social media.

Congratulations and please contact Leah at Feedback@artimpressions.com
to claim a free stamp set of your choice!


Our Lucky Random Winner is 
#3 De Furey


Congratulations and please contact Leah at Feedback@artimpressions.com
to claim a free stamp set of your choice!

Now that we've announced last weeks winners, let's introduce our new challenge and Tasha's fabulous feature!

The challenge for the next two weeks is Home is Where the Heart is!


We want to see your creations that have to do with HOME.  It can be a house, cottage, cabin, a room in a house or even something like Tasha did...these sweet little fairies home.

Now for Tasha's wonderful card and tutorial.
-----------------------------------------------------------------------------------------------------------------------------------------------------------------

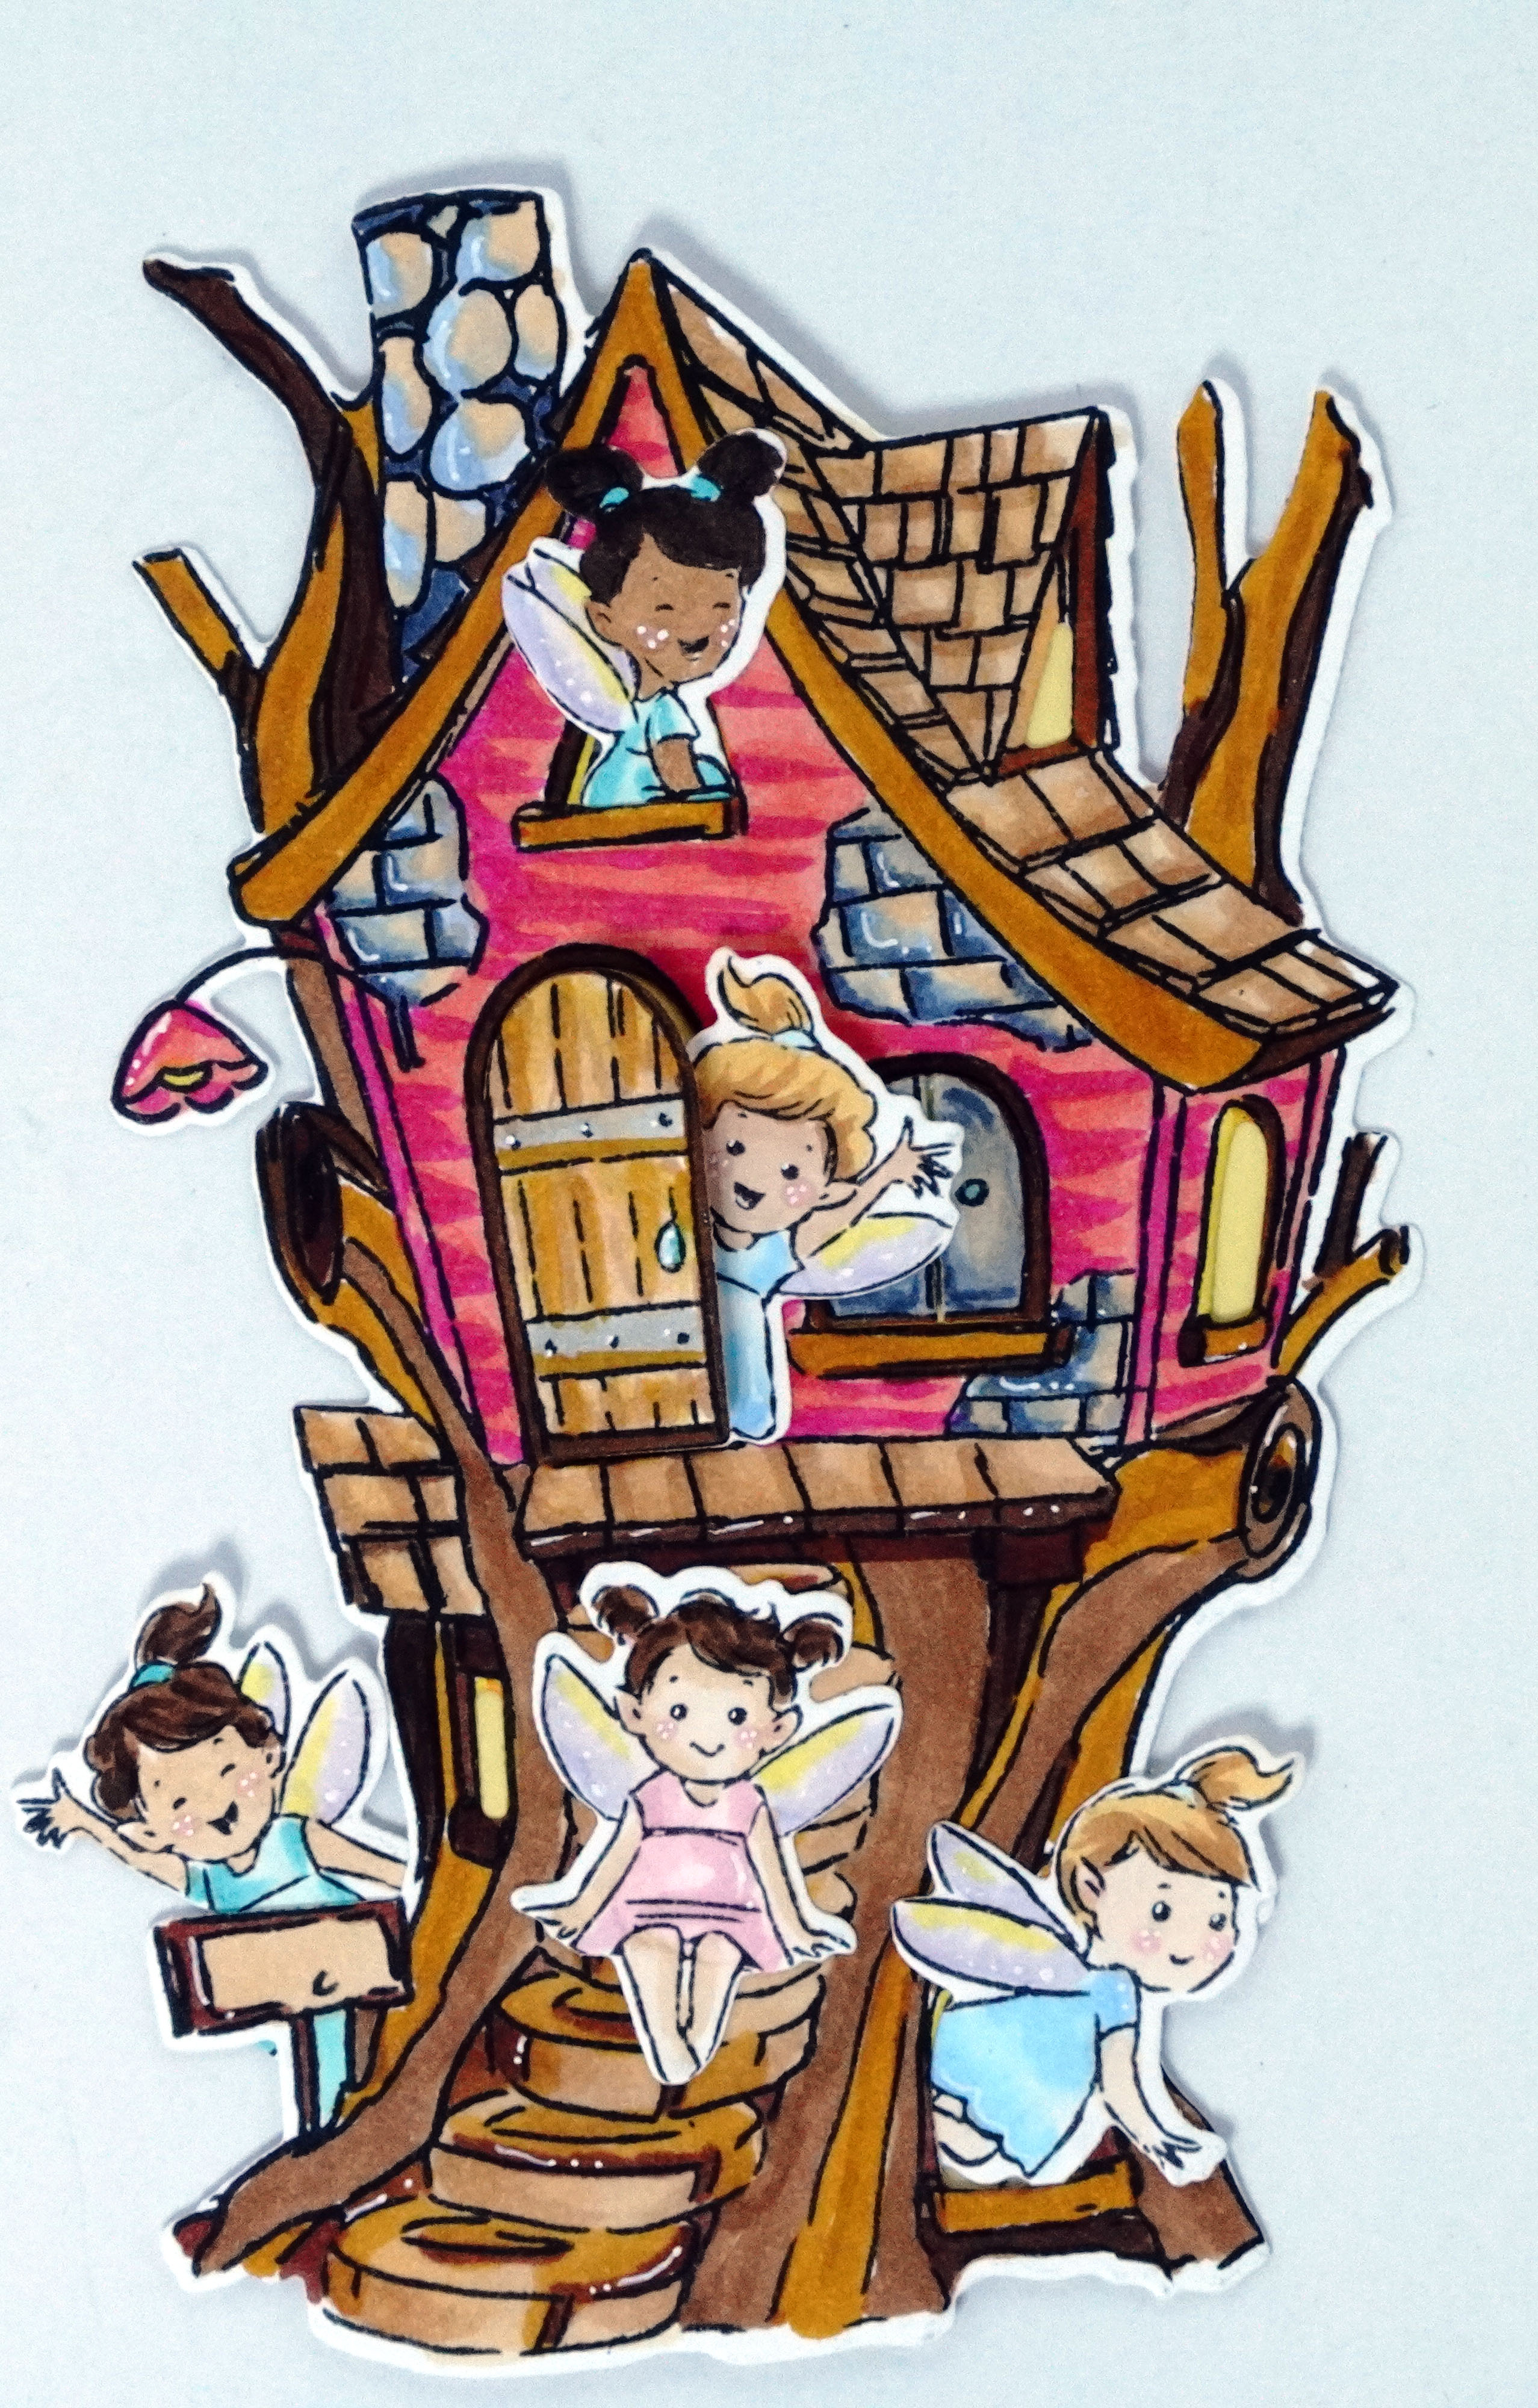
For my challenge card, I created a magical scene using the Ai 5345- Fairies Cubbies Set! I love this little fairy house and all the included fairy images!

To begin, I stamped the house with hybrid black ink and colored it with markers. I used shades of pink, gray, and brown to make the card bright, but still have the fairy garden look. I love the steps and all the little details!


After coloring, I used the coordinating die to cut the house out. The die cuts out the entire house and opens the doors and window areas. I think it's so cool when cards are interactive and the door opening allows plenty of space to add little stamped characters. 
Hint: You can use wash tape to hold your die in place when cutting. 


Here is a peek of what the image looks like after using the coordinating die. You can see the open windows and notice how it cuts around all the areas perfectly!


Next, I colored all the fairy images for this project and I used the included die set again to cut all the images out. I wanted each fairy to look different and since there are several characters, it was easy to give each one a unique look. I also added glitter to the wings for extra sparkle!


Now it was time to position the fairies around the house. I used yellow paper behind the open windows to resemble a lighted room, and attached the fairies with glue runner. I like that there are two fairy images that are sitting down, this way I could have one sitting on the front steps. I just love those steps!


Before attaching the house to the card front, I created a stenciled background. I used light blue ink for clouds and added green grass. I also stamped the sentiment directly on to the card using a matching light blue ink. 


Lastly, I attached the fairy house and layers of pink glitter and lime green cardstock. The card was attached to a white card base and I adhered several glitter enamel dots to complete the design.

I hope you enjoyed today's project and will participate in the Home is Where the Heart is Challenge!


------------------------------------------------------------------------------------------------------------------------------------------------------------------
Thank you Tasha!  Your card is so sweet.

If you'd like to possibly win a stamp set of your choice, be sure to enter your crafty creation below.
Some of Art Impressions new releases are just PERFECT for this challenge.
Take a look at the new release category for Front Porches, Matchbook Rooms,  WC Cottages and Towns and MORE!


Good luck and we can't wait to see what you create!

You are invited to the Inlinkz link party!

Click here to enter

Sunday, August 15, 2021

Cloudy with a Chance...of Fairies! by Reneé Matarese

Hello Ai fans!


Today I'm sharing my card for the Art Impressions Cloudy with a Chance... challenge!


This is a fun fold to use and is SO easy to make. 
My pink base is 11 1/2" x 3 7/16"


Each of the floral panels inside is cut to 5 1/4" x 3 1/4".
The pink strip that holds the 4 little panels is 11 1/2" x 3/4".


Each of the 4 pink panels is 2 1/2" x 2 1/2" and 
the floral squares are 2 5/16th x 2 5/16".


I cut the fairy tree in half and put the top on the front and the bottom inside my card.


I wanted it to look like the tree was growing and peeking up through the clouds.


Did you notice how the door opens and closes for the adorable little fairy to peek out of?


This is what it looks like from above.


Aren't these fairies the cutest?


I used crystal Stickles on all of their wings for that little extra something.


Copics used:
E000, E31, E35, E95, YG93, 
W1, W4, RV00, RV63