Showing posts with label Christmas Village Window. Show all posts

Thursday, July 30, 2015

Challenge 165: Create a Card Set!

Hello Ai Fans!


It's a fantastic time for a challenge! Before we jump in, lets see how things went last week with the "In with the New" challenge winners!

Our Top Spot is awarded to...
AmyWho

Congratulations, Amy! We love how fresh you made summer with our Beach TF Set! Feelin' the ocean breeze... Contact annelise@artimpressions.com with your address to claim your prize pack!

Our Honorable Mentions go to ...


Congratulations to the both of you! What vibrant coloring work on the Birdhouse Neighborhood, Karen! And Kalla, this Buzzard looks like he needs some birthday cake! Be sure to contact annelise@artimpressions.com with your address and a set of your choice as a prize!

And now time for another challenge. Come join the fun!

Lets be honest--how many of us could make cards all day? Well here's your excuse! This challenge we want to see a set of cards! Lets see what Karen has been up to this week!

Hello Ai challenge fans!!  When I heard that we were making card sets for this week's challenge, I immediately thought of the Windows to the World collection of Art Impressions stamps, and came up with the idea of doing one for each season - so here are winter, spring, summer & fall:
Here are Lighthouse Window (Sku #M3175) and Christmas Village Window (Sku # M3184)
Here are Antiques Window (Sku #M4587) and Gazebo Window (Sku #M3174)
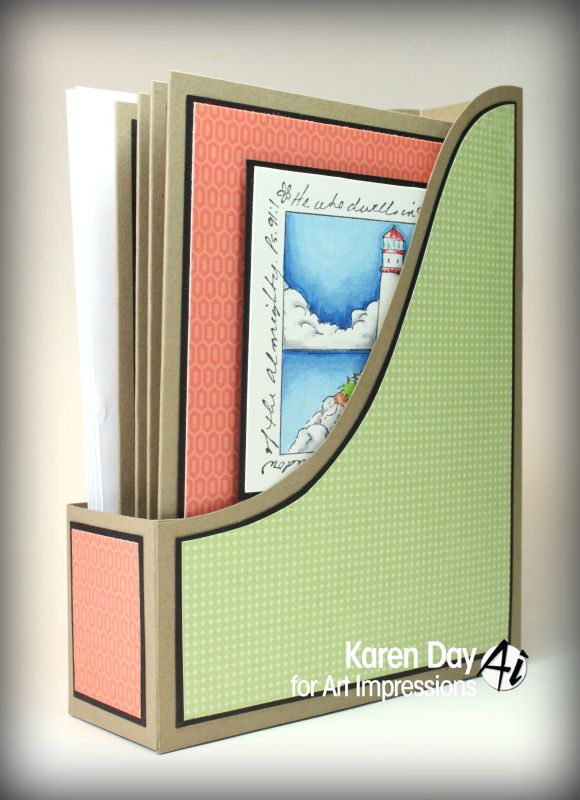
Whenever I make a set of cards as a gift, I like to make a little coordinating holder, so I made this fun little file folder that holds all four cards & their envelopes:
 I started with a  10 1/2" x 6"piece of kraft cardstock, scoring it 4 1/2" in from each side; and I cut a curvy shape off each upper corner.  The base piece is 7" x 2 1/2", scored 2" up from the bottom, with 1/2" flaps scored to fold and glue it together:
 Here it is decorated and ready to assemble (oh, and the best part is that all it takes is one piece of  8 1/2 x 11" cardstock and some scraps to decorate it:


So get crafting and show us your card sets! 

Lovely, Karen! I'm loving the consistency between your cards, yet each is unique! Okay, now it's your turn to make! We want to see you create a set of at least three similar cards. They can be similar in style or color, have a theme, or use the same stamp....use your creativity! The key to a good card set is cohesion. Join the fun and add a photo to our InLinkz below!

Here are the challenge rules …
✻ Please make a new card or creation. You can make any crafty item you wish; this is not limited to cards!
✻ Limit two submissions per person. You will receive extra votes if you use Art Impressions stamps!
✻ The Ai Challenge is open to everyone, international submissions are welcome!
✻ Include a link back to the Ai Blog or grab our button on the top right of our sidebar!
✻ Share the Ai love by clicking and commenting your fellow crafters.
✻ Make sure to get your link up by Wednesday, August 12 at 5:00 p.m. PST to enter your creations.
✻ Good luck and happy stamping!


Tuesday, July 8, 2014

Windows To The World by Karen Day

Hello Ai fans!
I have a group of Windows To The World cards to share with you today!  This is the first time that I have used these along with their matching window stamp - and they were so much fun to colour and make.  They aren't the easiest cards to photograph, so bear with me, and scroll down to the end of my post, I'll share some step by step photos with you.  First up is Island Window (Sku #M3178):
I stamped Window (Sku #M3169) onto coloured cardstock and mounted it on the card front.  The windows have been cut open so that they reveal the 'scene' that is placed on the inside:


I chose a different jewel colour for each card, and they make a pretty striking set if I do say so myself :o)

By stamping each of the images on their own piece of cardstock, it made colouring easy, and positionning them even easier. 

I cut the window panes open with an exacto knife first, then trimmed around the edges, and finally I cut open the upper, lower and center lines of the windows so that they would open up.

I cut a 2" square in the front of my card base, glued on the window, then it was a simple matter of centering the image on the inside of the card, so that it would show through the window.

There are 21 different Windows To The World images to choose from!  Literally for every occassion - so check them out in the Art Impressions store here.  The Copics that I used were too numerous to mention, so if you have any questions about them - leave me a note on my blog and I'll get back to you, you'll see a link here on the sidebar.  Happy stamping, everyone!