Showing posts with label Slimline Cards. Show all posts

Friday, November 1, 2024

Next Stop the North Pole! Card by Tasha!

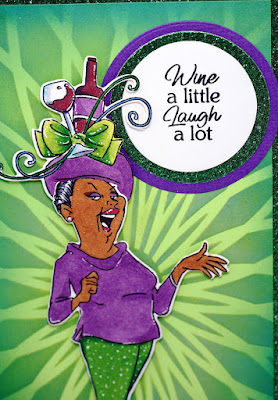
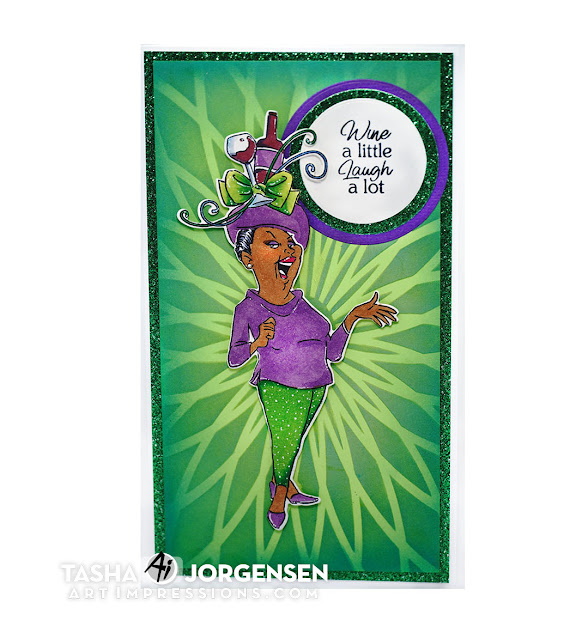
 Happy Friday Art Impressions Friends!

Tasha here sharing a new holiday card featuring the 5929 - Christmas Train Set. Today is the first day of November, so it's time to get a jump start on holiday card making and this set is perfect for this year's Christmas cards, gift tags, and craft projects!

This set includes the coordinating dies and you can mix and match the train cars to fit your project. I decided to create a slimline card and wanted to use as many little penguins that I could fit; I love penguins!!! My favorite part was coloring the little hats and scarves, I made each one a different color and used a white gel pen to give a knitted look.
For the greeting, I embossed "Choo-Choo Merry Christmas" directly on to one of the train cars and love how the bright white color pops against the dark red. To go with the holiday theme, I colored the train in shades of red & green and attached holly to three cars for extra detail.


Lastly, I added a a night sky and white paper for the ground to resemble a snowy hill; I like the Winter night look. To continue with the holiday theme, I attached layers of black and red card stock, and snowflake pattern paper. I also adhered little peppermint shaped enamel pieces to the train's wheels and added red glitter to the berries to complete the design.

Thank you for checking out today's card and I hope you enjoyed a peek at the new 5929 - Christmas Train Set.

Have a great day!


Friday, October 25, 2024

Halloween Slimline Card by Tasha!

 Happy Friday Friends!

Tasha here sharing a Halloween slimline card inspired by the current "All the Fall" Challenge. My project features the fun 5460-Halloween Slimline Set and I just LOVE these cute little critters!

I started by stamping the main image and leaves with black ink and used the included coordinating dies to cut them out. It can be a challenge at times to create with large stamps, but I think having a little outdoor scene with a bright moon was a great way to highlight the furry friends and their pumpkins.

The sentiment I selected is from the 5037-Halloween Magic Set; another one of my favorite sets. I embossed the greeting on to black paper and think the bright white goes great with moon and sky background. 
Lastly, I attached gold glitter paper, deep teal and black card stock, and a layer of pretty leaf print pattern paper. I also added a little Distress Oxide Ink to the moon to complete the card.

Thank you for checking out today's project and I hope you will participate in the "All the Fall" Challenge!

Have a great day!


Friday, July 1, 2022

It's Par-Tee Time Mini Slimline Card by Tasha!

 Happy Friday Ai Fans!

Today I'm sharing a mini slimline card created with the  4902 - Par-Tee Golfers Set! This set includes two character stamps, a variety of sentiments, and fun golf accessories to customize your design. My card features the male golfer zipping around with his golf cart to the next hole. 

I stamped the image with black ink and colored him with Copic Markers. I used Distress Oxide Ink and a puffy cloud stencil to make the sky and drew in the grass. I love his golf clothing and had fun coloring his outfit; I love these socks!!!
Lastly, I stamped the sentiment "I can drive 300 yards...IN MY GOLF CART!" with gray ink. I also added layers of blue cardstock and black pattern paper before attaching it to a white mini slimline card base.

I hope you enjoyed today's card and wish you all a happy and safe 4th of July weekend!


Saturday, April 30, 2022

Born to Ride in the USA! by Janet Axtman


I know there are a lot of motorcycle fans out there or you have family and friends who love to ride. You might be surprised to know that Art Impressions has a fantastic set that includes great motorcycle images for the special people in your life who are, "Born to ride!" 

5044 Born to Ride includes this awesome motorcycle dude and it also has a sidecar complete with a lady rider. It's so adorable! It that wasn't enough, there is also a very cute riding lawn mower image with another guy and a whole bunch of sentiments to go along with these images. 

I created this scene by using the 5463 Slimline Die Set to cut a white panel out of alcohol ink friendly paper. I stamped the rider 1/3 away up from the bottom of the card and then I used a C9 Cool Gray Copic Sketch marker to draw and fill in the winding road. Then I used the small and large grass stamps from the 4051 Water Color Foliage Set 1 and several colors of green ink to fill in the areas on each side of the road. It was very easy to make this scene and I think it has a sketched look that fits well with the rider.


I colored the rider with Copic markers and then I heat embossed two of the sentiments from the set on white cardstock. I used a punch to cut out the oval shapes and attached them to the card. I added Glossy Accents to the headlight and his sunglasses for a little extra shine. The final touch was to use a fine tip black marker to sketch USA on his bandana.

Thanks for joining me today for a ride on the wild side!

Have yourself a crafty weekend!
Janet YouTube - Blog - Facebook - Instagram - Pinterest 

Tuesday, February 1, 2022

Fluttering By To Wish You A Happy Birthday by Janet


Hello Ai fans! It's Janet and today I have a slimline card that combines several unrelated Ai sets to create a fun interactive birthday card. This card was made with the 5463-Slimline Dies Set, 5407-Birthday Cake Gift Card Holder Set, 4972-Owl Flutter Set and 5133-Flag Double Stitched Dies.  

The card base measures 8 1/2" by 3 1/2" when folded. On top of the base, I placed a matching cardstock piece cut with a Slimline Die. The next sized die in the set was used to cut the gray marbled mat. I placed the three layers of cake from the Birthday Cake GCH on the gray mat and then stamped, colored and cut out the adorable little owl from the Owl Flutter set on marker paper. I also cut a long pull tab out of rose gold metallic cardstock. I followed the easy Flutter Owl package directions to assemble the winged mechanism and tab and install it under the gray mat. Once done, I glued the gray base on top of the green matt being careful not to glue on or too closely around areas that move. Then I trimmed the tab to the right length and stamped it with a Pull Here stamp from my stash. 

The finishing touches were to stamp the sentiment from the Owl Flutter Set and cut it out with a flag from the Flag Double Stitched Dies set. I also cut three balloons with dies from my stash and arranged all the extra pieces on the card. 

Once complete, pulling and pushing the tab causes the owl's wings to move up and down.I really like how this looks like the owl is landing on top of the cake to wish the birthday recipient. "owl the best!"

Thanks for stopping by today. Please join us in our new challenge. You might win some swag of your choice and challenge yourself with a new technique. Win, win! Click on the graphic above to link up your card.


Happy Creating!
Janet YouTube - Blog - Facebook - Instagram - Pinterest 

Friday, January 21, 2022

Time for Wine Card by Tasha!

Happy Friday Ai Fans!
Tasha here sharing a mini slimline card featuring the fun Ai 5404 - Miss Set!

This set set quickly became a favorite last year and I just love the variety of hats! To mix it up, I decided to use a wine-themed hat from the 5405-Mrs. Set. It's so awesome that the hats from these two stamp sets work with both characters. This allows you to get more creative and really customize your projects.


I wanted this card to pop, so I used a decorative stencil to give the background a cool look. Green and purple always look great together and these colors work well for a Wine-themed card! I also used two shades of green ink to give a glowing look to the background to spotlight the stylish lady.


The greeting "Wine a little Laugh a lot" was stamped on bright white cardstock and I used layers of green glitter paper and purple textured paper to bring in sparkle and color. This greeting is great for birthday's or a hello card anytime of the year. 
Lastly, I added little white details to the clothing before attaching the card to a mini slimline card base. 

Thank you for checking out today's project and I hope you all have a wonderful day!


Monday, October 18, 2021

Boo's Cruise Slimline Card by Bri Firth

Hello Ai Fans - Bri Firth here! Today, I am sharing a haunting card design featuring the new Spooky Wagon set. This project is featured on my personal blog today, check it out here


I used coordinating Halloween themed paper to decorate the slimline card. I used the Pull and Slide Die Set from Kindred Stamps to make the Spooky Wagon stroll through the graveyard scene. The tombstone silhouettes are from the Graveyard Scene Craft Die. I decorated the slimline card with vellum spiderweb die cuts from the Web Dies set. The sentiment is from the Happy Haunting Set which I heat embossed with white embossing powder.


Check back next week for more Ai inspiration made by me!

Friday, October 15, 2021

Happy Halloween Cards by Tasha

Happy Friday Ai Friends!
Tasha here sharing two Halloween cards created with the super cute Happy Hauntings Stamp Set from Art Impressions! This set has quickly become my new favorite Halloween stamp set!


I started by stamping these cute critters with black ink and I covered the images with masking paper. I used Distress Oxide Ink to created the background. I wanted it to look like they were trick or treating in the woods on a fall night. I also added the grass border to make the card more interesting and frame the design.


The sentiment was embossed with white on black paper. I love the look of white embossing and it fits perfectly between the trees!

 
Lastly, I added orange glitter paper before attaching the card to a black card base. This orange glitter color is really pretty and you know I love sparkle!

Since I love this stamp set so much I made a second card to share today. I used the haunted house to make a little not-so-spooky Halloween slimline card!

This design used masking paper again to block off the house before ink blending the background. After I colored the sky, I used a star stencil and white Distress Oxide Ink to add stars. I love having bright stars on cards!

For the ground, I used a grass stencil and black ink to continue with the haunted house vibe. It's fun to think of new ways to use your stencils and try out different color combinations!

Lastly, I stamped a the greeting "Spooky Salutations" and attached several enamel dots. I also added polka dot pattern paper and orange card stock layers before attaching the card to a lime green card base to complete the project. 

I hope you enjoyed today's cards and are inspired to create some Halloween projects with the fun Ai Happy Hauntings Stamp Set!


Monday, October 11, 2021

Halloween Slimline Card by Bri Firth

Hello Ai Fans - Bri Firth here! Today, I am sharing an fun Halloween card design featuring the Halloween Slimline Set. This project is featured on my personal blog today, check it out here

Since this set is part of Ai's new Slimline collection, I decided to put the images onto a slimline-sized card (3.5" x 8.5"). I used purple and orange Halloween themed paper matted with solid black cardstock to create a layered background for the card base. The images were colored with my Copic markers. I used a wide variety of oranges, along with e80's, R30's and C's to color this Fall collage. For some extra fun, I added some vellum spiderwebs that I created with the new Web Dies Set.

Check back next week for more Ai inspiration made by me!

Saturday, October 9, 2021

Slimline Halloween Critter Wagon by Janet


Have you seen the new Halloween releases yet? Oh my goodness! They are adorable! Today's project uses the new Halloween Slimline Set, the Slimline Dies Set and the Web Dies Set. These little trick or treaters are way too cute to spook!

I am so happy that Ai has added a slimline die set. This has 6 stacked dies. As a bonus, it includes a long flag die too. For today's card, I used the 3rd largest die for the main panel and stacked it on top of an orange panel cut with the 2nd largest die. I love the stitching and it matches all the other stitched die sets from Ai. 

I haven't done a construction video for a while but I have one today! Click on the thumbnail below to see how I created this card.

One of the great things about the new Halloween Slimline Set is that it comes with matching dies for every stamped image except for the skinny Halloween letters. However, I did notice that the flag in the Slimline Dies Set would cut that phrase out perfectly. 

I colored the images with Copic markers and then created a background panel using several Oxide inks in Forest Moss, Black Soot, Chipped Sapphire and Blueprint Sketch. I created the moon by cutting a mask with a die from the Round Double Stitched Die set. The negative of the cut was used like a stencil to fill in the moon with Squeezed Lemonade and Spiced Marmalade. Then the circle itself was used as a mask to protect the moon while I blended the much darker sky around it.

Water and Dylusions Spray in White Linen was used on the inked panel before I arranged all the pieces on it. The critter wagon (as I like to call it) was mounted with double sided foam tape. I cut the webs out of black glitter cardstock and attached them and the other images to the panel with Art Glitter Glue. I have to say that I adore the hanging bat from the set. I think he could carry a card all by himself, he's so cute! He even has tiny little fangs. The last thing I did was stamp the sentiment Trick Or Treat on the bottom of the card using a phrase from the Halloween Critters Set

Thank you for stopping by today. I hope I've encouraged you to check out all the new releases from the past two weeks at the store. There's more coming so keep your eyes and ears on! You're going to love the new designs. In the meantime, join us in the slimline card challenge going on now through Wednesday next week. You could win up to three sets of your choice!

Happy Creating!

Janet YouTube - Blog - Facebook - Instagram - Pinterest

Thursday, October 7, 2021

Slimline Challenge Week Two!

 Hello Ai fans!

It's time for week two of our Slimline card challenge at Art Impressions!

We're keeping it simple.  This is a challenge that everyone should
be able to participate in...both watercolor artists and fans of the regular Art Impressions stamps.

Janet used 5043 – Ole Buck Set


Lynn used the newly retired Art Impressions - Clear Photopolymer Stamp Set - Hydrangeas Exclusive from Scrapbook.com.


Tasha used 5404 – Miss Set


Jil used the 5348 – Santa Twister Set and Die set along with the 5218 – Twist Frame Die.


Bri used 5460 – Halloween Slimline Set and 5462 – Web Dies Set


and


 ReneĆ©  used 5397 – Submarine Cubbies.


We hope you have fun with this challenge!
Show us your best Slimline (or mini slimline card)
and just maybe you'll win!

Here are the Challenge Rules...
✻ Please make a new card or creation. You can make any crafty item you wish; this is not limited to cards!
✻ Limit two submissions per person. You will receive extra votes if you use Art Impressions stamps!
* Please include first name and last initial on your submission.
✻ The Ai Challenge is open to everyone, international submissions are welcome!
✻ Include a link back to the Ai Blog or grab our button on the top right of our sidebar!
✻ Share the Ai love if you can by clicking and commenting your fellow crafters.
✻ Make sure to get your link up by the deadline to enter your creations.
✻ Good luck and happy stamping!


You are invited to the Inlinkz link party!