
Hello Ai fans!
It's time for another Watercolor Weekend.
Over the last few weeks Art Impressions has released several new Watercolor sets and there's more to come. This past week we saw some fabulous new nested die sets, perfect to frame all of your beautiful paintings. All of these sets contain several nested shape making it so easy to matte or frame your little works of art!
You can view ALL of the newest releases from Ai HERE.


Isn't this exciting??
We can't wait to see what you create with these great sets.
Now...it's time to share the wonderful creations our Watercolor Design Team has made.
This weekend we starting things off with Tricia.
Happy Valentine’s Weekend! It’s Watercolor Weekend time. Today I am sharing the birdhouses from the Birdhouse Village set included in the new 2023 Watercolor release! I just adore these little houses, so fun to decorate.
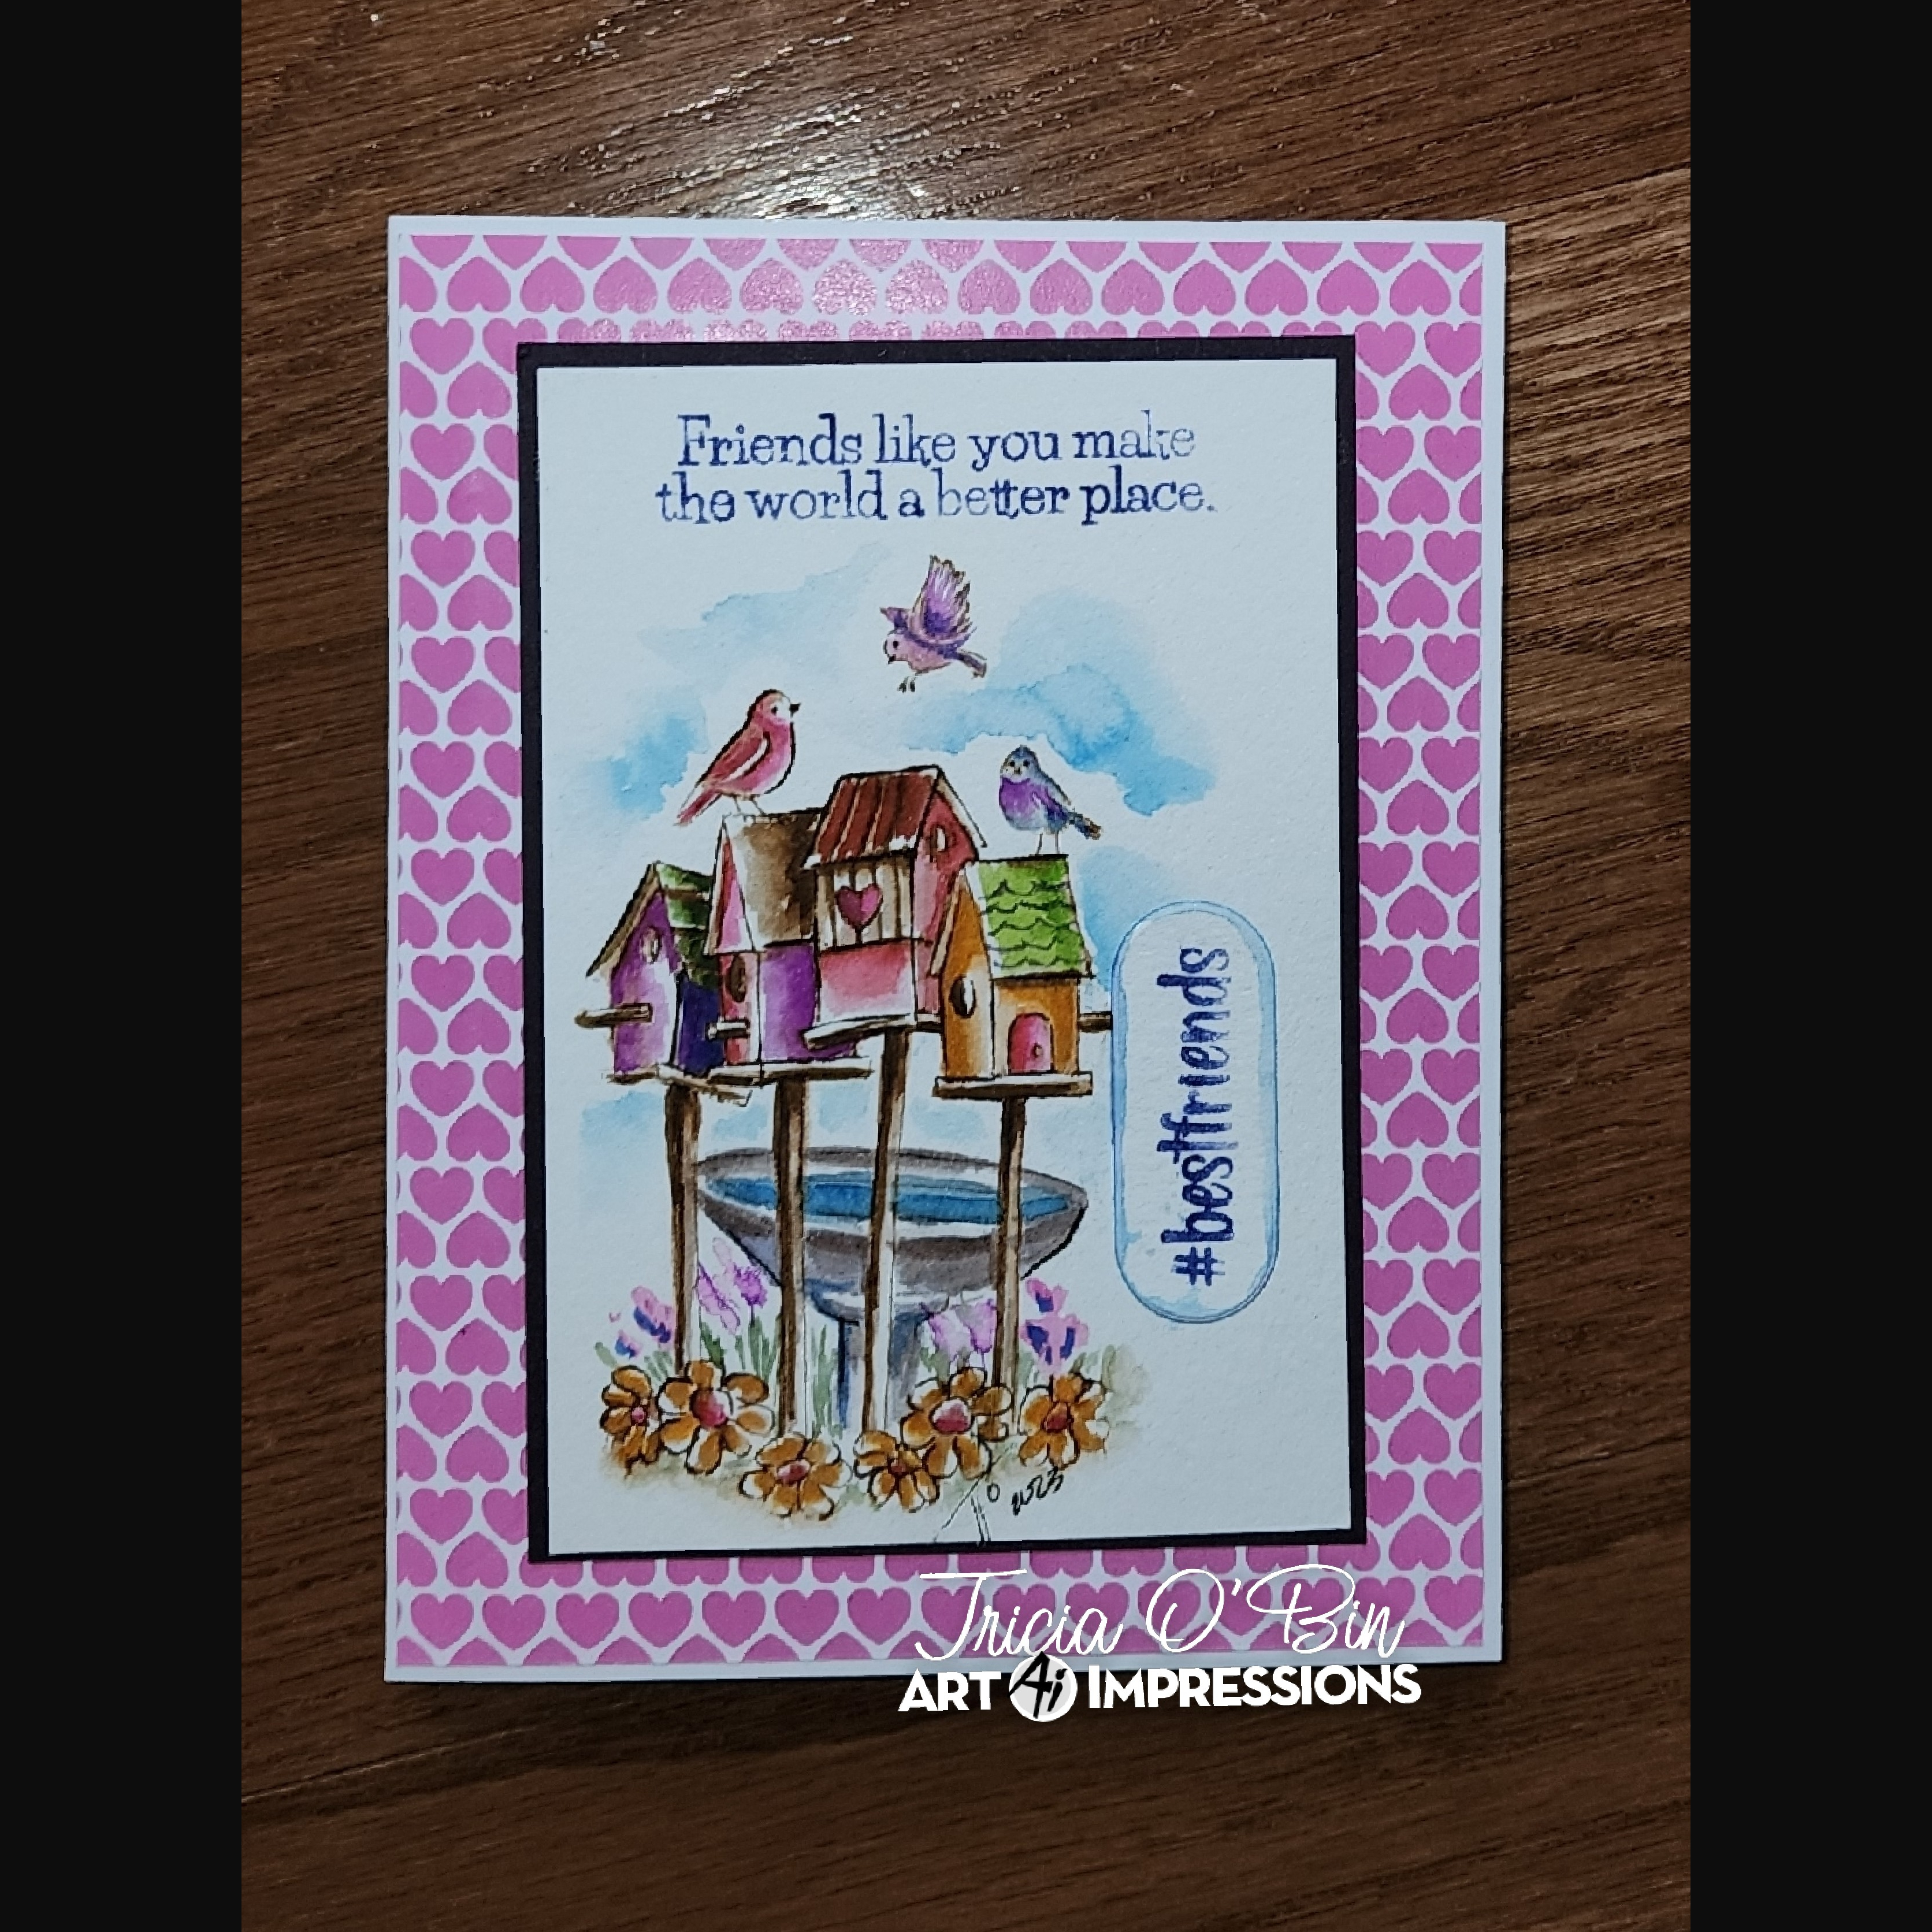
To start off, I inked the birdhouses up with 969 and stamped it down. I wanted it darker so I didn’t stamp it off. Next, I inked up the flowers from the set with 969 and stamped them along the bottom. Using my positioner, I inked up a couple of random birds (soo many sets, take your pick 😊), stamped them off and then placed them at the top. I wanted it to look like a bunch of friends gathering.
As an afterthought, I masked off the posts and stamped in the Bird Bath. It reminded me of Florida’s gated communities with their pools. Once everything was stamped where I wanted it, I pulled color out of the lines, only where the darkest shadows would be. Once it was dry, I came back in with some color from my palette to color everything in. Remember, don’t color everything in solid, you need some white space to create dimension. The flowers and foliage were hand painted in.
Once the painting was done, I inked the two sentiments from the new Friends sentiments up with 569 and stamped them down. Psst…I messed up on my #BestFriends (didn’t use my MISTI…oops), so I just restamped it on a scrap piece of paper and cut it out with one of the journal dies. Lastly, sign and date and you are ready to put it on a card!
I trimmed down a piece of cardstock from the Valentines Paper Pack to 4.125x5.375. I mounted the watercolor piece on a mat made from Gina K Designs Edible Eggplant cardstock.
I hope you will try this project, it was so easy and fun. Great for Valentine’s, Galentine’s or any other occasion where you want to tell someone you care! Thanks so much for stopping by and being the incredible community that you are. I am grateful for all your encouragement and love. Happy Crafting!

Next up we have Karen and her lovely Southwest Scene with the new 5569 – Handcart Set.
Hello Ai Watercolour fans!
I made a scene with a bit of a Southwestern feel this week.
.jpg)
I coloured the stacked pots from 5569 - Handcart Set in Tombows #969/565, and stamped it onto my Canson XL Watercolour Paper. I left off the lower leg on the stool, so that I could add in the little mouse from 5599 - Mini Mice & Squirrel Set, and then added the rocks from 5055 - WC Sitting Places Set on the opposite side. I used the 5528 - Desert Succulent Set to fill my pots, doing plenty of masking to tuck some of them in behind. After pulling out the colour with a damp brush, I used #947/N79/373 to paint my pots, keeping them lighter in the middle, and adding several layers to build up the colour more towards the sides to give them a rounded appearance. I painted a bright version of #373 onto the stool. I used different shades of green on the cacti: #126/177/228/312, along with hints of #772/606/565 for some two-toned effects. I used a warmer grey #N57 on the mouse and rocks, and added a few spots of colour to make them interesting. #565 was used to add shadows to the pots, and under the stool, then was painted as a wash for the sky.
.jpg)
The panel was die cut with 5063 A2 Double Stitched Rectangle Dies, and a sentiment from the retired Exclusive Roses Set was stamped in the top corner.

Finally, we'll wrap things up with Diane's uber sweet birthday card!
Hello Ai Watercolor fans! Have you seen the new 5722 - Birthday Journal Set? This is an absolutely adorable set to create a birthday journal for that special person in your life. It is also a must have for card making. Included in this set are nine stamps and five dies! My favorite stamp of this set is the sweet little puppy wearing a party hat. Using the included dies, it is so easy to cut out the stamped balloon shapes.

To create this Birthday Girl card, I used the following Ai watercolor sets, Tombow markers, and dies:
5722 – Birthday Journal Set
5735 – Birthday Sentiments Set
4052 – WC Floral Set 1
4051 – WC Foliage Set 1
5126 – WC Foliage Set 4
Tombow: 565, 969, 177, 947, 528, 772, 991, 993, and 291
Art Impressions Dies:
5543 – Journal Template Die Set
5588 – Journal Oval Frames Die Set
5065 – Double Oval Stitched Dies
5063 – Rectangle A2 Double Stitched Dies
I knew I wanted to include the sweet little birthday puppy in this scene, so I began by inking the puppy stamp with 969 then 565. I stamped off on a scrap of watercolor paper before stamping onto my Canson XL watercolor paper. I also created a mask of the puppy, by stamping again onto some Post-It Labeling Tape and then cutting out the shape. With the mask in place, covering the puppy, I inked the flower pot and stack of presents stamp with 969 and 565 and stamped off before adding to the scene. Next I removed the mask and the puppy appears to be in front of the presents! Using 969 and 565 again, I stamped out two round balloons and one heart shaped balloon on a separate piece of watercolor paper.
With a damp #4 brush, I pulled out some color from the stamped images to add shadows and depth. To define the space of my painting, I lightly traced an oval shape with a pencil. Next was the fun part, adding color to the stamped images! The colors I chose were fairly light and required a few layers to darken the colors. I started with the balloons. For the heart shape balloon I used 291. I brushed in a light layer, and left a highlight at the top. For the next layer, I added color to the edges and faded in toward the center to make the heart look puffy. I added layers of color until I was happy with the shade. It’s important to let things dry a bit before adding each layer. If the paper is too wet, it can start to rough up the paper and cause pilling. I repeated the process for the two round balloons using 772 for the pink one and 991 for the yellow one. I set these aside to dry and later used the dies to cut them out.
Getting back to the stamped scene. For the puppy I painted his spots, ears, and tail with 947. The collar is 772. The stripes on the party hat were painted with 291 using a #1 round brush. For the puffball on the top of the party hat, I used 772 again. I darkened the shadows where needed on the white areas of the puppy near the chest and legs and also under the party hat and below the collar. Using a black 01 micron pen, I carefully drew over the eyes, nose, and mouth of the stamped image to better define the features. I used a bit of 772 to lightly brush in some cheeks on the puppy’s face. I know puppies don’t have pink cheeks, but it looks so cute! Feel free to leave them off if you prefer.
Moving on to the stack of packages from top to bottom. For the party hat, I repeated the steps and colors from the puppy’s hat. I used 291 on the top package and 772 for the ribbon. Plaid stripes were added later with 993 and a #1 brush. For the next package down, I used 291. Remember to darken the side of the package that would be in shadow (left side). For the stripes, I mixed a little 528 with 291 to create a darker shade and painted on with the #1 brush. For the round box, I used 772, leaving a highlight in the center to create a rounded shape box. Remember to darken the colors, by adding extra layers on top. Once dry, I used the bullet tip of 772 to add vertical stripes to the lid of the round box. I then lightly blended the lines with a damp #1 brush. The bottom package is 291, 991 for the ribbon, and 993 for the stipes. For the white dots, I used a #1 brush and Dr. Ph. Martin’s Bleed Proof White to paint on the polka dots.
For the flower pot, I added stripes with a #1 brush in 772, 991, and 291, curving the stripes to make the pot look rounded. Time to add the greenery to the pot. I used the small vine from 5126 - WC Foliage Set 4 and 177. I stamped the vines over edge of the pot and a few above, leaving room for the flowers. Next I stamped the flowers using the daisy bunch from 4052 – WC Flower Set 1 and 993. Using a damp #4 brush I lightly dabbed the flowers to blend and then the vines. Once dry, you may want to add some more greenery to the pot. I went back in with the bullet tip of 993 and added centers to some of the flowers. I also added a sprinkling of dots among the flowers. To add tiny white flowers to the vines, I again used Dr. Ph. Martin’s Bleed Proof White.
For the sky, I brushed in some watery 528 around the packages, flowers, and puppy. Remembering to stay well within the oval shape drawn earlier, I left some white space just giving the idea of the sky. I stamped in some grass tufts with the small grass stamp from #4051 in 177. Using a damp brush, I pulled the color from the grass up to extend the blades and blended some color below the grass. Next I added some shadows below the pot and bottom package with 177 and a bit of 969+565. You can also add some shadows to the pot below the vines with a bit of 969 + 565. Don’t forget to sign and date!
From the 5735 - Birthday Sentiments Set, I inked the “TO THE BIRTHDAY GIRL STAMP” in 772 onto white cardstock. You may want to use a MISTI or other stamp platform so that you can stamp multiple times to get a colorful, clean image. I used the banner die from 5543 – Journal Template Die Set to cut out the sentiment.
To assemble the card, I first cut an A2 sized card base from yellow cardstock. I then die cut the watercolor scene with the third largest oval die (5065). Next I cut 2 white cardstock panels with the 2nd largest rectangle die (5063). I also die cut another panel with the same rectangle die using the green gingham check patterned paper from (5741) Valentine’s Paper Pack. On one of the white panels, I stamped the sentiment “May your every wish come true!” in 772. I adhered the green patterned paper to the card front using double sided tape. Next I added the oval, centered and slightly raised to leave room for the sentiment below. I then popped up the sentiment with foam squares and placed it below the oval.


For the inside, I adhered the plain white panel to the left inside and the one with the sentiment to the right. I decided to jazz up the left side by adding a stamped cake slice image and cutting it out with the small scalloped round die from (5588) Journal Oval Frames Dies. From the green pattern paper, I used the largest scalloped round die and layered it below the cake cutout and adhered it to the left white panel. Bonnie recently did a great tutorial on how to paint the cake slice here: https://youtu.be/fDy-eP9qkU8?t=0 Valentine’s Journal – Part 3. The colors I used for the cake are 772 for the frosting, 947 for the cake, and 993 for the flame.


All that was left was to add the balloons! I decided to add real strings to the balloons (or you could skip this step and just draw in the balloon strings with a brown TwinTone marker). I used white cotton sewing thread and cut three 12 inch lengths. Next I colored the strings to match the balloons. I taped down one end of the thread to a piece of scratch paper and ran my marker over the thread until it was the color I wanted it. I actually used coordinating Copic Markers (Y17, R21, BG11) to color my threads, but you could probably use your Tombow markers to color the threads. Or, you could skip this step and just leave them white. Next I tied each string to the coordinating balloon around the balloon knot and trimmed the short tail. Do not cut off the remaining string. Next I added foam squares to the pink and green balloon. I arranged the balloons to slightly overlap, gluing down the yellow balloon first then the pink and green popped up balloons. Next I gathered the strings and tied a knot where I wanted it to attach to the packages. With a dot of glue, I adhered the knot and held it in place to dry. Then I trimmed off the strings about a half inch or so below the knot. With the left over strings, I gathered them together and tied a small bow. I trimmed the tails on the bow and glued it to the knot on the strings.

Now give yourself a pat on the back! Your card is complete and ready to give to a very special Birthday Girl! We would love to see what you paint with this set. Be sure to tag us on social media. Happy Painting!


.jpg)


2 comments:
Three amazing artists and 3 totally different, and totally gorgeous cards! Beautiful work as always!!
I have a bit of extra time to admire the handiwork, all 3 cards are exquisite! Thanks for sharing your works of art always. xox
Post a Comment