Showing posts with label Diane Mason. Show all posts

Saturday, July 25, 2026

Spotlight Daffodils Card and Floral Corner Bird Bookmarks by Diane Mason

  Hello, and welcome back for Watercolor Weekend!


Hello, my Ai Watercolor friends and fans! Today I’m sharing two projects featuring stamps and dies from three of the newest releases: 6218 – BJ Long Stem, 6220 – Sing to the Lord Set, and 6209 – Corner Bird Bookmark. I used the first set to create the Spotlight Daffodil Card, and combined the second and third sets to make the Floral Corner Bird Bookmarks.

Spotlight Daffodils Card:

I just love daffodils—their structure is so elegant, and they come in so many beautiful colors. My favorites are the bright yellow ones. Using the spotlight technique allowed me to highlight those beautiful yellow blooms and really draw the eye to the focal image.

Colors and Supplies Used

Paper: Canson XL Watercolor Paper

Cardstock: Black

Brushes: No. 4 round brush, No. 0 round brush

Stamps & Dies:

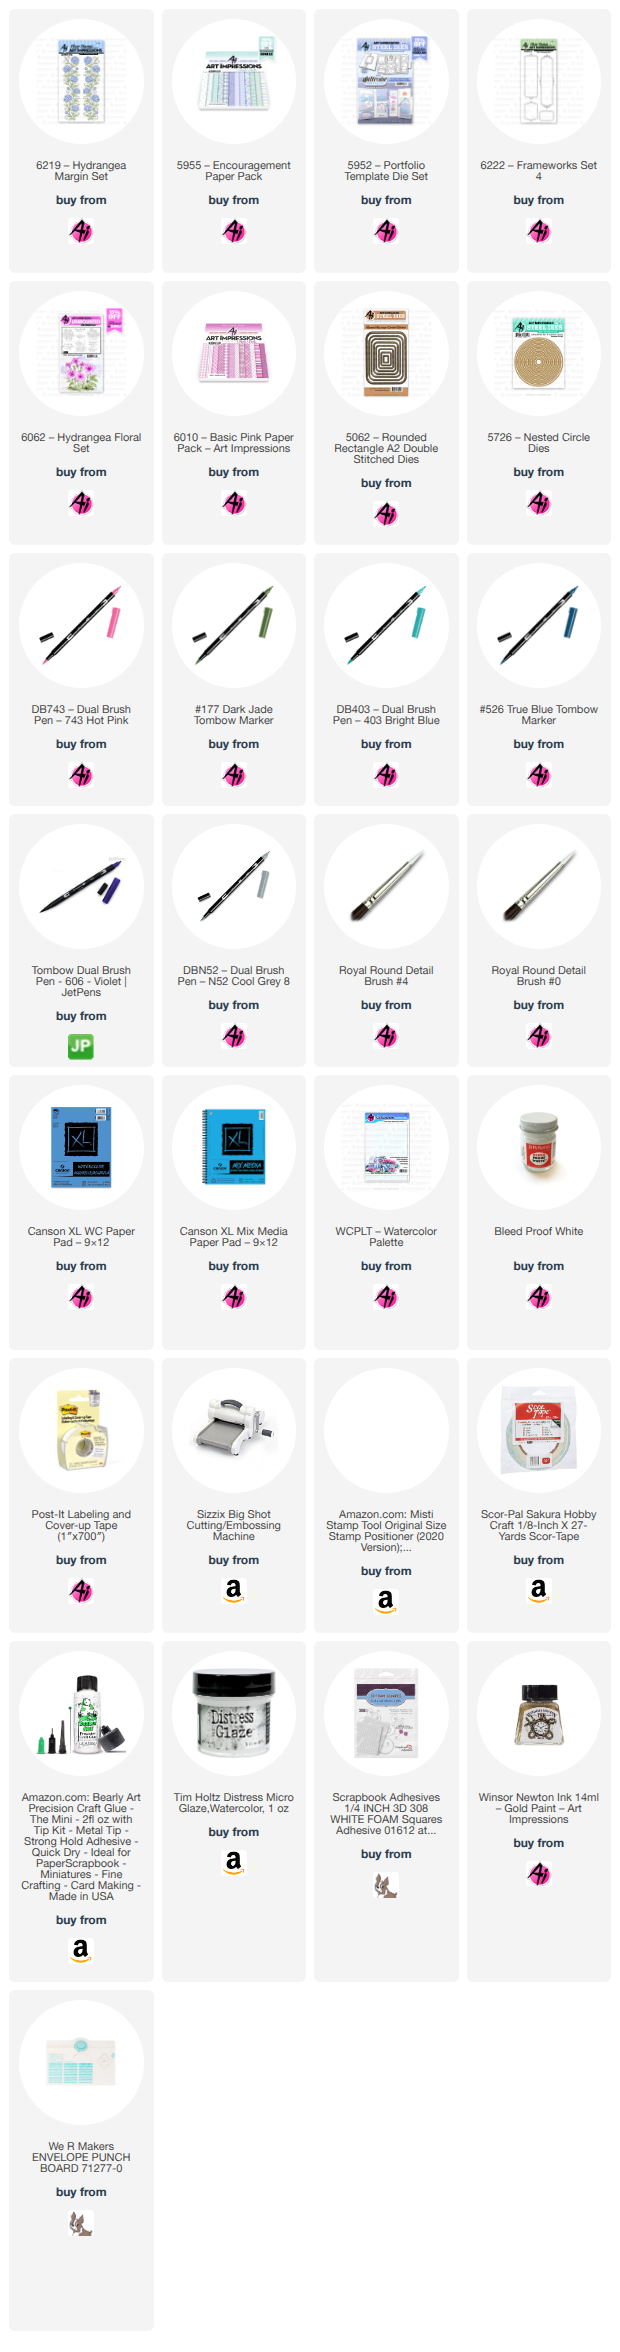
  • 6218 – BJ Long Stem
  • 5588 – Journal Oval Frames Die Set
  • 5724 – Nested Rectangle Dies

Ink for stamped images: Versafine Onyx Black Ink, Versamark

Tombow Dual Brush Pens: 025, 026, 177, 403

Other: Foam squares, Ranger Super Embossing Powder – White, Dr. Ph. Martin’s Bleed Proof White, Heat Embossing Tool

Creating the Background

Using a stamp platform, I stamped each long‑stem image in Versafine Onyx Black to build the background. I made sure to position the daffodil exactly where the spotlighted oval would later be placed.

For the spotlight image, I inked the petals with 026 and the leaves/stems with 177, stamped onto Canson XL watercolor paper, then pulled the color from the lines with a damp brush. I brightened the petals with 025 and deepened the shadows with more 026. The stems were shaded with a mix of 177 + 565.

For the background wash, I brushed a watery mix of 403 around the flowers using a No. 4 round brush. A few highlights were added with Bleed Proof White.

Assembly

I die‑cut the stamped background using the Nested Rectangle Dies (5724) and adhered it to an A2 black cardstock base. Next, I die‑cut the painted daffodil image with the oval from Journal Oval Frames (5588) and die-cut the scalloped oval from black cardstock. After layering them, I added foam squares and aligned the spotlight image over the background.

For the sentiment, I stamped the greeting from 6218 in Versamark clear embossing ink on black cardstock and heat‑embossed it with Ranger Super Fine White Embossing Powder. To complete the card, the sentiment was attached with foam squares.

I really enjoyed making this project. The simple black‑and‑white stamped background creates the perfect foundation for the spotlight technique. I can’t wait to try this approach with more Art Impressions images.

Floral Corner Bird Bookmarks:

The new 6209 – Corner Bird Bookmark die is such a delight to use—and these bookmarks come together quickly. You can absolutely make them with cardstock and patterned papers, but I decided to create my own patterned papers using images from 6220 – Sing to the Lord and 6150 – His Love.

Colors and Supplies Used

Paper: Canson XL Mix Media Paper

Cardstock: Purple

Brush: No. 0 round brush

Ink for stamped images: Versafine Vintage Sepia

Tombow Dual Brush Pens: 177, 606, 026, 969, N25

Stamps & Dies:

  • 6209 – Corner Bird Bookmark
  • 6220 – Sing to the Lord Set
  • 6150 – His Love Set

Stamping & Painting

I began by diecutting the tail, wings, and chest pieces from Canson Mix Media Paper.

Using Versafine Vintage Sepia, I stamped the floral vine from 6220 repeatedly across the tail and wings. For the chest, I stamped the mini hearts from 6150 to fill the shape.

The images were painted with 177 and 606, deepening the flower centers and leaves with additional layers. The eye was painted with 969, with a dot of N25 for the pupil. The beak was colored with 026.

Two Ways to Build the Bookmark

The standard construction (shown in the bottom-left finished sample) slides onto the bottom corner of a page.

To create a version that sits at the top of a page, follow these steps:

1.     Glue the folded cardstock body piece together.

2.     Attach the tail feathers to the outside, facing downward, gluing only at the top so the feathers remain open to slide over the page.

3.     Die‑cut two extra chest pieces from purple cardstock to extend the body and glue them over the tail feathers.

4.     Add the wing, chest, beak, and eye pieces as usual.

Now you have a second way to enjoy these adorable bookmarks!


Here are a few more bookmarks I’ve made for extra inspiration.

Thank you so much for spending a little creative time with me today. I can’t wait to see what you create with these new sets—be sure to tag us on social media. Until next time, Happy Painting!

Thursday, July 23, 2026

Summerween Challenge #432 Week #2

  Hello Ai fans and welcome to week #2 of our challenge.

(posting a little early today, because...why not?)

SUMMERWEEN!!

Summerween is a new expression for me that Tasha brought to light.
Just like there's Christmas in July, a lot of people like to have a mini
celebration of Halloween in the summer. (It's usually in June but I couldn't
fit it in.)

I loved this idea, so here we are. Let's see your best Halloween (or Fall) creations.
Cards, treat bags, boxes, gift card holders and more!

Also...did you see??
It's that time of year when the second set of Freebies become available.
Check out the cuteness overload on these bears!
My personal favorite is the Study Bear.
You can select one of these free stamps when you spend $30 or more on the

Last week Tasha was our Featured Artist and she created a darling Story Tile card.

Tasha also created this cute card.
Janet created 2 cards as well. Her first card is an adorable Frankenstein puppet card.


Her second card is a Story Tile card like Tasha's. Janet used the following sets to make hers.


A lot of our designers made 2 cards this week. Please enjoy these watercolor cards from Neema.
Her first card used:


Her second fun card used:


This fabulous window card is from Diane.
6111 – Spooktacular Set
6130 – Halloween S3 Paper Pack
5065 – Oval Double Stitched Dies


Next up we have the cutest little slider card from Sharon!


I made a ghostly tunnel card that you can find the details for here.


And...last but not least, Dori has an incredible little box with a lid that opens not once, but twice!
Please click HERE and view her video to see how it works. She's SO CREATIVE!!


I hope that something here has inspired you.
Art Impressions has the most amazing Design Team. They care so much about 
bringing you fresh ideas that are easy for you to create, help you think outside the box
and use the supplies you have while still keeping current.

Please make a new project featuring any Halloween or Fall themed
stamps, dies or paper from Art Impressions.
This is going to be a fun one! I can't wait to see what you create.

Here's the rules...

✻ Please make a new card or handmade crafty creation using either stamps, dies and or designer paper from Art Impressions. You can make any item you wish; this is not limited to cards! (unless specified)

✻ Limit two submissions per person.
✻Top Spot Winner and Lucky Random Winner each receive a free 
stamp set from Art Impressions
 ✻Please include your first name and last initial on your submission. You may include your entire last name, but it's not necessary.
✻We love to comment on your entries, but keep in mind if you use a private group or a platform that you need to sign up for, we probably won't be able to.
✻ The Ai Challenge is open to everyone, international submissions are welcome!
✻ Include a link back to the Ai Blog or grab our button on the top right of our sidebar!
✻ Share the Ai love if you can, by clicking and commenting on your fellow crafters.
✻ Make sure to get your link up by the deadline to enter your creations.
✻ Good luck and happy stamping! 

You are invited to the Inlinkz link party!

Click here to enter

Saturday, July 11, 2026

Blue Hydrangea Margin Card and Pink Hydrangea Frameworks Gift Enclosure Card by Diane Mason

 Hello, and welcome back for Watercolor Weekend!


Hello, my Ai Watercolor friends and fans! I’m excited to share some beautiful hydrangea cards with you today. These projects feature images from two of the newest releases: 6219 – Hydrangea Margin Set and 6222 – Frameworks Set 4. I had so much fun exploring different color palettes and layouts, and I can’t wait to show you how these came together.

Blue Hydrangea Margin Card:

Hydrangeas are some of my favorite flowers — we actually have four hydrangea bushes in our backyard, and the whole yard looks so pretty when they’re in bloom.

Colors and Supplies Used

Paper: Canson XL Watercolor Paper

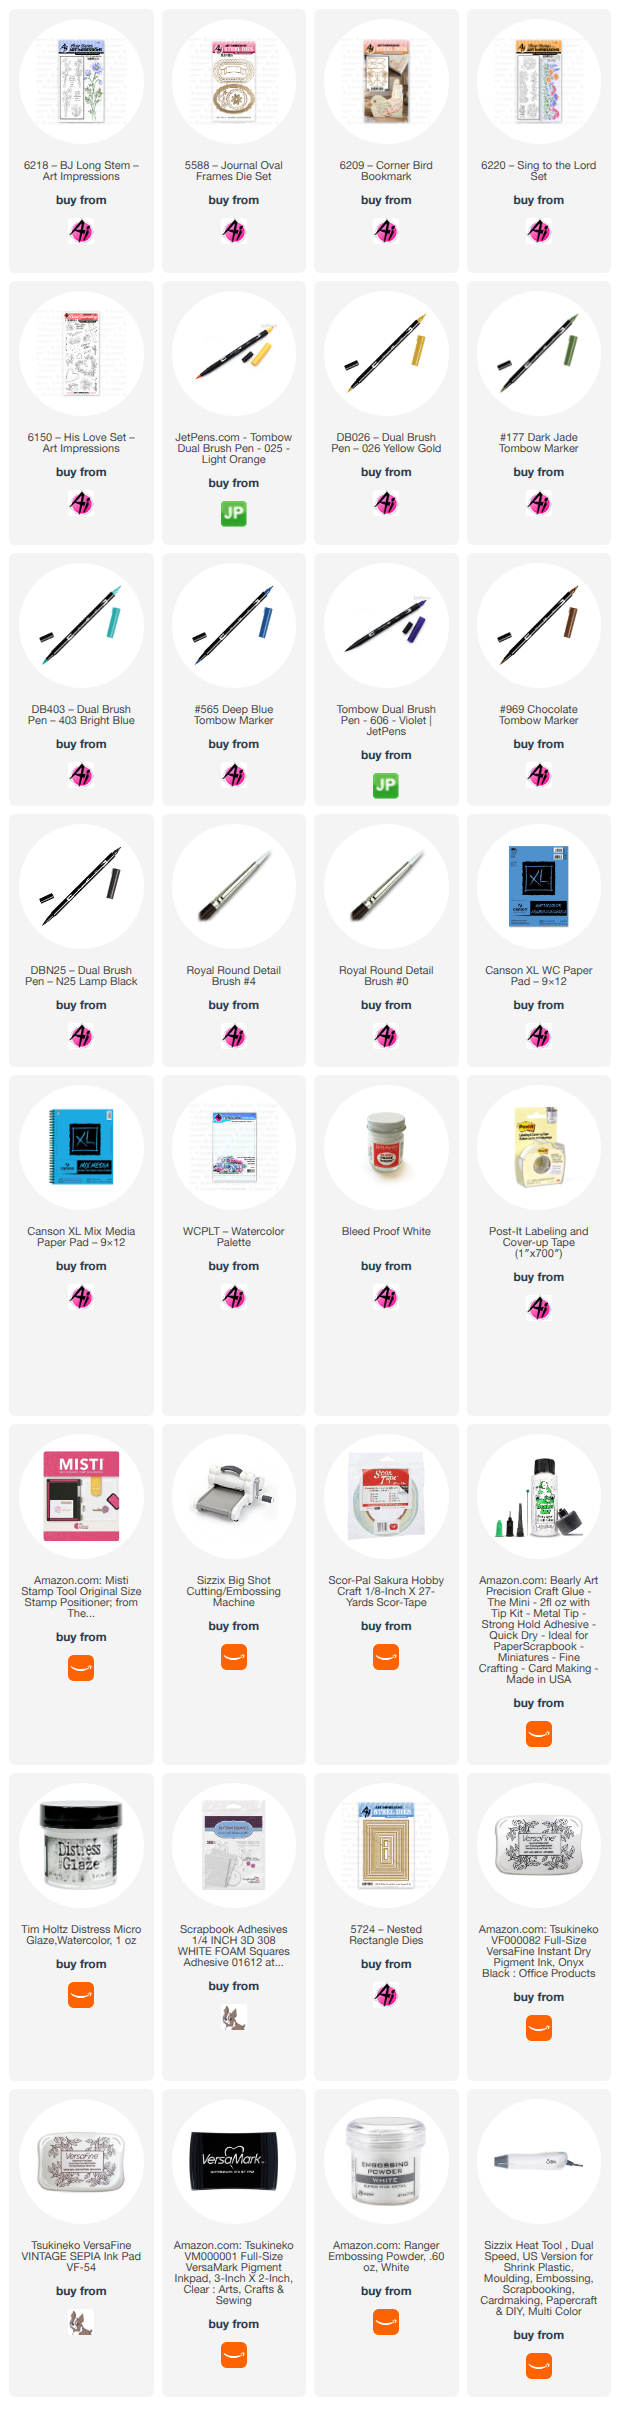
Patterned Paper: 5955 – Encouragement Paper Pack

Cardstock: gold metallic, white

Brushes: No. 4 round brush, No. 0 round brush

Stamps and Dies: 6219 – Hydrangea Margin Set, 5952 – Portfolio Template Set

Ink for stamped images: 526, 606, 177

Tombow Dual Brush Pens: 177, 526, 606

Other: Foam squares, Post-It Tape, Dr. Ph. Martin’s Bleed Proof White, Winsor Newton Gold Paint

I inked the flower petals in 526 and the leaves and stems in 177. After stamping the blue hydrangeas, I added 606 to the lower portions of the blooms and stamped again to create a soft blue‑purple blend.

Once all the elements were stamped onto Canson XL watercolor paper, I pulled the color from the lines with a damp brush and added additional color from my palette. The blue and purple tones blend beautifully to create depth and dimension. Using the bullet tip of 526, I dotted in the floral centers.

For the background, I pulled color from the edges of the image with a damp brush. When the panel was dry, I added tiny gold paint dots to the background and selectively to the stems and leaves.

Next, I masked off the edges of the painting with Post‑It tape, pressing firmly to prevent any bleeding. I painted the border with 526, and once dry, blended in 606 for added richness. Finally, I trimmed the finished panel to 1 7/8 x 5 1/2 inches.

To create the gold borders, I used one edge of the scalloped rectangle die from the 5952 – Portfolio Template Die Set to die cut gold metallic cardstock. Since the die wasn’t long enough, I extended the length by selectively die‑cutting and repositioning — there are lots of helpful YouTube tutorials on this technique. I adhered the gold strips behind each side of the painted panel.

For the card front, I trimmed patterned paper from the Encouragement Paper Pack to 4 1/4 x 5 1/2 inches and adhered it to a white A2 card base. The watercolored panel was then attached directly to the card front.

To add a little interest inside the card, I adhered a strip of coordinating patterned paper along the right edge. This design makes a lovely all‑purpose card, perfect for many occasions.

Pink Hydrangea Frameworks Gift Enclosure Card:

Sometimes it’s nice to have a small card for leaving a sweet note or attaching to a present or gift bag. This little enclosure card measures 3 1/2 x 2 6/8 inches (full card base: 5 1/4 x 2 6/8 inches).

Colors and Supplies Used

Paper: Canson XL Mix Media Paper

Patterned Paper: 6010 – Basic Pink Paper Pack

Cardstock: White

Brush: No. 4 round brush, No. 0 round brush

Ink for stamped images: 743, 606, 177

Stamps and Dies: 6219 – Hydrangea Margin Set, 6222 – Frameworks Set 4, 6062 – Hydrangea Floral Set, 5062 – Rounded Rectangle A2 Double, Stitched Dies, and 5726 – Nested Circle Dies

Tombow Dual Brush Pens: 743, 606, 177, N52, 403f

Other: Foam squares, Dr. Ph. Martin’s Bleed Proof White, sheer white ribbon, detail scissors, and envelope punch board.

I inked the frame and flower petals in 743, and the leaves and stems in 177. After stamping the pink hydrangeas, I added 606 to the lower portions of the flowers and stamped again to create a pink‑purple blend.

Once I pulled the color from the frame, I added touches of 606 for shading and used N52 to create shadows under the frame edge. For the background, I washed in a watery mix of 403 and added white dots with Bleed Proof White. Using the bullet tip of 743, I dotted in some floral centers.

I lightly sketched a cutting border with pencil and trimmed the image using detail scissors. Mix Media paper is thinner than watercolor paper, making it easy to cut cleanly. After attaching the sheer ribbon to the card front, I popped up the image with foam squares.

Inside the card, I die‑cut two panels from Mix Media paper using the Rounded Rectangle A2 Double Stitched Dies, plus a small circle from the Nested Circle Dies for the envelope seal. The sentiment is from the Hydrangea Floral Set, and the hydrangea images come from the top portion of the margin stamp. I created a coordinating envelope from white cardstock and patterned paper using an envelope punch board.

Thank you so much for spending a little creative time with me today. These hydrangea sets were such a joy to paint, and I hope they inspire you to pull out your favorite pinks, blues, purples, and greens this weekend. Whether you’re trying a new layout or revisiting a favorite technique, I can’t wait to see what you create. Be sure to tag us on social media. Until next time, Happy Painting!

Saturday, June 27, 2026

America’s 250th Birthday Card and Gift Tag by Diane Mason

 Hello, and welcome back for Watercolor Weekend!

Hello, my Ai Watercolor friends and fans! On July 4, 2026, the United States will celebrate its Semiquincentennial—the 250th anniversary of the Declaration of Independence. I’m old enough to remember the Bicentennial, so it feels extra special to experience a second milestone celebration in my lifetime. I’ve always loved the classic red, white, and blue color combination, and today’s projects are filled with plenty of those festive hues.

America’s 250th Birthday Card:

For this festive celebration card, I used the 5511 – Floral Truck Set and mixed in a few elements from the 5494 – Front Porch Patriotic Set. To set the perfect patriotic tone, I chose bold patterned papers from 6090 – Patriotic Paper Pack, which adds just the right splash of red, white, and blue.

Colors and Supplies Used

Paper: Canson XL Watercolor Paper

Patterned Paper: 6090 – Patriotic Paper Pack

Cardstock: red, white

Brush: No. 4 round brush, No. 0 round brush

Ink: Versafine Smokey Gray Ink

Stamps and Dies:

  • 5722 – Birthday Journal Set (dog and cake)
  • 5491 – Front Porch Party Set (birthday banner)
  • 5562 – Journal Letter Die Set
  •  LF3799 – Lawn Fawn Build-A-Cake Dies

Tombow Dual Brush Pens:

  • Dog: 977, 969, 856 (cheeks and collar)
  • Party hat, banner, and numbers: 856, 555, 565
  • Cake: 856, 555, 565, 942, 992
  • Cake Stand: 451, 565
  • Truck body: 856, 565
  • Windows: 451 
  • Tires: N25
  •  Hub caps and lights: Winsor Newton 14ml Silver Paint
  • Flower pots and bunting: 856, 555, 56
  •  Florals: 856, 555, 993 (red flower center)
  • All greenery: 177
  • Fireworks bucket: 856, 555, 451, 565, 977
  • Flag: 856, 555, 565, 977, Winsor Newton Silver Paint
  • Candle flames: 025, 933, 993, and 856

Other: Foam squares, Post-It Tape, Dr. Ph. Martin’s Bleed Proof White


Once I had all the elements painted, I assembled the pieces and popped some elements up with foam squares (truck bed, fireworks bucket, blue flowers pot, red flowers pot, and flag).


I cut a 2 inch by 5.5-inch piece of blue patterned paper and a 2.5 inch by 5.5-inch piece of red and blue striped patterned paper and adhered to an A2 red card base. The floral truck and the remaining elements were glued to the card front. I die cut the scripty Celebrate die (5722 – Birthday Journal Set) from shimmery white card stock and adhered it to the card front.

Inside the card, I added die cut numbers using dies from 5911 – Large Number Die Set and chose predominately red, white and blue patterned papers to die cut 250. I added flames to each number to resemble candles (flames were die cut using Lawn Fawn Build-A-Cake Dies #LF3799).


For the white mat and pop-up mechanism, I cut a piece of white cardstock measuring 8 1/8 x 5 1/8 inches and folded it in half. I then positioned my numbers along the fold where I liked them and marked the center of their placement with a pencil. Then I used a ruler to draw two cut lines for each letter about a 1/2 inch long. I used my Fiskars paper trimmer to cut along the pencil lines from the fold (you could also use a pair of scissors). I then opened up the folded cardstock and pushed the cuts forward to create the pop-ups and refolded the card.

I stamped the Happy Birthday sentiment from my stash using Versafine Onyx Black ink. Before adhering the mat to the card base, I added ¼‑inch strips of patterned paper to the top and bottom edges for a little extra color and balance. Finally, I glued the numbers onto their pop‑out openings. It turned into such a fun, dimensional, interactive card—perfect for celebrating this historic occasion!

America’s 250th Birthday Gift Tag:

To go along with the card, I created this adorable gift tag featuring my favorite little puppy stamp paired with the layered birthday cake from the 5722 – Birthday Journal Set. It’s a sweet, patriotic accent that ties the whole celebration ensemble together.

Colors and Supplies Used

Paper: Canson XL Mix Media Paper

Patterned Paper: 6090 – Patriotic Paper Pack

Cardstock: White

Brush: No. 4 round brush, No. 0 round brush

Ink for stamped images: N52 (cake), 969 (dog), N52 (party hat)

Stamps and Dies:

  •  5722 – Birthday Journal Set (dog and cake)
  • 5491 – Front Porch Party Set (birthday banner)
  • 5562 – Journal Letter Die Set

Tombow Dual Brush Pens:

  • Dog: 977, 969, 856 (cheeks and collar)
  • Party hat, banner, and numbers: 856, 555, 565
  •  Cake: 856, 555, 565, 942, 992
  •  Cake Stand: 451 and 565

Other: Foam squares, Dr. Ph. Martin’s Bleed Proof White, glue, red baker’s twine, Spectrum Noir Clear Sparkle brush pen, tag die and detail scissors.


I painted and die cut numbers for the cake candles using the numbers dies from 5562 – Journal Letter Die Set. The dog and cake images were fussy cut with detail scissors. The birthday banner is from 5491 – Front Porch Party Set and is popped-up on the tag with foam tape as well as the dog. The cake and numbers are glued directly to the tag. Dr. Ph. Martin’s Bleed Proof White was used to paint the candle wicks. For extra sparkle, I added Spectrum Noir Clear Sparkle brush pen to the banners, the numbers and the white frosting.

I adhered a plain white tag to the back and stamped the to/from image from my stash using Versafine Onyx Black ink. To finish the tag, I added red baker’s twine, looping it through the hole for a simple, festive touch.

As we look ahead to America’s 250th birthday, it feels wonderful to celebrate with handmade projects that capture the spirit of red, white, and blue. I hope these ideas inspire you to create something patriotic for your own celebration. Until next time, Happy Painting!