
Happy July everyone!
And, Happy Watercolor Weekend!

I don't know about you, but I'm always so excited to see what our Watercolor Design Team comes up with for our Watercolor Weekend posts. You can find these watercolor filled posts the 1st and 3rd Saturday of each month. Our designers share their cards and give you a step by step guide with colors used in case you'd like to give their paintings a try.
This week, our first designer up is Tricia.
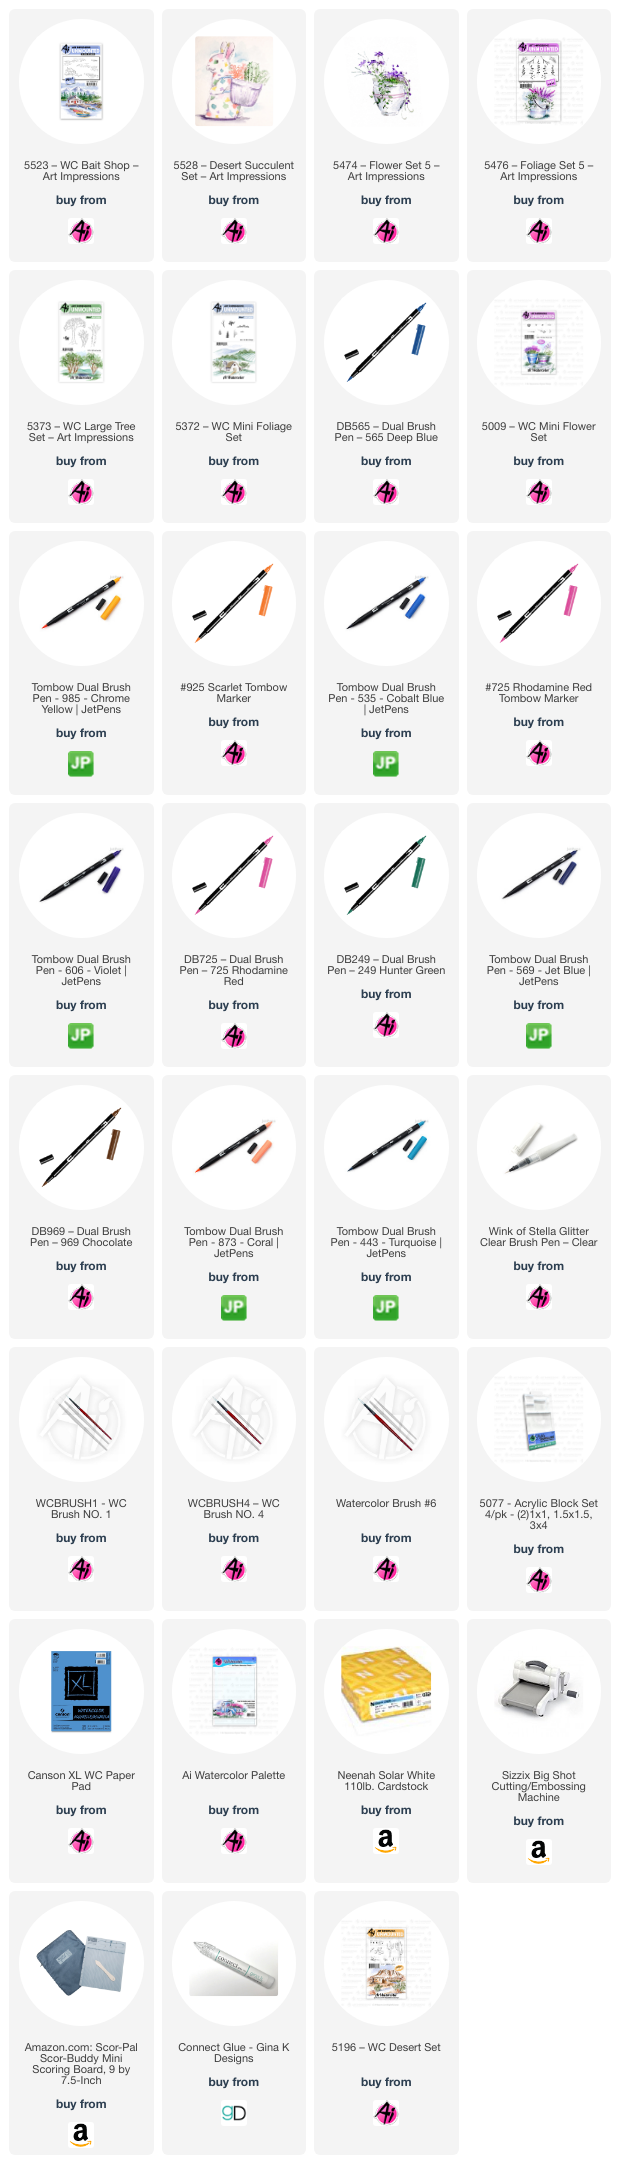
I started out with the wet in wet technique to create the water on the right side of the painting. I left the area on the bottom left white for the coral. Once it was dry, I added the boat (it went awry, next time I’ll make it a lot lighter). I added some darker color to the lower right and let it move and spread in the water, then let it dry naturally. Make sure to keep it light, layers!

While that dried I added some of the coral that didn’t touch the water areas. This was the best part! I took some of my flowers and foliage that reminded me of plants from the sea and stamped them in bright colors. Use your imagination, what can you transform today?
The yellow coral is actually the small cactus from the Desert Succulent set (I used a lot of stamps from this set) inked with 985. I stamped it in the side left and bottom right. I masked any of the coral I wanted to be in the front before I stamped additional images.
Next up, from the succulents set, told you, I made what I am calling an anemone. I inked just the top of the stamp with red (not sure what it is called) and stamped it several times, bringing the color down a little towards the middle to give it depth. I added some 969 in the middle.
For the middle of the two, I inked the top of the tree up (it looked like coral to me) and pulled the color out of the lines by running my brush along one side and rounding the ends with water. I added some pink to it and then added white highlights once it was dry. I used the leaves from that set inked in orange and stamped randomly around the bottom. I pulled the color out – be random and crazy like coral!
I took the small blower bunch from from the mini flower set and inked the top and some of the stems in 725. I stamped it several times around. For the purple coral, I used the large cactus from the Desert set inked with 606. I pulled the color out of the lines and used a white gel pen to make dots. Lastly, the succulents plant inked with 346 added a nice accent. I used the small flowers from the Flower Set 5 inked with orange to make the fish. I added a little white to their bodies. For a little accent I stamped some of the hanging leaves.
For the sea, I added some 912 and 873, my favorite sand colors, along with some green blue- I stamped the small scribble flowers into the blue and pull the color down to create another reef. With some white highlights and darker areas underneath, I am trying to pull it into the background.
I added some additional flowers and created the sky with the wet-in-wet technique. I added some darker color to the highlights and some white where I missed some highlights.
This project took a little more time, but it was fun trying to find more water flowers to use! I can’t wait to see what you come up with. Thanks for stopping by and have a crafty day!
Hello Ai Watercolour fans!
I've done a little masking today to put my scene together.

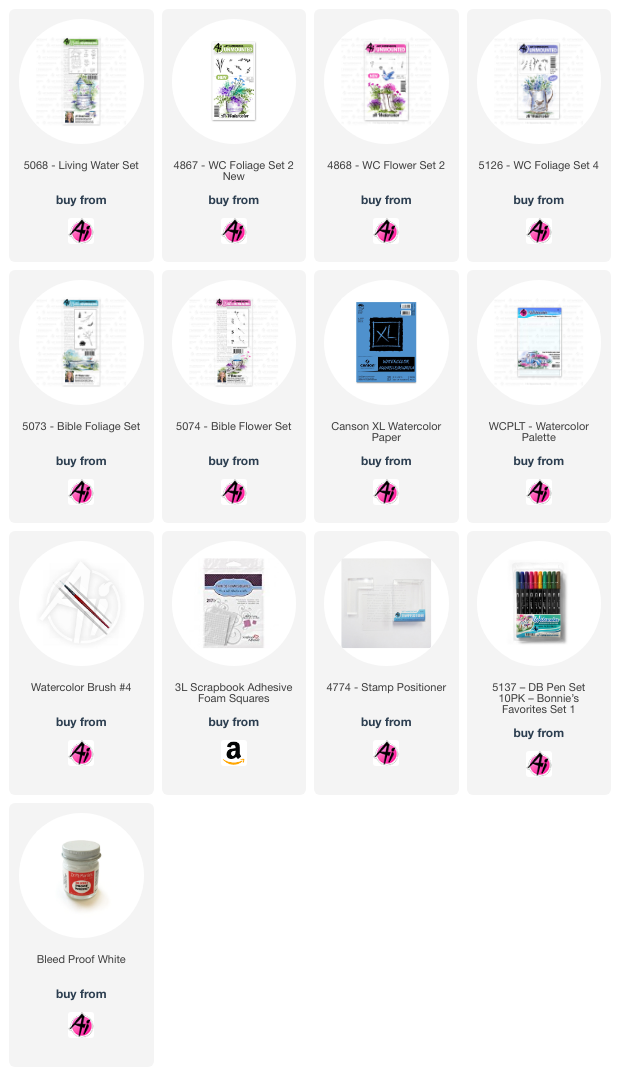
Using 5068 - Living Water Set, I positioned the bucket along with the geese from 4207 - Feather Friends on the same block, and stamped them onto my Canson XL Watercolour Paper using Tombows #969/565. After masking them both, I used my stamp positioner to place the wishing well just behind them. I pulled the colour out of the lines with a damp brush, using it to create the greys of the stones and rocks, and shadowing the wood and geese. I used the Daisy Bunch from 5074 - Bible Flower Set and #565 as the flowers in the bucket, then stamped my greenery from 5126 - WC Foliage Set 4 on either side of the well in #126. Tones of #992/977/969 were used for the bucket and wooden posts, to create an aged, weathered wood look, and #407 was painted on the roof and spindle. With the medium sprig from 4867 - WC Foliage Set 2 New, and #177, the vine was stamped to be winding up the well onto the roof, and after dampening it with water, I went in a second time to add some darker branches. The heart circle from 4868 - WC Flower Set 2 was stamped in clusters using #993 to add in the yellow flowers. I used my #905 and 933 markers directly on the paper to colour in the beaks and feet of the geese. *To make sure that the geese didn't fade into the background, I made sure that there was enough greenery behind them to give contrast to their white bodies.

The small grass from 5073 - Bible Foliage Set was stamped repeatedly in #126 to add touches of grass around the scene, and a wash of the green extended the look of grass on the ground. To finish up, I used Bleed Proof White ink to add white centers to my blue flowers, used #565 to add shadows on the well, the rock and around the geese - and finally, used my blue Twintone marker to add a few dots, and darken up some of the lines. A wash of # 493 was painted in as the sky.


Don't forget to check out the Art Impressions sale category for the best deals.


3 comments:
Love the cards. They are all beautiful.
Beautiful work from all three extremely talented artists! You continuously blow me away with your work!
Love the beautiful cards.
Post a Comment