

Hello, Ai Watercolor Fans! It is time for another Watercolor Weekend, a special blog post featuring projects from our Watercolor Guest Design Team. Today we welcome Karen Day as our new design team member! You may remember Karen's beautiful cards from our weekly design team, so please welcome her back in the comments. Inspiration today includes plenty of beach-inspired scenes, as well as that cute bicycle we all love so much. Let's take a look!
Hello Watercolor Friends,
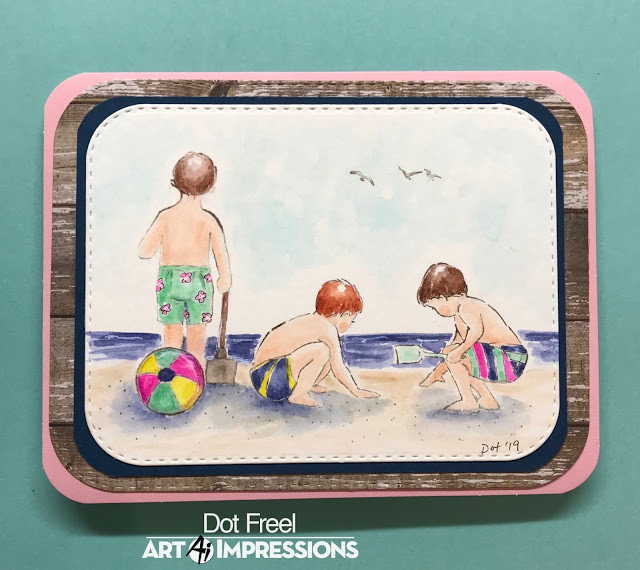
You may think it's a little early for beach scene cards but my three grandsons, Conor, Caide and Charlie, are in Hawaii right now probably in a similar scene. Lucky boys! I made this card for the Art Impressions Watercolor Weekend using the brand new 5119 - WC Beach Boys Set. There's also a WC Beach Girls set which I have to get! The first thing I did was stamp the boy in the middle (Caide) using 40 brownish grey. Next I stamped the beach ball and then masked it off and stamped the standing boy (Conor) also in the 40 brownish grey. I stamped the third boy (Charlie) again in the 40 brownish grey. I used 77 pastel peach on the palette to watercolor each boy. I used 6 brown to color in the hair of the boy in the middle. I used 969 brown for the other two boys' hair. Coloring their trunks was fun. First I added the stripes and flowers using my favorite Copic Multi Liner 0.03 pen. I colored the trunks and beach ball using the 5 yellow, 565 blue, 725 pink, and 34 pale green. I used the 969 brown to color in the shovel handle and 40 brownish grey for the actual shovel. I used 990 to watercolor in the sand and 565 to color in the water and 36 manganese blue for the sky. I added 565 blue to the palette to watercolor in the shadows under the ball and kids. I used the 40 brownish grey fine tip to add the dots to the sand. I stamped 3 of the birds using the 40 brownish grey from the 5069 - My Fortress Set. I used a Signo White Pigment Ink pen to add white caps into the ocean, the high light on the ball and dotted the centers of the flowers on the swim trunks. I used my Copic pen to sign and date it. I cut it out and framed it using the 5062 Double Stitched Rounded Rectangle Dies and a rounded corner punch for the card itself.
You can find more inspiration by following me on my Instagram account here.

I started creating my image cluster by stamping the puppy from the WC Mini Critters Set, the sitting little girl from WC Beach Girls Set, the beach ball from WC Beach Boys Set - masking each as I went along - and finally stamping the umbrella from WC Beach Girls Set. I coloured each of the stamps with my 992 Sand Tombow marker, except for the girl, where I used my LP38 Oyster Grey Marvy marker. I wanted a paler shade for her skin tone, as she's sitting partially in bright sunlight. I also used the fine tip of my LP38 marker to draw in the blanket. With a damp WC Brush4 paintbrush, I softened all of the lines, and then began filling in the colour by scribbling my markers onto my palette: Tombow 991 Straw for the hat/ball; Tombow 885 Warm Red for the umbrella, and added more water to make it more of a pink shade for her swimsuit & the ball. I used my LP86 African Violet Marvy marker to create the shadow under the umbrella, and in and around all of the images on the blanket. Her skin tone is made with several layers of Tombow 850 Flesh, and then I used the same colour to sketch in the suggestion of a sandy beach. I picked up the LP86 with my brush and painted in the water, and after watering it down a little more, used it to paint in the suggestion of a sky as well. *Design tip! You'll notice that I placed everything on the left side of my painting, leaving the upper right corner mostly white. The white space provides a sense of balance for the cluster of images. I could've added a sentiment up there, but felt like it would've been too busy. To assemble my card, I popped up the image and the stripey pink frame that I created with adhesive dots with my periwinkle cardstock peeking out from behind. Happy painting!

Step 1 - The Planter: I stamped the planter from the WC Window set inked in 969-Chocolate. I left off the bottom of the planter so I could stamp the small grasses below it to ground it. I added some additional color (969&569) from my palette and added some additional lines to make it look like wood slats. I also added some additional details with the fine tip of the marker.
Step 2 - The Bike: To protect the planter, I masked it off and stamped the bike inked in Chocolate. I pulled the color out of the lines and added some additional color from my palette.
Step 3 - The Foliage & Flowers: I inked the small vines from the Foliage Set 4 set with 249-Hunter Green and stamped it into the planter as well as both bike planters. I added water to the foliage.
I used the small flower from the Foliage Set 2 inked with 725-Rhodamine Red and added them to the planter. I used the same color to ink the single flower from the Mini Flowers set and stamped it into the back planter. I used 636-Imperial Purple to ink the small dots in the Mini Flowers set to stamp into the front and back planters.
I inked the small grasses with the Dark Jade and stamped below the planter. I added water to all the blooms and grasses. I added a small amount of 526-True Blue to the sky. Sign and Date!
Step 4 - The Card: I cut the square out with a stitched square die. I cut mat from Gina K Black Onyx card stock about 1/8 bigger than the square. I added some white craft foam to the back of the watercolor piece. I had a piece of watercolor background that I had from another project made from watercolor markers which I used to cut a stitched banner from the new stitched banner dies. I cut a little bigger one from Black Onyx card stock. To make the weathered wood background, I scored a white piece of card stock at 1" intervals. I added some Dark Chocolate ink from Gina K Designs direct to the paper in long swipes. Finally, I white heat embossed the Hello from the new WC Sentiments 2 set.
I assembled the card and added it to a white card base. And that's it!

Thank you, team! These projects are just so lovely! Like what you see? Be sure to leave a comment to let us know! Also, don't forget to follow the pink links by the designer's name to visit and follow them on social media, you're sure to find more project ideas with them, too!
Happy Stamping!
4 comments:
Wow!!! Karen’s cars is so beautiful!!!
Wow!!! Karen’s card is so beautiful!!!
Great inspirations!
Wonderful projects!
Post a Comment