Hello everyone and welcome to week two of our Making Spirits Bright challenge!
As promised last week, we have Janet's feature tutorial for you. Her card is so full of sparkle and cheer that it's sure to make everyone's spirits bright! Let's see what Janet has prepared for you!
Hello everyone! It's week 2 of our Making Spirits Bright challenge. To participate and possibly win free stamps from Ai, you just need to make an upload a holiday themed card to our challenge post.
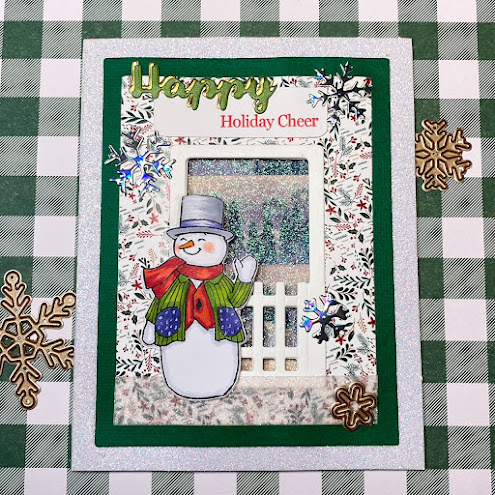
Today I'm showcasing the 5779 - FB Snowman stamp and die set. To begin this project, I stamped the front and back of the snowman, colored them with Copic markers, and cut them out with the dies included in this set. I glued them together. Because they are a Front Back set, they match up perfectly when glued glued with wrong sides together.
To make the front of the card, I started with a white glitter A2 sized card. I cut a piece of holly cardstock from the 5812 - Christmas S2 PP with the 3rd largest rectangle die from the 5724 - Nested Rectangle Dies set. I cut another piece of green cardstock with the largest rectangle die. I glued these on top of each other and then glued the stack to the top of the card. I used the rectangle die in the 5719 - FB Fence & Window Dies to cut a rectangle in the three layers of cardstock. This die is exactly the correct size so that the fence die in this set fits around the rectangle. After cutting the rectangle, I cut two fence pieces and glued one on the front of the car and the other on the inside.
Inside I added a rectangle covered in winter glitter washi tape. When the card is shut, the glittered trees and snow show through the window cut with the fence die.
Janet - YouTube - Blog - Facebook - Instagram - Pinterest
What a gorgeous card Janet!! Thank you for such amazing holiday inspiration!
Now for the rest of the Design Team.
You saw my card last week and can find all of the details here.
Next we have Tasha who used:
4936 – Christmas Wonder Set
5782 – Snowflake Frame Die
5566 – Christmas Sentiments
WC Poinsettia Set (5828)
Lg Snowflake Dies (5353)
Snowflake Frame Set (5782)
Christmas Sentiments Set (5566)
Christmas S2 Paper Pack (5812)
You are invited to the Inlinkz link party!
Click here to enter


No comments:
Post a Comment