Showing posts with label Nativity Mini TryFold. Show all posts

Monday, November 6, 2017

wood slice ornaments by Diane Zechman

Hello Ai friends and happy Monday!
 
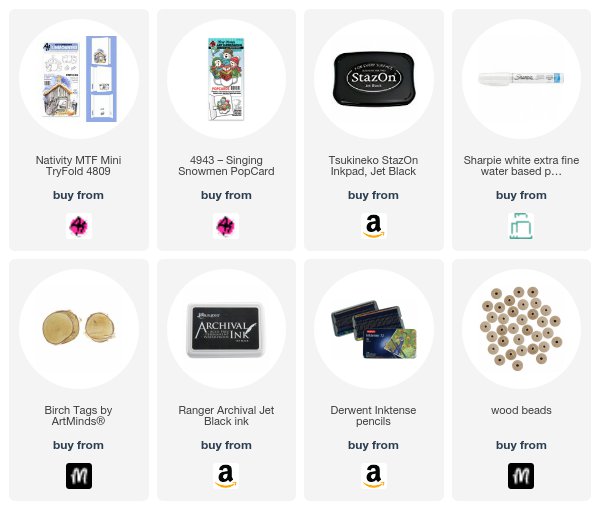
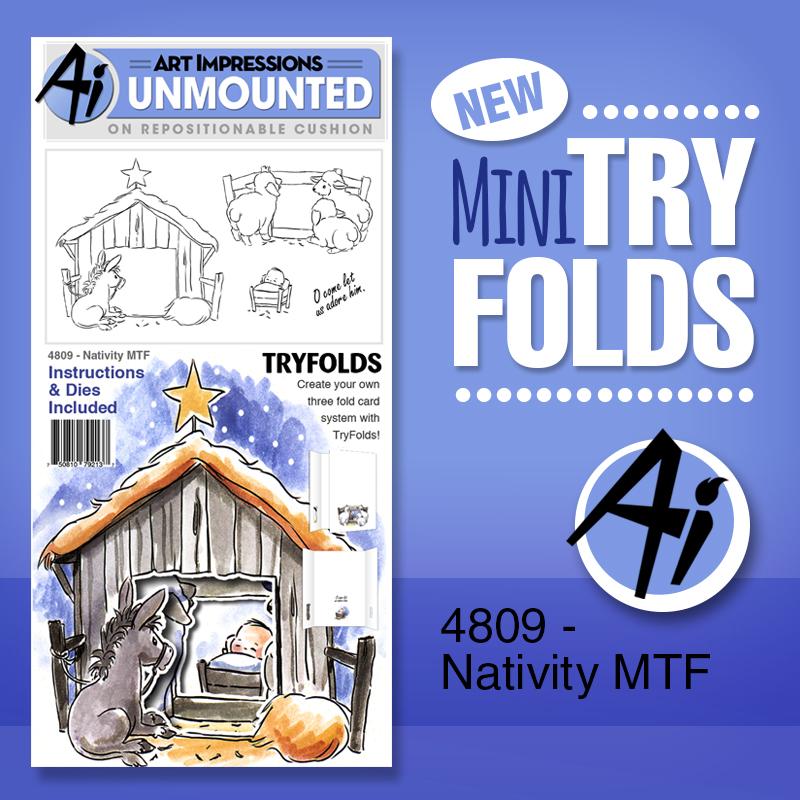
Today I am sharing a Christmas project using two different Ai stamp sets... 4943 Singing Snowmen PopCard and 4809- Nativity MTF. The PopCards and Mini TryFolds images are SO fun to use as they were intended (creating interactive cards) but can also be used many other ways! Today I made some Birch Tag (wood slice) ornaments!
 

To begin, purchase some wood slices (or cut them yourself if you can!).  I purchased these Birch Tags at Michael's and Hobby Lobby. I've also ordered some from Amazon which are a different type of wood and I haven't used them yet. But I'm assuming I will have similar results.  The wood slices from Amazon are approx. 3/16" in thickness compared to the M's and H.L. ones which are 1/2" thick.  My husband drilled holes in these for me but some come pre-drilled too.
 
Next you need to choose the Ai images you want to use. Remember that you can use just a portion of your image if it is too large.  The snowmen I used are from the new Singing Snowmen PopCard. For one, I stamped and masked the songbook before stamping the snowman.  Stazon ink works well but I used my Archival Black because that pad of mine seemed juicier at the moment and it also gave me the permanent ink that I needed for coloring.
 
I wanted to try the Inktense pencils on them and add water with a brush so the color would smooth out and wouldn't just sit on top of the wood.  It might be easier to do some shading if you just use regular colored pencils such as Prismacolor.  It's difficult to blend or shade this way but I do like the look. The wood soaks up the water so quick...you don't need to worry too much about bleeding out of the lines as long as your pencil color stays within! I used a tiny #10 brush.
 

Here are my finished ornaments. A sentiment was stamped on the back of the snowmen ones. Don't forget to also sign and date!  I also added some "snowflake" dots with a white paint pen. To finish them, I added a small wood bead to the top of the twine (use a 9" piece).


I wanted the nativities to be more rustic, so I only spotlighted the star and manger by coloring with shades of brown.
 
Inktense colors- Beech Green, Cherry, Chilli Red, Carmine Pink (cheeks), Neutral Gray, Sienna Gold, Saddle Brown, Amber, Tan.


Have a great Monday and… happy stamping!


Saturday, December 10, 2016

Nativity Mini Tryfold

Hello AI Fans

My opinion - This is ONE of my favorite Christmas Stamp Sets AI has ever done.  I absolutely love it!  Today I'm featuring the new Nativity Mini Tryfold Set.  I had a lot of fun teaching this card at our local Scrapbook Paradise store in Reno. I will admit that layering them up like this takes a lot of cutting, but with the dies being included in the set, it makes it a lot easier.

First thing I did was make a negative of the die cut. On a smaller scrap of paper, put the die in the center and run it through your machine.  You can throw the part that was die cut away, and keep the outside of the paper with the die cut hole in the middle. TIP - keep that negative with your stamp set so you can use it over and over in the future.  I stamped the image on watercolor paper and die cut it. From there, I lined it up with the mat, and penciled around the inside of die cut.  I then used the negative of the die cut to line it up with my pencil marks, held it down with washi tape, popped the die into the negative space and ran each piece through my die cut machine. Voila - perfectly layered die cuts!  


I used some masking fluid and the small tip of my water brush handle to make the falling snow. (will do until I can get a Molotow Grafx Masking Marker).  Once the masking fluid is dry, you just paint your background over the top of the masking fluid. When your image is completely dry, rub off the masking fluid and you have the illusion of a snowy sky! 


I honestly LOVE LOVE LOVE this stamp set!!! I am making a number of these to send out as Christmas cards. 

Thanks so much for stopping by today and hope you have a wonderful weekend! Crafty hugs!!

colors used: Sepia, Ochre, dark brown, African Violet, Brownish Gray, Brilliant Yellow, Black, Rosewood, Pink


Friday, December 2, 2016

Come Let Us Adore Him!

Hi Ai Fans!
Happy Friday!! Today I am sharing with you one of the new Mini Tryfold stamps sets from Art Impressions. This one is called "Nativity MTF". This set was so easy to use as all the instructions, stamps and dies for how to complete your project come with the set! Having said that..... I followed along with the instructions but made my tryfold base smaller as I wanted to mount it on the front of my card. 
The size of my little white section is about 3x3". I used a ribbon to keep it shut and added a Tomboy fastener on the back for easy opening. That way the bow stays nice when you want to close it back up.
The Photoplay "Luke 2" 6x6 collection was the perfect choice for my papers!
I added some paper on the back of the layers as when you colour it with your Copics some of the ink bleeds through and this hides that problem.
On the inside of the card I used the Ai Sentiment called "The Season"
Copics Used:
BG90, BG93, BG96, BG99
W00. W01, W3, W5, W7, W8
E00, E11, E30, E31
Y00, Y15, Y17, Y26, Y28
R20, R59, B000

Don't be afraid to try the Mini Tryfolds! They are super easy and so much fun! You will wow your card recipient!

Happy Stamping!
Supplies:

Thursday, September 22, 2016

Challenge 193 - Cards to DIE for (Inspiration Galore!)

Hello, Ai Fans!

We are back with more inspiration for the second week of our "Cards to DIE for" challenge, a challenge all about using die cuts! We are featuring FOUR new products today, including some of our most popular items from our Summer 2016 releases! Our Nativity Mini TryFold is a beautiful three panel folded card looking in on the manger scene, including four stamps and two dies! Our new Placecard Pals are unique die sets for creating table settings or papercraft projects! This line includes a Cat & Owl Placecard Set, as well as a Christmas Placecard Set for creating a sweet Snowman and Santa. And last but not least, we've created a beautiful set of Snowflake Dies, perfect for adding to all your holiday cards!
NEW Mini TryFolds  NEW Placecard Pals
Christmas Placecard SetCat _ Owl Placecard SetNativity Mini TryFoldSnowflake Dies

Last week Sharon posted a fabulous tutorial for the Placecard Pals, be sure to check it out if you haven't already! Today, the whole design team is here to share their super creative projects with these new stamps and dies! Be sure to visit their personal blog for more info about their crafts!

Cheri with Cat & Owl Placecard Set
Wow, amazing!! Way go to, DT! Alright, fans, are you inspired? We want to see your brilliant cards using die cuts! The card or craft can be for any occasion, but be sure to give us a card to DIE for!


Here are the challenge rules …
✻ Please make a new card or creation. You can make any crafty item you wish; this is not limited to cards!
✻ Limit two submissions per person. You will receive extra votes if you use Art Impressions stamps!
✻ The Ai Challenge is open to everyone, international submissions are welcome!
✻ Include a link back to the Ai Blog or grab our button on the top right of our sidebar!
✻ Share the Ai love by clicking and commenting your fellow crafters.
✻ Make sure to get your link up by Wednesday, September 28th at 5:00 p.m. PST to enter your creations.
✻ Good luck and happy stamping!