Tasha here sharing a new card inspired by the current Art Impressions LEON Day! Challenge. Can you believe we’re already halfway to Christmas? LEON (which is “NOEL” spelled backward) is the perfect time to start thinking about winter cards, and I had so much fun creating this snowy design!
For my project, I used the adorable 5954-Woodland Bears Set. I just love this little bear and the sweet bird; it’s such a cozy winter scene! I stamped the main image with black ink and used the coordinating die to cut it out before coloring the image with Copic Markers.
To build the background, I layered white cardstock to look like a snowy hillside and added several pine trees behind the bear to create a forest effect. For the sky, I used a snow print pattern paper with falling snowflakes; it really adds a winter feel.
To complete the card, I added layers of silver glitter paper for some sparkle, along with green, white, and blue cardstock. I also included a piece of Art Impressions’ winter-themed patterned paper to tie everything together.
I hope you enjoyed today’s card and feel inspired to join the LEON Day! Challenge; it's a great excuse to start your holiday crafting early!
Hello Ai fans and welcome to our latest challenge!
LEON Day!
You might be asking yourself "What is LEON Day?"
I just recently learned myself.
Leon Day takes place on June 25th. Leon is Noel spelled backwards and June 25th is halfway to Christmas. So, we're asking you to make something Christmas or winter themed for our challenge.
June 25th will be extra special for me next week because my daughter's birthday is June 25th and she's turning 25, it's called a Golden Birthday. This is because the day of your birth (25th) matches the age you are turning (25). She even has an extra 25 in hers because the year matches as well so hers is called a Beddian birthday. Super cool.
Lynn is our Featured Artist for this challenge and she created the cutest little gift tags and has a wonderful video tutorial for you.
Be sure to scroll all the way down to find the winners of our last challenge.
Now, let's look at Lynn's fabulous Christmas gift tag project!
I know it's only mid-June but... today's tags were inspired by the current Ai "LEON Day!" Blog Challenge! Leon is Noel backwards and is a great way of celebrating the half-way point to Christmas and the holidays!
I thought this would be a fun way to get a bunch of holiday gift tags done and ready to add to Christmas gifts! We will create 6 tags, and I will talk a little bit about mass producing these tags in an easy and efficient way in today's video!
We will be using the Ai Mini Christmas Village Set (5977) to create all 6 of these tags. These tiny little images will be perfect for some quick and easy coloring and cutting. This set is part of the Ai Village Series and will coordinate perfectly with your Village Freebies, and the three add-on sets (Ai Village Signage, Ai Village Vehicles, and Ai Village Accessories).
Let's begin by stamping and coloring all of the images using the Zig Clean Color Real Brush Pens in the following colors: Blender, Sugared Almond Pink, Deep Red, Scarlet Red, Peach Pink, Yellow, Lt Green, Green, Ice Blue, Lt Blue, Cobalt Blue, Violet, Lt Brown, Beige, Mid Brown, Dk Gray.
For the tags we will be using the stitched label die from the Ai Decorative Journal Page 1 Set (5768). Let's die-cut these from some Kraft 100lb cardstock.
Next, we will add some white ink around the edges of the tags, to soften the look a bit. Then we will use the Dr Ph Martin's Bleed Proof White Ink to spatter some "snowflakes" around each of the tags.
Now let's stamp a bunch of sentiments from the Ai Christmas Sentiments Set (5566) and cut these into thin sentiment strips. We will be attaching these to some pretty holiday papers from the Ai Christmas Paper Pack S2 (5812). This is the fun part.... just selecting some fun patterned papers to go behind each of the sentiments! We can attach these to each of the tags!
Let's pop up each of the images on our tags and then for some sparkle and bling we will add some clay peppermint candies and some pretty gems.
Finally, we will add some red/white baker's twine to each of the tags. These are an easy and fun project to make ahead and to have on the ready for the holidays or to give as a gift to a friend!
Thank you so much for joining me today! Have a fun and crafty day!!!
We hope you love Lynn's little tags and tutorial as much as we do!
Not quite ready for Christmas? This idea could be changed up for any occasion.
Now let's see who won our Blossoms & Blooms challenge.
Our Top Spot went to Betty Crunk for her FABULOUS window sills lined with flowers. 5511 – Floral Truck Set
Please contact Leah at Feedback@artimpressions.com
to claim a free stamp set of your choice!!
Be sure to grab our badge to display on your social media too!
Our Lucky Random Winner was Gabriella B.
Please contact Leah at Feedback@artimpressions.com
to claim a free stamp set of your choice!!
Be sure to grab our badge to display on your social media too!
Be sure to enter your creation for the chance to win a free stamp set from Art Impressions.
We award one Top Spot and one Lucky Random Winner and each will win a free stamp set from Art Impressions.
✻ Please make a new card or handmade crafty creation. You can make any item you wish; this is not limited to cards! (unless specified)
✻ Limit two submissions per person.
✻Please include your first name and last initial on your submission. You may include your entire last name, but it's not necessary.
✻We love to comment on your entries, but keep in mind if you use a private group or a platform that you need to sign up for, we probably won't be able to.
✻ The Ai Challenge is open to everyone, international submissions are welcome!
✻ Include a link back to the Ai Blog or grab our button on the top right of our sidebar!
✻ Share the Ai love if you can, by clicking and commenting on your fellow crafters.
✻ Make sure to get your link up by the deadline to enter your creations.
I'll be the first to admit it. I have a holiday earring addiction.
It was costing me money. Lots of money.
I work in an elementary school and so we dress in holiday attire a lot. About a year ago I started making earrings out of Art Impressions dies and paper. These are a few of what I made for myself and for school friends.
These are for my friend Holly who is the one who inspired my to make earrings.
These are for sweet Ellie who is an older woman who works in our cafeteria. She has very short hair so smaller earrings still make a statement on her. I actually gave them two her over a week ago and she's worn them 3 times.
These are ALL ME!! I have a black sweater with a white snowflake on the front and back and I wanted something to compliment that.
This pair is also all me! I just love snowflakes and this vision.
This pair is yet to be determined. LOL! I may keep, I may gift them...we'll see.
This pair is also for me. Those little pine cones are just so darling!
My friend Katie has two green dresses.
I made these for her. As I was packing up for work I thought they needed a little something. I through a rhinestone in the center of the bow and was very happy with them. I didn't have time to get a picture though. When I got to work and handed them to her...she was actually WEARING one of the green dresses! She immediately put them on and loved them.
This pair was for Shelly and I made a set for myself.
I have SO. MANY. EARRINGS!
For those wondering...paper earrings??? Well, they're not indestructible. I don't wear them when heavy rain is expected. I use three layers of paper. I use the patterned paper in the front, the Canson watercolor paper which is heavy duty, in the middle and then the patterned paper on the back again. Many of these earrings spin around and I want the back to be as pretty as the front if that's what's showing.
Please think outside the box when you order your Art Impressions stamps and dies.
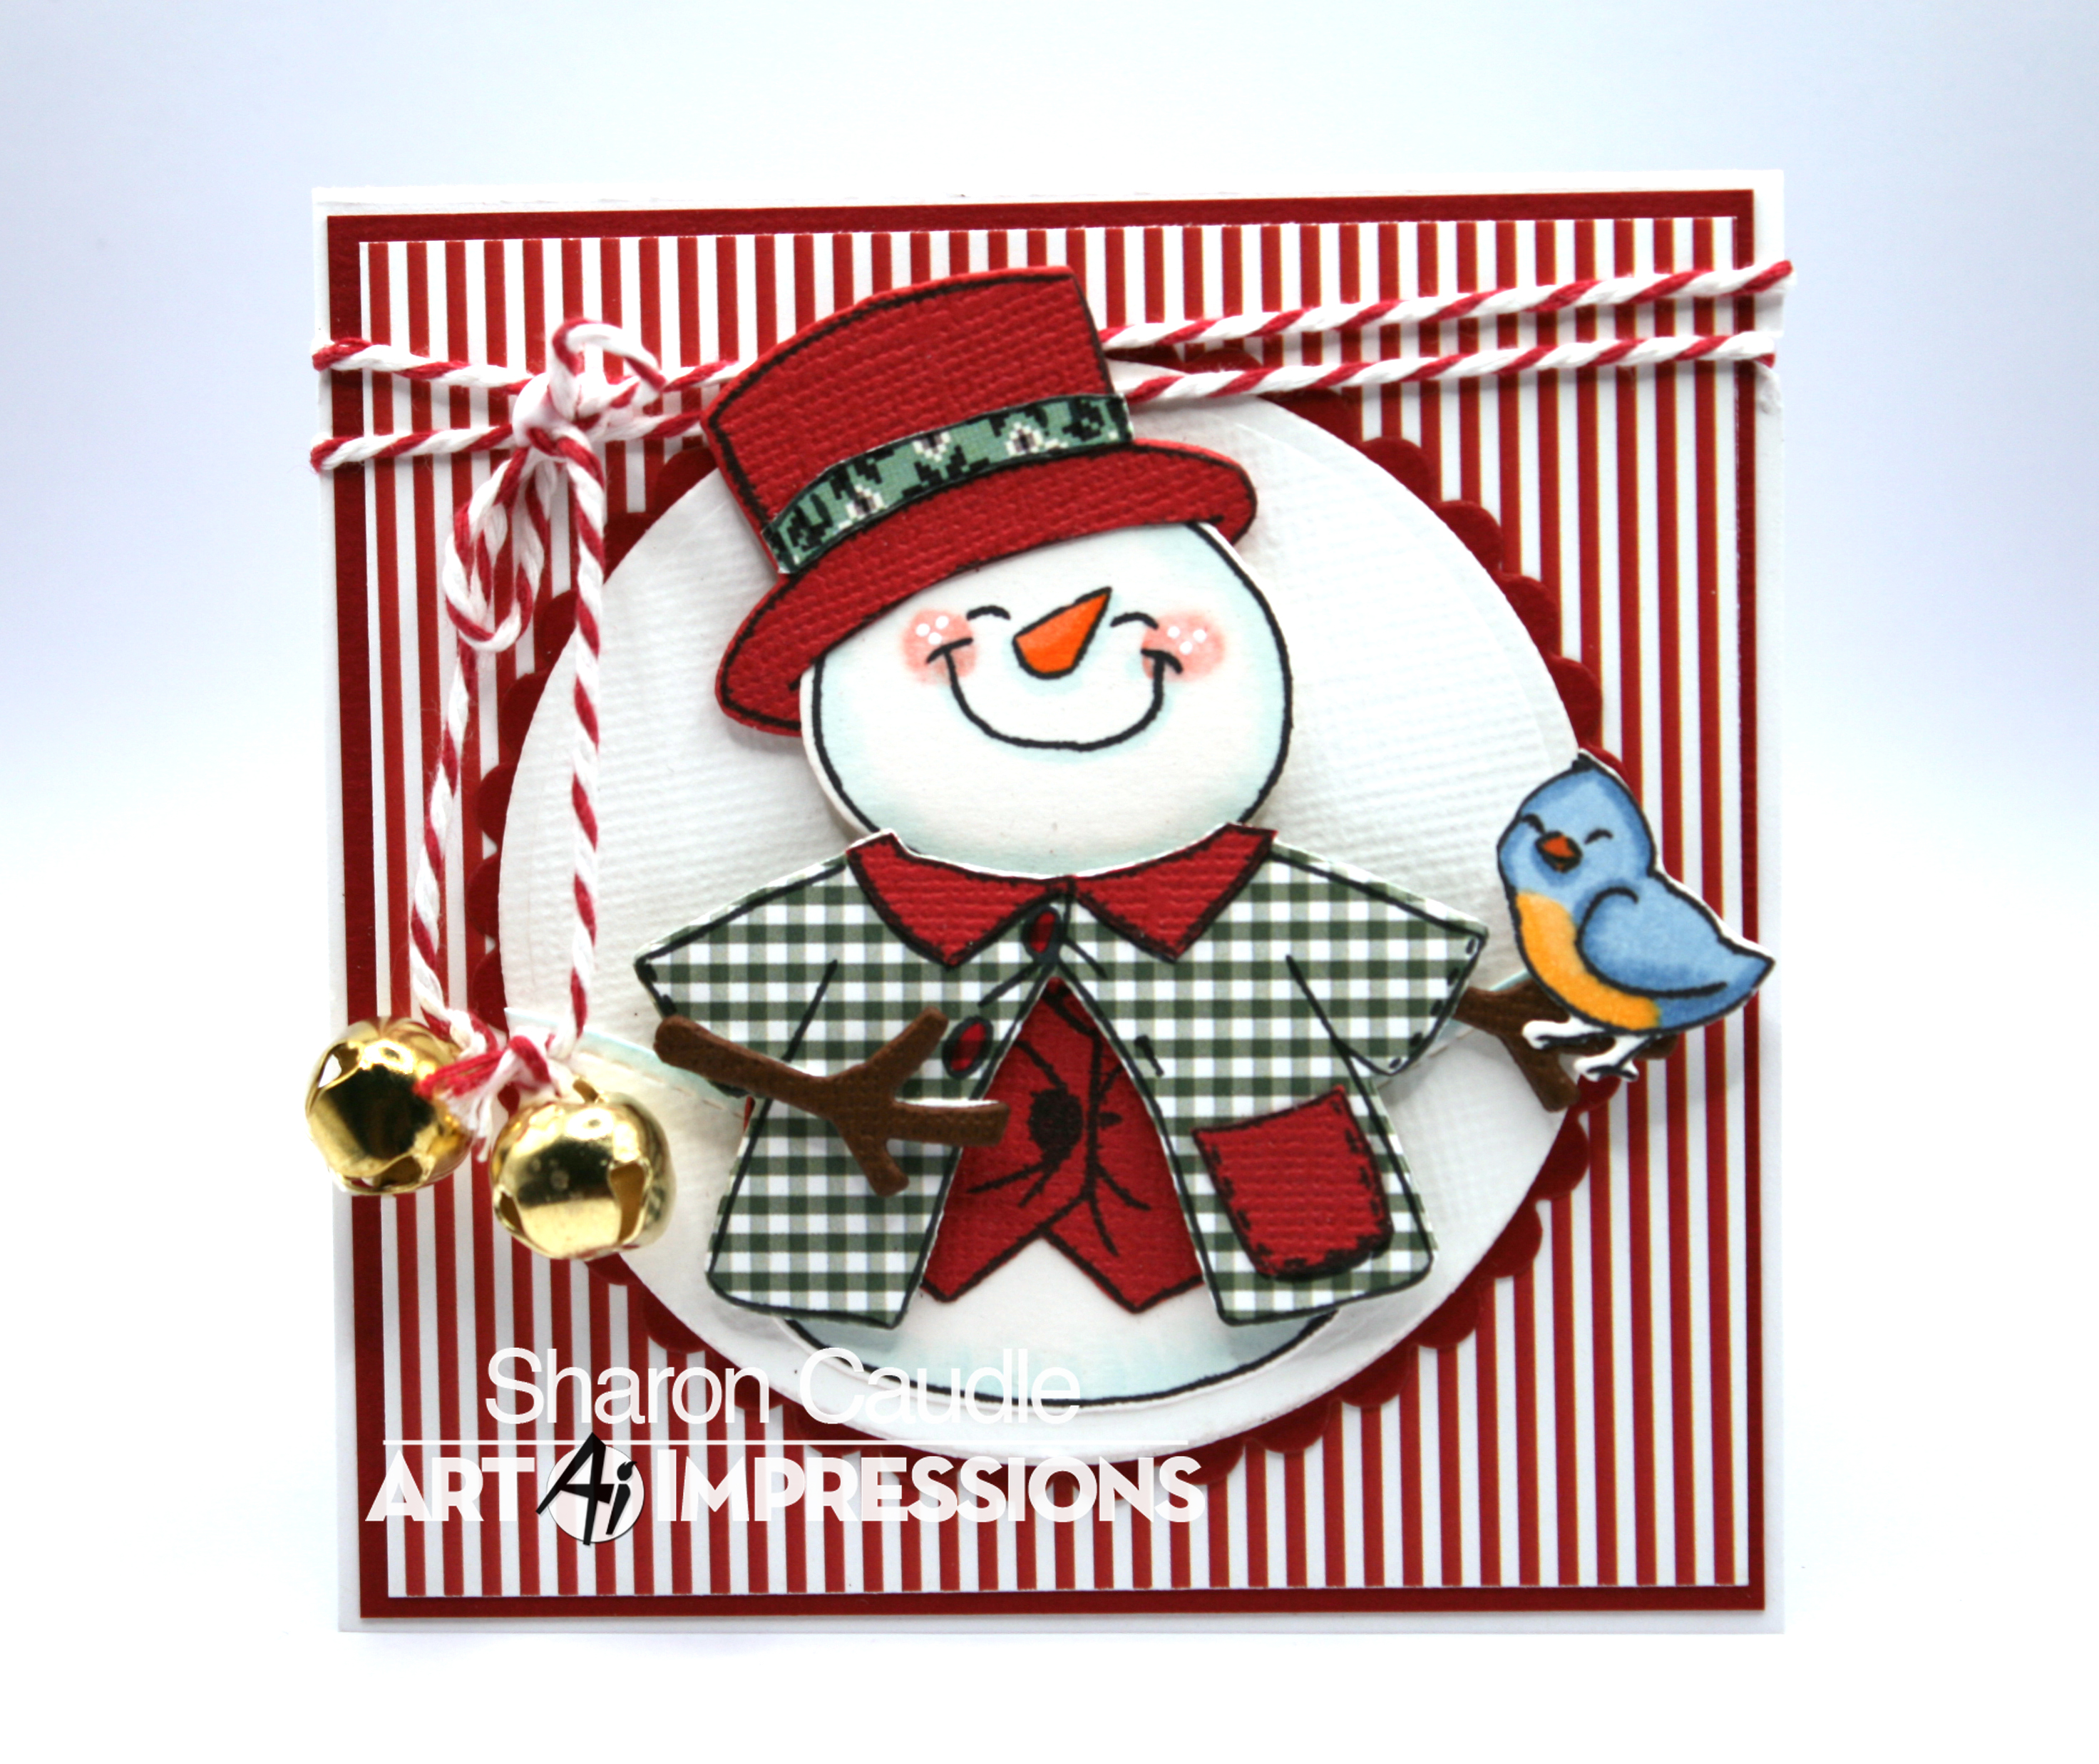
Have you gotten 5803 Snowman Puppet Set yet? Oh my gosh, this set is so much fun! I had two of my granddaughters over this weekend and had an ornament making day with them and this fun set! I simply die cut a bunch of different pieces from various Christmas paper from my stash, and let them go to town. I couldn't believe the creativity they had! The were using scarves as pony tails, they were adding bows to everything! On one, they even used a scarf on the head that made it look like a durag tied on the side! It was awesome! And hopefully, they have some wonderful memories with Grandma! I've got a few cards I put together using the same set. Oh my gosh, these are so fun to make and they are so dang cute!!! They are PERFECT for using up all those scraps of paper you have hanging around! I made two round cards and two square ones. The word JOY is from 5802 Joyful Snowman Set and the snowflakes are from 5353 Large Snowflake Die Set stamped into a circle cut with #5726 Nested Circle Die Set.
I used 5812 Christmas S2 Paper Pack for this one.
The sentiment comes from 5802 Joyful Snowman Set
I used the sentiment ribbon from 5543 Journal Template Die Set for the sentiment, and just cut off the sides of it. I didn't want to pop it up and the curve fit the round card really well.
So that's it for me today! I hope you've enjoyed your visit and until next time - I hope you have some time to be crafty!!
We hope you all had a nice, relaxing Thanksgiving with friends and family.
We hope you're rested and ready to play along with our final challenge of 2023.
Since you may be busy this time of year, we're keeping it simple.
Clean and Simple.
No, fussy, time consuming cards here.
Whip up something quick so that you have time for everything else going on right now.
Before we show you Sharon's card we have a special announcement. Tricia from our Watercolor Design Team has taken on a very important endeavor. Please be sure to read all the way to the bottom of this post after viewing Sharon's card.
Sharon is our Featured Designer and you're going to be so inspired by her simple yet sweet card.
So are you crazy busy this time of year and just discovered you needed just one more Christmas Card? Well, clean and simple to the rescue. Some people might think that clean and simple means a single layer or lots and lots of white space on your card. I don't think there are any hard and fast rules to qualify a card to fall under clean and simple. I think as long as you can make the card without having to spend hours on it or making a big fuss, it qualifies as clean and simple. I couldn't believe how quickly I put this card together! All I did was grab some scraps from some other projects along with a frame and sentiment. It took me no time at all to throw this card together. So although it uses three different paper with layers, to me it is SO clean and simple!! To be honest, when I have a feature for a challenge, it's usually a full day of crafting and assembling. This card took me about 30 minutes total, from start to end. So here's how I went about making it.
First I decided which scraps I wanted to use and got my sentiment along with a frame for the sentiment. I think that took me longer than putting together the card.
I cut the scraps down to 1.25" x 4.5" for the red mat and did the pattern paper at .25" smaller. The other piece I cut at 1.25" x 3.75" and cut the pattern paper at .25" smaller. I cut out the frame and stamped the sentiment.
I sat the frame over the top of my sentiment and just lightly traced around it, then trimmed just inside the pencil marks so the sentiment would fit inside the frame perfectly, then glued the frame onto the sentiment.
I lined everything up to make sure I was going to like the way it looked, then proceeded to pick out my ribbon and make a bow.
Once again, I lined it up to make sure I was going to like it, then glued it all together. I added some 3M tape to the back of the sentiment so it would stand up from the rest of the card.
That was it, about 30 minutes total. And I was super happy with the result.
So that's it for me today. I hope you call take the time to join in with the challenge for the chance to win a stamp set of your choice! Thanks for stopping by for a visit and until next time - hope you have time to get crafty!
Thank you so much Sharon.
We hope this gives you plenty of time to prepare for the holidays.
We love your card and all of your helpful tips!
Now onto our special announcement.
Tricia wants to help out senior citizens who may be alone this time a year and even moving forward into the new year. She is asking for your help.
We're so proud to have her on our DT and hope you will help Tricia and this group of people that are often forgotten about. Your simple gift of a card could truly brighten someone's day. HUGE BONUS!! There will be multiple Art Impressions giveaways! Be sure to visit her blog for all of the details. Now, go make a card for our challenge. And maybe, just maybe, send it to Tricia and win something. Even if you don't win a prize, it's a win if you are giving and make someone else happy today.
✻ Please make a new card or handmade crafty creation. You can make any item you wish; this is not limited to cards!
✻ Limit two submissions per person. You will receive extra votes if you use Art Impressions stamps!
✻Please include your first name and last initial on your submission.
✻We love to comment on your entries, but keep in mind if you use a private group or a platform that you need to sign up for, we probably won't be able to.
✻ The Ai Challenge is open to everyone, international submissions are welcome!
✻ Include a link back to the Ai Blog or grab our button on the top right of our sidebar!
✻ Share the Ai love if you can, by clicking and commenting on your fellow crafters.
✻ Make sure to get your link up by the deadline to enter your creations.
There's a new challenge going on and it's Making Spirits Bright! So for that, I created a card featuring the brand new and absolutely ADORABLE #5802 Joyful Snowman Set! Oh my gosh, how cute are all of these snowmen! I can't get enough of them! I wanted to create a little wintry scene inside the beautiful #5782 Snowflake Frame Set, and then I added the Let it Snow sentiment from #5566 Christmas Sentiments. With the new release last week of all the oh so cute snowmen sets, I'm in heaven!! I stamped the image and colored it with Copic markers which are listed below. I popped the Snowflake Frame up from the little scene behind it to add a bit of dimension. Just click on the links above to be directed to the Art Impressions Shop for those items.
Thanks so much for stopping by for a visit today, and until next time - hope you have some time to get crafty!!


.png)