Welcome to another Watercolor Weekend post! Twice a month we share watercolor inspiration from our Watercolor Guest Design Team, and today as chance would have it, they have all created projects featuring trees! It must be the change in seasons that inspired us this week! You may have heard, we just launched FIVE new watercolor sets (more info
HERE) that are perfect for building trees, creating fall images, and so much more! Some of these new products are featured here today. Take a look!
Who doesn't love Fall? For me, it's definitely the most wonderful time of the year! I have fond memories of Fall like the excitement of going back to school, which I always loved, to raking piles of leaves and jumping in them with my big brothers and my little sister. Fall brings us Halloween, my birthday, Thanksgiving, pumpkin spice creamer in my morning cups of coffee and best of all Fall colors!
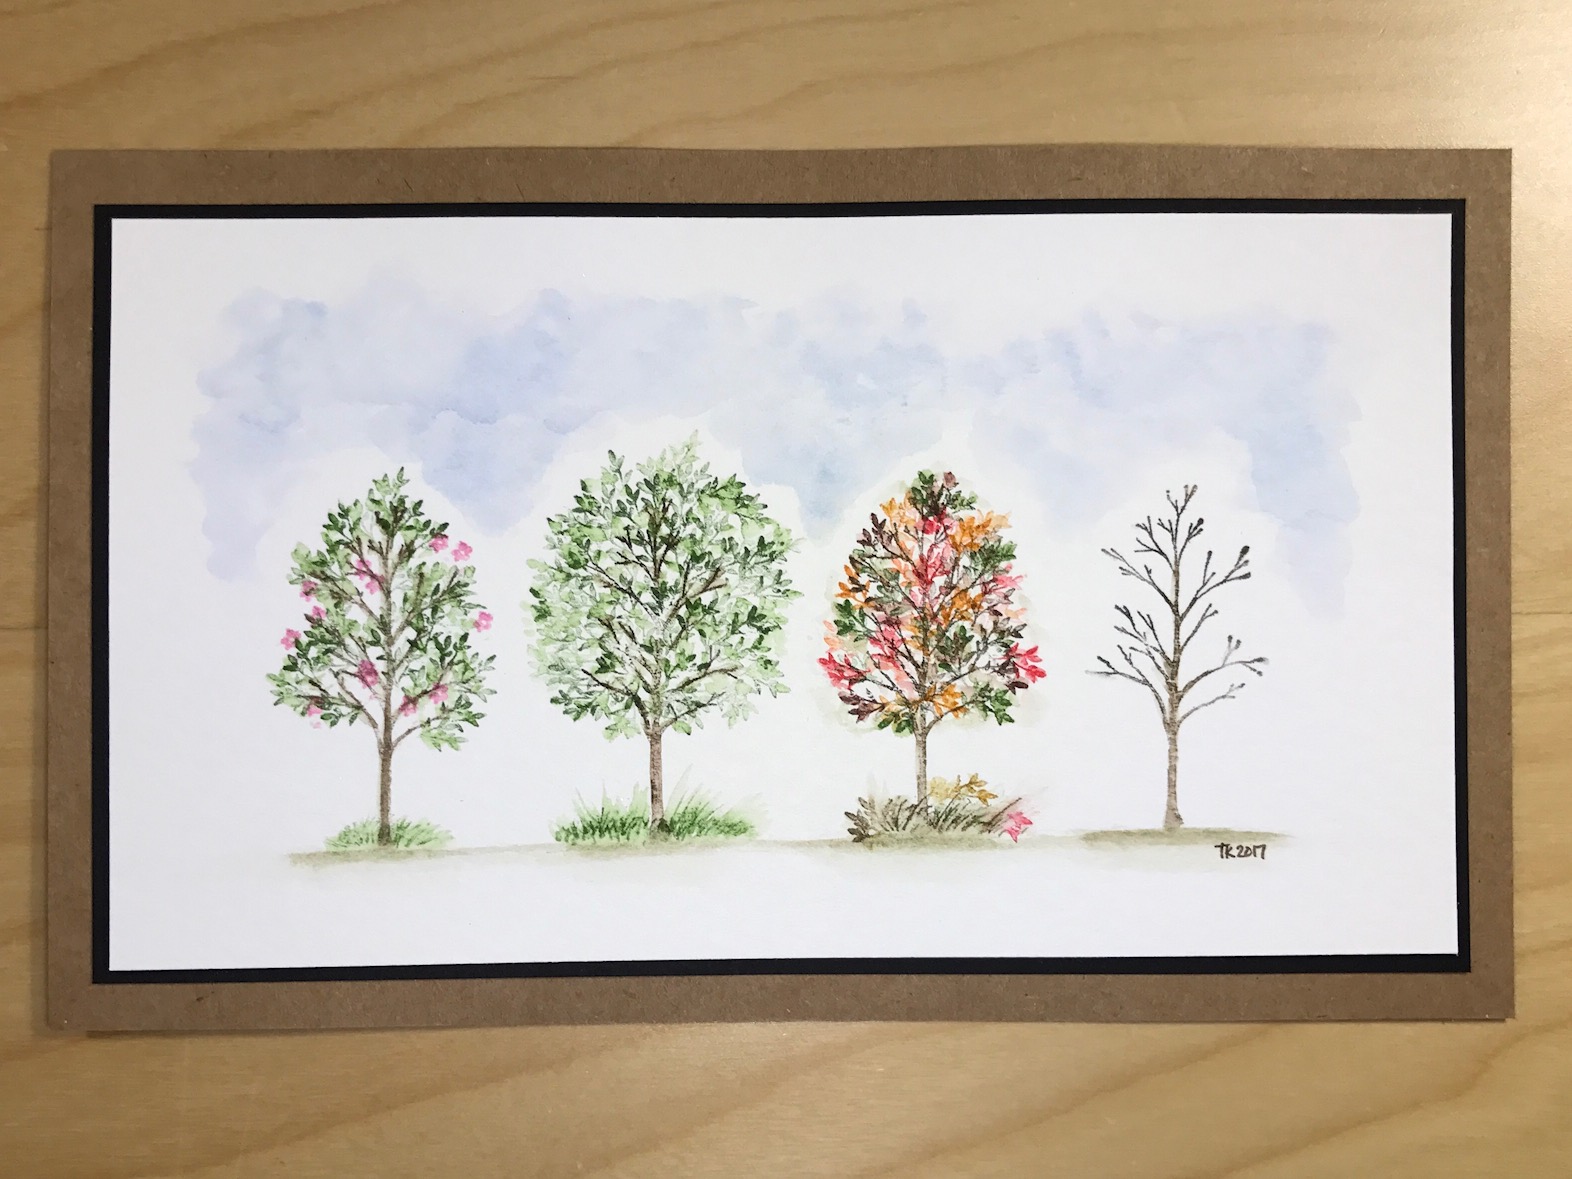
Today I’ve included all four “Seasons” into my Art Impressions Watercolor Weekend project. This is a fun project using just a few stamps.
I started by finding the center of my watercolor paper. I stamped the single tree from the Covered Bridge Mini Set twice to the right of center and twice to the left of center in 45 Sepia. I used water and my paint brush to pull the color from the trunk of the tree only, leaving the branches as is. I worked my way from left to right, starting with the spring tree. I stamped the small foliage from WC Foliage Set 2 in 15 Olive Green and only inked up one flower from the filler flower in WC Flower Set 1 (not pictured) in Bubble Gum Pink. Since it’s the spring tree, I left visible branches and white space. I added a little grass with the small grass stamp near the trunk from WC Foliage Set 1 in 15 Olive Green. Onto the summer tree. I stamped the small foliage from WC Foliage Set 2 in 15 Olive Green, this time rather thick to show summer growth. I added thicker grass with the small grass stamp near the trunk from WC Foliage Set 1 in 15 Olive Green. Next, the fall tree. I stamped the small foliage from WC Foliage Set 2 in 15 Olive Green, 7 Orange, 13 Ochre, 18 Dark Brown and 89 Persimmon. Since it’s the fall tree, it wasn’t as thin as spring tree and not as full as the summer tree. I added thicker grass with the small grass stamp near the trunk from WC Foliage Set 1 this time in 45 Sepia. I also added a few leaves onto the grass since it’s fall. Last, but not least the winter tree, no stamping, I just added a little 45 Sepia onto my palette and brushed it under the tree. I did the same under each tree, extending out to connect all four trees. To complete the scene, I placed 60 Salvia Blue on my palette and brushed in the clouds.
I am so pleased to join the Watercolor Guest Design team for this week's Watercolor Weekend. We are showcasing some of the Art Impressions watercolor stamp new releases.
I am showcasing the new WC Fir Trees Set. This set is going to be a staple in your watercolor tools. It is so versatile.
Here are the details of my project.
I used Sepia to ink up the smaller trunk and stamp it a few times, I re-inked it and stamped it a few more times. I used the straight fir leaves and inked them in Pine Green and Olive Green to get some color variation. I inked the top of the fir in Pine Green and stamped it below the trees.
Using my watercolor palette, I created the water using Blue, Manganese and African Violet.
I then added the large tree with the bigger tree trunk. Again, I added Pine Green and Olive Green to the large fir branch to create a full look. I then used my palette to add Sepia to the ground and added grass with the Olive Green. To finish off I added some Blue to the sky.
I cut the scene down to 3 3/4 x 5. I mounted it on a piece of Gina K Designs Blue Denim cardstock trimmed to 4 x 5 1/4. I then mounted this to the Gina K Designs Asparagus card base.
I just love all the new releases and hope you can join us this weekend! Try out the new challenge over at the Art Impressions Blog.
Thank you so much for stopping by and have a crafty day.
Other Supplies: Gina K Designs Blue Denim Cardstock, Gina K Designs Asparagus Cardstock
Great work, designers! Aren't these tree techniques terrific? How cool to see so many different ways to stamp and watercolor trees! We would love to see your comments here on the blog. You can find even more inspiration on our designer's personal blogs and Instagram accounts!