Showing posts with label WC Series 7 Set 2. Show all posts

Saturday, October 21, 2017

Watercolor Weekend Roundup - Fresh Fall Inspiration!

Happy Saturday! It's the third Saturday of the month, so it's time for our second Watercolor Weekend of October! Our Watercolor Guest Design Team is feeling the fall season with these beautiful autumn projects! They are sure to inspire you to do a little watercolor today!

Dot Freel - Instagram - Blog - Pinterest

I made this card for the Watercolor Weekend round up on the Art Impressions blog. You may recognize this bench as the one with a sleeping kitten on it (3545) but I didn't ink up the cat. I took the sleeping puppy and used the 4774 - stamp positioner to place the dog right where I wanted him. Then I added fall trees, leaves and grasses. 

Marvy Le Plume II Markers: 6 Brown, 13 Ochre, 28 English Red, 45 Sepia, 49 Vermillion, 56 Dull Blue
Other Supplies: Tombow Marker N15

Tricia Kennedy - Instagram
I have two versions of my “Birds On A Wire” project for this Art Impressions Watercolor Weekend – summer greenery and full on fall.

The process is the same for both versions of “Birds On A Wire”, just a few additional colors on the fall leaves. Start by masking off a 3”x3” square on your watercolor paper using 3M Painters Tape, washi tape or Post It Notes. Stamp the tree branches on the left, bottom and right using stamps from the Branches Set in 45 Sepia. Next build the trees by stamping leaves from the Foliage Set 2 in 15 Olive Green and 96 Jungle Green for the summer greenery version and 15 Olive Green, 96 Jungle Green, 6 Brown, 13 Ochre, 45 Sepia, 89 Persimmon for the fall version. Pull the color from the lines with your Watercolor Brush No. 6. Next, draw in the wires using a ruler or the edge of your Stamp Positioner with 86 African Violet. There are 6 birds in the Bird Bath Set, I used 5 out of the 6. Using your Stamp Positioner, stamp the birds in 45 Sepia onto the wires. Pull the color from the lines with either your Watercolor Brush No. 6 or Watercolor Brush No. 1. I found it easier to use the Watercolor Brush No. 1. Put 6 Brownand 86 African Violet onto your Watercolor Palette and brush these colors onto the bird’s chests. Add detail back into the eyes, beaks and wings using the fine tip of 45 Sepia. Place 60 Salvia Blue (or any other pale blue) onto your Watercolor Palette, water it down and paint it into for sky. And finally, remove the tape and sign your masterpiece!


Marvy Le Plume II Markers: 6 Brown, 13 Ochre, 15 Olive Green, 45 Sepia, 60 Salvia Blue, 86 African Violet, 89 Persimmon, 96 Jungle Green
Other Supplies: Post It Notes, 3M Painters Tape

Tricia O'Bin - Blog - Instagram - YouTube - Pinterest - Facebook
Woo Hoo it's Watercolor Weekend time again! This weekend I wanted to do an Autumn Farm Scene. I am just loving doing fall scenes with apples, pumpkins and mums.

Here are the details of my project. I started off on a piece of Canson XL WC Paper Pad cut to 3 7/8 x 5 1/8. I inked the Veggie Cart up with African Violet, stamped it off and re-inked it with Sepia. I pulled the color out of the lines and added Brown to the wooden buckets.

I used the new Dogs set to add a sleeping puppy underneath the Cart. I used Sepia and Brown on the palette to give him a little bit of color. I added the tiny grass in Olive Green around the card and the puppy along with a bit of Sepia. Using the palette, I created a sun with Brilliant Yellow and a hint of a sky with the Steel Blue.

I masked off the left basket and inked the apples (to use them as pumpkins), using the stamp positioner I stamped the apples into the bucket. I masked the apples and stamped them again. I used the Sepia to add some lines to the apples. I added stems to the small pumpkins with Olive Green. I used thewatercolor palette to paint on the Brilliant Yellow as the first layer and then added Orange and Terra Cotta, leaving some of the Yellow for a highlight.

Next I masked off the middle basket, inked the mums with Olive Green and English Red, stamped them a couple of times, re-inked and stamped again.

I followed the same process of masking with the right hand basket of apples. I added some Olive Green and English Red (so they look like Macintosh --my fav). I added a tree in the background using the new Branches set. I added some fall leaves using the flower from the Garden Wagon Mini Set.

To create the card, I cut a mat from some Gina K Designs Cranberry Tart cardstock and mounted it to a base card of 5 1/2 x 8 1/2 scored at 4 1/4.


What beautiful projects! Leave some comment love, we love to hear about your favorite projects and tips from our designers! Watercolor Weekends are a chance to roundup some of our favorite projects from the week, but you can find even more inspiration on our designer's personal blogs and Instagram accounts! Be sure to share what you create with us with #AiWatercolor!

Dot Freel - Instagram - Blog - Pinterest
Tricia Kennedy - Instagram
Tricia O'Bin - Blog - Instagram - YouTube - Pinterest - Facebook

Happy Watercolor Weekend!
Saturday, September 16, 2017

Watercolor Weekend Roundup - Trio of Trees!

Welcome to another Watercolor Weekend post! Twice a month we share watercolor inspiration from our Watercolor Guest Design Team, and today as chance would have it, they have all created projects featuring trees! It must be the change in seasons that inspired us this week! You may have heard, we just launched FIVE new watercolor sets (more info HERE) that are perfect for building trees, creating fall images, and so much more! Some of these new products are featured here today. Take a look!

Dot Freel - Instagram - Blog - Pinterest
Who doesn't love Fall? For me, it's definitely the most wonderful time of the year! I have fond memories of Fall like the excitement of going back to school, which I always loved, to raking piles of leaves and jumping in them with my big brothers and my little sister. Fall brings us Halloween, my birthday, Thanksgiving, pumpkin spice creamer in my morning cups of coffee and best of all Fall colors! 


Tricia Kennedy - Instagram
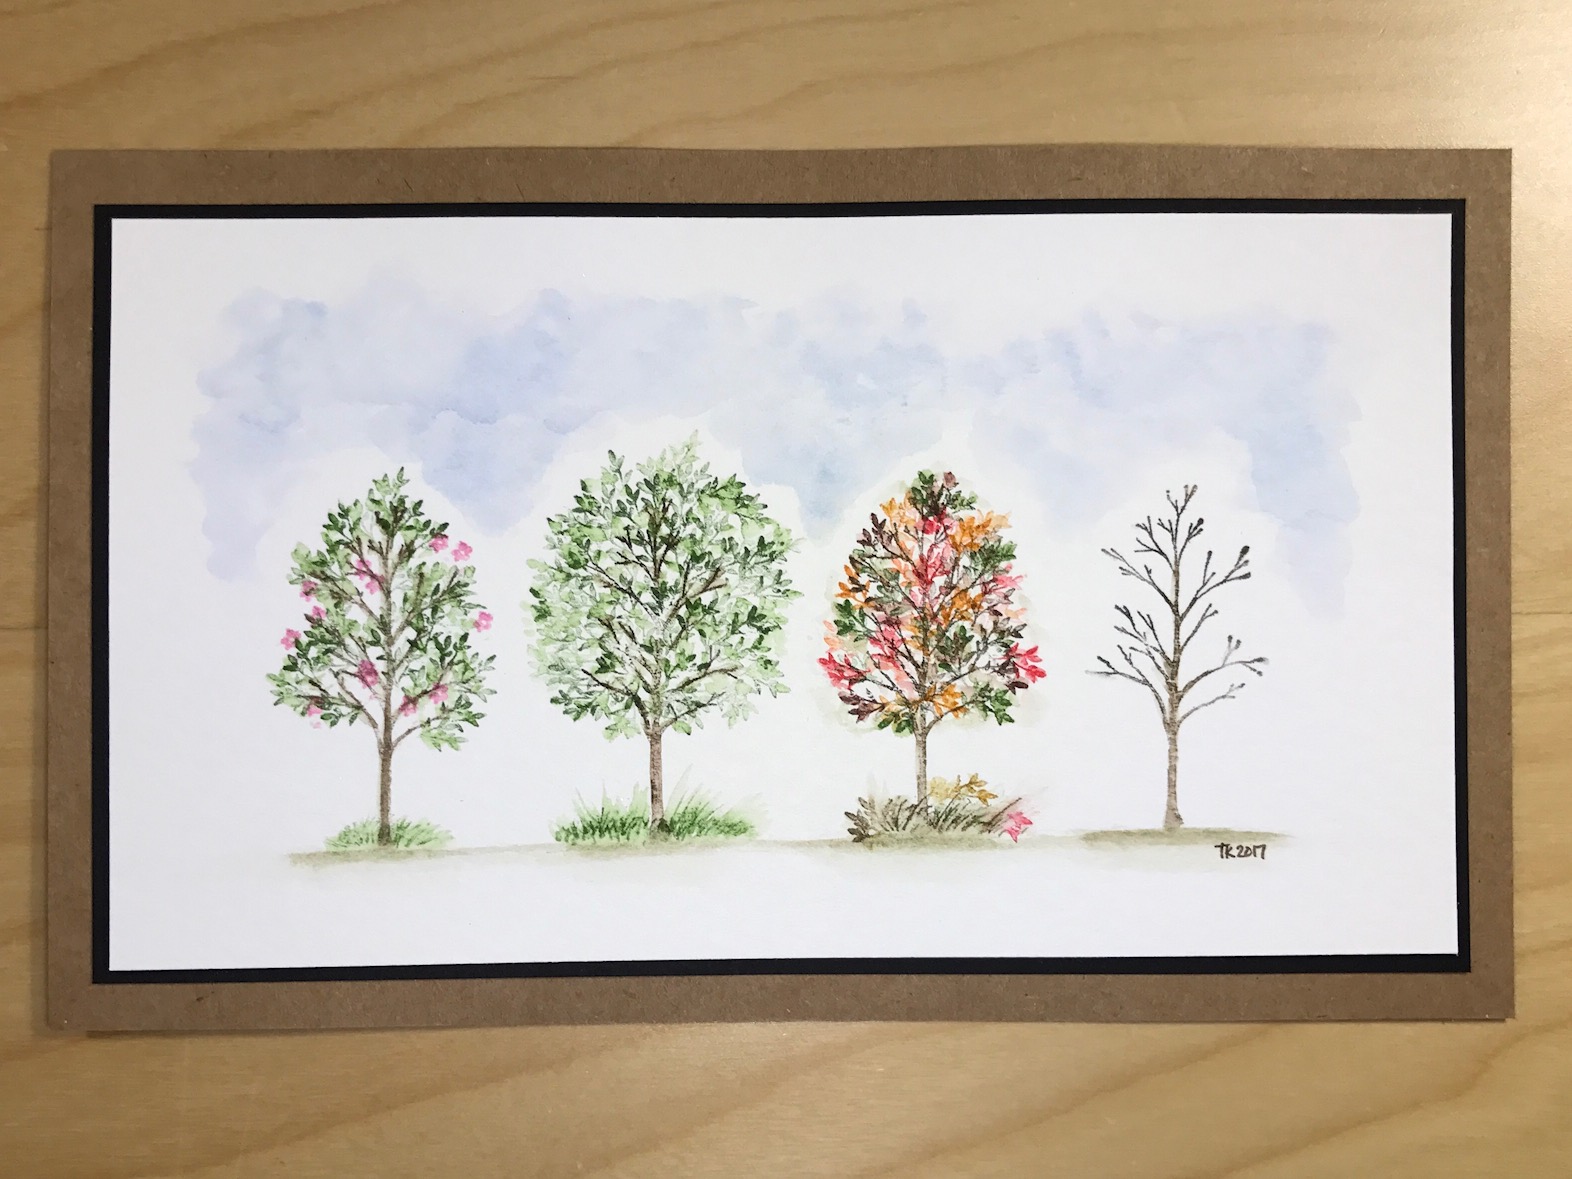
Today I’ve included all four “Seasons” into my Art Impressions Watercolor Weekend project. This is a fun project using just a few stamps.

I started by finding the center of my watercolor paper. I stamped the single tree from the Covered Bridge Mini Set twice to the right of center and twice to the left of center in 45 Sepia. I used water and my paint brush to pull the color from the trunk of the tree only, leaving the branches as is. I worked my way from left to right, starting with the spring tree. I stamped the small foliage from WC Foliage Set 2 in 15 Olive Green and only inked up one flower from the filler flower in WC Flower Set 1 (not pictured) in Bubble Gum Pink. Since it’s the spring tree, I left visible branches and white space. I added a little grass with the small grass stamp near the trunk from WC Foliage Set 1 in 15 Olive Green. Onto the summer tree. I stamped the small foliage from WC Foliage Set 2 in 15 Olive Green, this time rather thick to show summer growth. I added thicker grass with the small grass stamp near the trunk from WC Foliage Set 1 in 15 Olive Green. Next, the fall tree. I stamped the small foliage from WC Foliage Set 2 in 15 Olive Green, 7 Orange, 13 Ochre, 18 Dark Brown and 89 Persimmon. Since it’s the fall tree, it wasn’t as thin as spring tree and not as full as the summer tree. I added thicker grass with the small grass stamp near the trunk from WC Foliage Set 1 this time in 45 Sepia. I also added a few leaves onto the grass since it’s fall. Last, but not least the winter tree, no stamping, I just added a little 45 Sepia onto my palette and brushed it under the tree. I did the same under each tree, extending out to connect all four trees. To complete the scene, I placed 60 Salvia Blue on my palette and brushed in the clouds.

Marvy Le Plume II Markers: 7 Orange, 13 Ochre, 15 Olive Green, 18 Dark Brown, 45 Sepia, 60 Salvia Blue, 67 Bubble Gum Pink, 89 Persimmon

Tricia O'Bin - Blog - Instagram - YouTube
I am so pleased to join the Watercolor Guest Design team for this week's Watercolor Weekend. We are showcasing some of the Art Impressions watercolor stamp new releases.

I am showcasing the new WC Fir Trees Set. This set is going to be a staple in your watercolor tools. It is so versatile.

Here are the details of my project.

I used Sepia to ink up the smaller trunk and stamp it a few times, I re-inked it and stamped it a few more times. I used the straight fir leaves and inked them in Pine Green and Olive Green to get some color variation. I inked the top of the fir in Pine Green and stamped it below the trees.
Using my watercolor palette, I created the water using Blue, Manganese and African Violet.
I then added the large tree with the bigger tree trunk. Again, I added Pine Green and Olive Green to the large fir branch to create a full look. I then used my palette to add Sepia to the ground and added grass with the Olive Green. To finish off I added some Blue to the sky.
I cut the scene down to 3 3/4 x 5. I mounted it on a piece of Gina K Designs Blue Denim cardstock trimmed to 4 x 5 1/4. I then mounted this to the Gina K Designs Asparagus card base.
I just love all the new releases and hope you can join us this weekend! Try out the new challenge over at the Art Impressions Blog.

Thank you so much for stopping by and have a crafty day.


Other Supplies: Gina K Designs Blue Denim Cardstock, Gina K Designs Asparagus Cardstock

Great work, designers! Aren't these tree techniques terrific? How cool to see so many different ways to stamp and watercolor trees! We would love to see your comments here on the blog. You can find even more inspiration on our designer's personal blogs and Instagram accounts! 

Dot Freel Instagram - Blog - Pinterest
Tricia Kennedy - Instagram
Tricia O'Bin - Blog - Instagram - YouTube

Plus, we LOVE to see what you are creating, so keep hash-tagging #aistamps and #aiwatercolor! Have a wonderful weekend, hope you get some crafting time today! Happy Stamping!

Wednesday, February 15, 2017

NEW VIDEO - Birdhouse & Fence Watercolor featuring Molotow Masking

Hello Ai Fans!

Welcome to a new Watercolor Wednesday! Ready for another fabulous video featuring the Molotow Masking marker? This item has been so popular we are currently sold out, but never fear, you can join our 2.0mm or 4.0mm waitlist to be notified by email when it is back in our shop! Today, Bonnie creates another stunning fence so you can keep practicing this new technique. She added a couple birdhouses and lots of extra foliage and flowers to make it look overgrown and full. 

We hope you enjoy this week's video! Make sure to subscribe to our YouTube and give this video a "thumbs up" as well! Have a wonderful week!

Happy Watercolor Wednesday!


View on YouTube: https://youtu.be/XqhUFWOqDCI


Saturday, January 14, 2017

Let's take a nap in the flower garden!

Hello AI Fans!!

Happy weekend!! Hope you're having a fun Saturday. :)  My card today features #3545 WC Series 7 Set 2.  I am really enjoying playing with these water color sets! This cute little kittie is having a wonderful nap in the flower garden. I want to go join him! :)  


markers used: 45 Sepia, 101 Tropical, 14 Turquoise, 17 Steel Blue, 15 Olive Green, 86 African Violet, 20 Magenta

Thanks so much for stopping by to visit and hope you have some time this weekend to get crafty!


Thursday, July 21, 2016

Challenge 189 Sweet Summertime!

Hello, Ai Fans!

We're back with another challenge this Thursday! We had a FABULOUS time celebrating our 29th Anniversary with you at the beginning of this month, and thank you for celebrating with us!

We had some fabulous card entries for our Anything Goes challenge, so let's announce the winners now!

Top Spot is awarded to...

Maria K!


Congrats, Maria! We think your one-layer card is fabulous, and shows off your lovely bright coloring! Our Picture Perfect girlfriends are look amazing! Email annelise@artimpressions.com with your address to claim your prize pack!

Honorable Mentions go to...

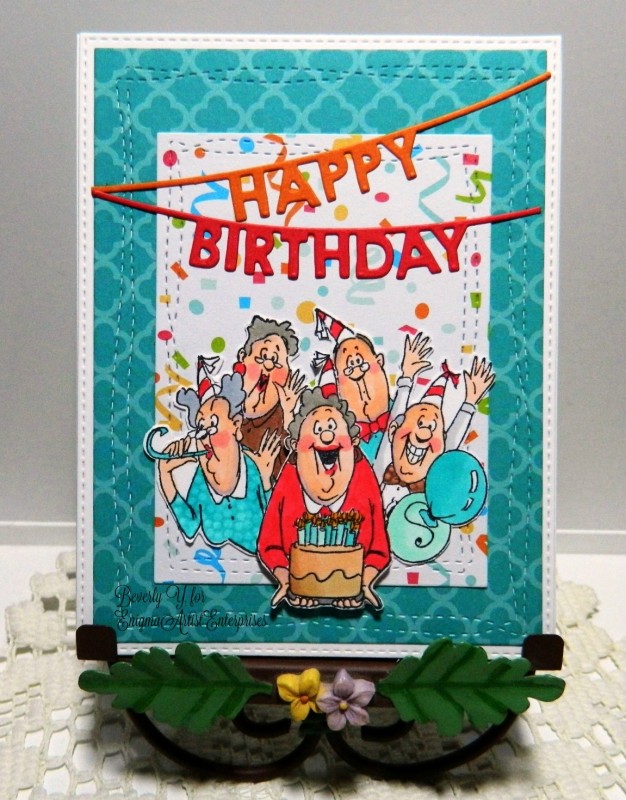
Congrats, you two! Beverly, we love your bright birthday card with our Maturing Set! They look ready to celebrate something big! And Carol, your lovely watercolor scene with Series 7 Set 2, Flower Set & Foliage Set looks great broken up in those rectangles! Such a cute idea! Be sure to email annelise@artimpressions.com with you address and the stamp set of your choice for a prize!

Thanks to everyone who entered our Anything Goes challenge! We hope you'll join us again this week! Our next challenge is called "Sweet Summertime!" Sharon is here to share her card based on our theme! Take it away, Sharon!


Hello AI Fans!

Today I'm going to show you how I created a very easy beach scene using my Copic markers and one of my favorite summertime sets #4211 Selma and Gladys Set!!  Nothing elaborate here, just a very simple scene that anyone can create!! 


First I colored up Selma and Gladys to match my paper. 
Copic colors are listed below.


For the sand, I used E30, E31, and E33.  I started with the lightest color and worked my way to the darkest at the top (the further away from the eye - the darker it will get).  


Directly above the sand, use BG72 and BG75. Again, the darker color will be on top as that's the furthest from the eye. 


Outline some clouds on your background paper using C1, then take your C3 marker and darken the bottom portion of the clouds. Blend it out with the C1.


With B000, start coloring in your sky making sure you keep your pen moving horizontally the way air moves. Just start next to a line and flick your pen outward. 


Finish filling in the sky with the B000 and you've got an easy peasy beach scene to add to your card!! 


And here is the finished product! I just added a layer of a coordinating paper and a bow made with May Arts ribbon that is yellow and orange! 


Thanks so much for taking the time to stop by today and hope you have some time this week to get crafty and join our new challenge!! 
Copic colors used for Selma and Gladys:
E000, E00, E11, R20, B21, B24, YR04, YR07, YR09, hat: Y11, Y13, Y17, suit: YG21, YG23, YG25

Papers are Carta Bella Beach Day


Thanks, Sharon! What a darling card with the Selma & Gladys Set! And perfect for summer dreams of the beach!
We would love for you to join our challenge! Let's see what summer-y craft-y goodness you can create!

Here are the challenge rules …
✻ Please make a new card or creation. You can make any crafty item you wish; this is not limited to cards!
✻ Limit two submissions per person. You will receive extra votes if you use Art Impressions stamps!

✻ The Ai Challenge is open to everyone, international submissions are welcome!
✻ Include a link back to the Ai Blog or grab our button on the top right of our sidebar!
✻ Share the Ai love by clicking and commenting your fellow crafters.
✻ Make sure to get your link up by Wednesday, July 20th at 5:00 p.m. PST to enter your creations.
✻ Good luck and happy stamping!