Friday, July 31, 2020

1 Sketch 10 Cards with Stackers | By Jessica Shier

Hello Ai Fans!
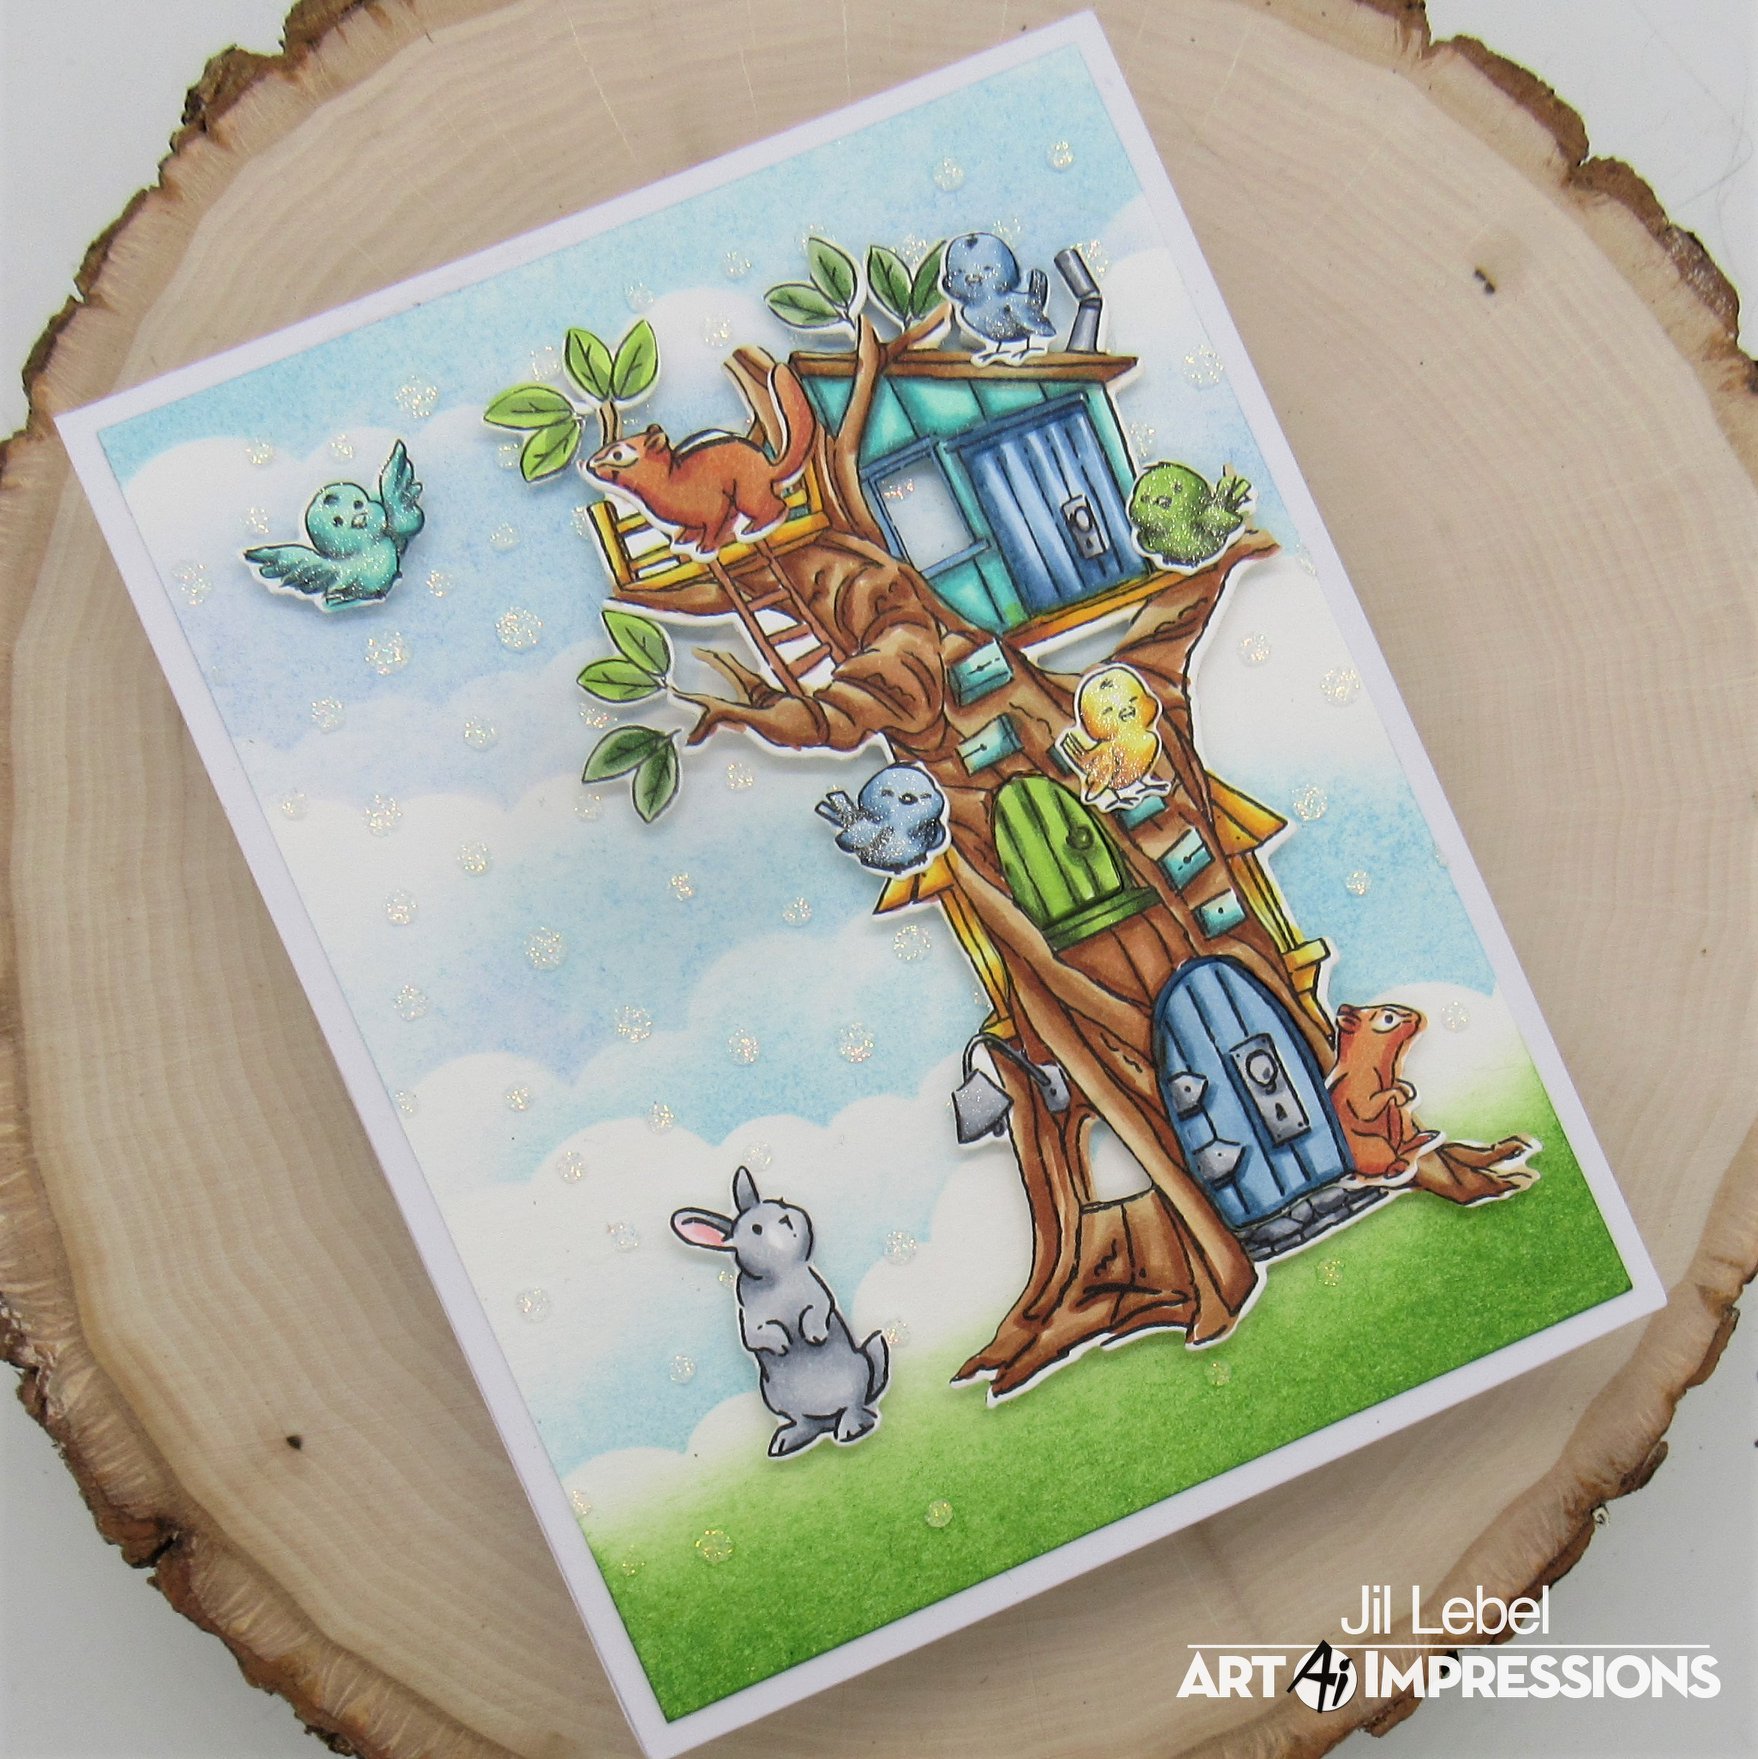
It's Jessica today and I have a card sketch to share with you. If you didn't see the challenge for the next couple of weeks, make sure to head over and check out the information. Art Impressions is partnering with Scrapbook.com for Cards for Kindness! I created a simple card sketch, to create a lot of 10 cards to send in.


You can find the card sketch down below. I hope it inspires you to create your own lot of cards to send in! I started with stamping all of the Art Impressions Stackers ( the ones I have... so far) with Gina K. Designs Amalgam ink, on Neenah Solar White 80lb cardstock. There a quite a few designs in this category and the ones I'll be using are the; Turtle, Duck and Dog Stackers. 


For the most part I colored all the turtles the same, along with the dogs and ducks. Except for one stack of ducks. I thought it would be fun to have some gray colored ducks on a rainbow background. So that is the exclusion from the rest. I'll have the list of markers down below for the different combinations I used. To make this easier on me, I did repeat quite a few markers, while coloring all the critters. 

Here is the card sketch that I came up with. Please feel free to use and share.


For a few of the cards I mixed up some shapes using a few Art Impressions dies like the large banner and rounded rectangle.


I also used Tombow markers on a few. The diagonal watercolor line is easy to do with masking tape on watercolor paper.


A couple of my favorites are the rainbow card stock striped backgrounds with the gold watercolor paint splatter. I love a little planned splatter on backgrounds and I used anything from paint to sequins.

I do have to say it was fantastic practice coloring the same images multiple times. Plus playing with different color combinations and textures always puts a smile on my face. Like revisiting the basics. 


Thank you so much for joining me today. Happy Stamping!


Thursday, July 30, 2020

Cards for Kindness with Scrapbook.com

Hello, Ai Fans!

This week we are so honored to get to partner with scrapbook.com for their amazing event, Cards for Kindness.


We believe that handmade cards can lift the human heart and spread happiness.

Scrapbook.com has launched a global initiative to get handmade cards to people who are in
need of an emotional boost, a smile, or a helping hand. Together we can lift hearts
around the world with handmade creativity and kindness and make a difference in
so many lives. We have already received and delivered thousands of cards and
we're just getting started.

Here's How it Works

1. You send your handmade cards (blank inside - with no
personal message) to Scrapbook.com.
2. We organize and distribute the cards to cancer foundations,
hospitals, shelters, retirement homes, children's homes
and other organizations in need.
3. The cards are used by nurses, doctors, staff members,
counselors, parents and volunteers who add handwritten
messages of encouragement and love before giving them
to patients, children and other people in need.


Want to participate?

Email claire@artimpressions for a Submission Form, or download one HERE

Submit your cards in the Challenge below!

For additional information, visit www.scrapbook.com/kindness


Now, as we get ready for another new challenge, let's congratulate the winner of our 
Sparkle & Shine!!!

Thank you all for participating and bringing joy to each of our challenges!

This week, Top Spot goes to Roberta Bostrom who used our
WC Snowman Set in an adorable, glistening snowglobe-like card!

Congrats Winner!!


Contact Claire at feedback@artimpressions.com with your mailing address, and choice of 3 stamps. Well done!


This week for our new challenge, we want to share our art for others! This program needs cards for : Thinking of You, Inspiration/Motivation, Get Well Soon, Thank You, Sympathy, Happy Hello, Christmas, Birthday, Mother's/Father's Day, or Generic/No Sentiment. If you're looking for some starter ideas, check out our BasicsFlip CardsLaughlines, or Flutters on our Pinterest Page


We want to see your Cards for Kindness! Though you can use any stamps you have, we'd love to see any Art Impressions products in your collection!
Hurry, challenge closes August 12th at 5PM PT!


Here are the Challenge Rules...
✻ Please make a new card or creation. You can make any crafty item you wish; this is not limited to cards!
✻ Limit two submissions per person. You will receive extra votes if you use Art Impressions stamps!
✻ The Ai Challenge is open to everyone, international submissions are welcome!
✻ Include a link back to the Ai Blog or grab our button on the top right of our sidebar!
✻ Share the Ai love by clicking and commenting your fellow crafters.
✻ Make sure to get your link up by the deadline to enter your creations.
✻ Good luck and happy stamping!

You are invited to the Inlinkz link party!

Click here to enter


Thank you to everyone who joined us yesterday on Wednesday Live with Bonnie!

Here is a link to the supplies you'll need for next week's challenge : 

This week, Bonnie will be posing a challenge. Want to enter? Follow the link below!

You are invited to the Inlinkz link party!

Click here to enter

Don't forget, you can always watch the videos after they air here : 

If you want to know what products Bonnie used in our most recent video, please check out our supplies list here : 

We will see you next week for our Watercolor Wednesday on YouTube!

I Love You- Cute Elephant Card by Crystal


Hi Ai fans! This week I made a cute card using the elephant from the Lovable Animals stamp set. I stamped the elephant with Memento black ink and colored it in with alcohol markers. After I colored the elephant in I used the coordinating dies to cut the image out.


I stamped the sentiment "I LOVE YOU TONS!" and die cut it out with a banner die. I die cut a double stitched rectangle and oval out of pattern paper. I added some ink to the edge of the pattern card stock to add a little bit of dimension to the layers. I layered everything and adhered everything in the order shown on the picture. Lately, I added a few sequins to finish the card. 


Spectrum Noir Markers: LY3, AG2, AG4, HB1, HB2, BGR1, BGR2, BGR3, CR11, PP1, PP4, AB1, AB3

Happy Stamping!


Wednesday, July 29, 2020

New Home Watercolor Card with Guest Blogger Tricia!!!


Greetings Ai Fans!

Today we have a special guest blogger, Tricia from our Watercolor Design Team! 

HI Ladies!!!!!


 Today’s project features the watercolor Door Set.  


I inked the door with the brown and stamped it off.  Next, I pulled the color out of the lines.  I added some additional color onto the welcome mat from my palette.  Using some blue from my palette, I added some color to the door.  I also used the fine tip of my blue and drew in some curtains (I used some small lines at the top to make them look pleated.  I added some purple to my palette and colored the curtains in.


To create the steps, I inked the stones up with brown then blue.  This gives a nice gray color.  I stamped it off and then stamped it in front of the mat.  I added some water to the stones making sure to keep the tops white. 


I inked the stones from the Wall Texture set with brown in a few places, I did not use the entire stamp.  I stamped it off added a few areas of blue (very sporadic) and stamped it off again. I wanted it to be really light.  I made sure to leave room where my vines and flowers were going to go. I repeated that on the other side.  TIP:  Using a positioner is really helpful to get your texture straight and where you want it.  I added water to make the lines really faded.


I inked the small grass with green and stamped it around some of the rocks.  I inked the small vine up with green and added it to each side and the top of the door.  I softened the grasses and the vines with water.  I inked the small dots up with purple and stamped them in various areas within the vines.  Lastly, I inked the wildflowers (left and right) from the Wagon Set with green and pink and stamped them on either side of the door and added water to soften the lines.


Finally, I signed and dated.  To finish the card, I cut it down to 3.75x5 and added it to a piece of Wild Lilac Gina K Design cardstock cut to 4x5.25.  I added this to a base card.  I put the card into my MISTI and stamped the sentiment using Gina K Designs “Reasons to Celebrate” stamp set. 


I hope you have a great day and thanks for stopping by!


<!-- LinkDeli Code End --

Tuesday, July 28, 2020

Happy Camper Slimline Card by Jil Lebel

Hello Ai fans!

I used the Happy Camper stamp set to make a slimline card. My family had a very similar camper when I was growing up.  We traveled around the United States for two weeks every summer.
I started by stamping the images onto Spectrum Noir Ultra Smooth card stock with Gina K Black Amalgam ink and colored them with Copic markers.  The colors I used will be listed at the end of this post.   After that I stamped the images onto masking paper I cut them out on the black line and placed them over the images.
I added the Distress inked background over the masks with a mini  ink dabbers and the foam pads.  I used Tea Dye for the sand and Tumbled Glass for the sky.  I splattered the entire layer with water droplets and let it dry for about 30 seconds before I remove it with a dry paper towel. I removed the masks and revealed the finished layer.  I added some dots and shadows with my Copic markers.  
Copic Colors Used:
Skin - E000, E00, E11
Hair - C1, C3, C5
Purple - V04, V06, V09
Blue - B91, B95, B97
Green - YG03, YG97, G99
Chairs - W3, W1
Tree Truns - E31, E35, E37
Camper - E000, E000, E32, E35, E37

Thanks for stopping by and Have a Great Day!


Monday, July 27, 2020

Daisy Exclusive Card by Karen - Guest Blogger


Hello Ai fans!

I am so excited to be your guest blogger again today with this simple card.

In this case, the image does all the talking, and I just didn't want to add much to the card to take away from the pretty spray of flowers:


 This is one of the images from the Exclusive Daisy Set, available through Scrapbook.com. 
I stamped it in Memento Tuxedo Black ink onto Cryogen cardstock (which has the loveliest subtle shimmer to it!). I coloured it using my Copic markers, concentrating the colour near the centers of the flowers. I added a soft halo of blues in and around the flowers to make them pop off the page a little more, using a bit of a stipple to add some texture.


 The sentiment is also found in the Exclusive Daisy set - and was stamped using Versafine Onyx Black ink.  The matted image is adhered to the patterned base with some 3D foam adhesive so that it rises up just a little.  To add even more shimmer, I went over the blooms with my clear Wink of Stella pen, and you can see the results here:


Happy stamping!

Copics used:  C1, C3, C00, YG01, YG00, B0000, B000, B00, B32, B34, G40, G43


Sunday, July 26, 2020

Bees Galore by ReneƩ Matarese

Hello Ai fans!

Today I'm sharing a card that uses images from several different Art Impressions sets.  The circle with the lilies is from 5091 – Easter Circlet MTF.


The little bees are from two different sets...

I took one of the little bees and popped him up on some thin wire.  I wrapped the wire around my piercing tool to create a "spring" so that he would "buzz" around.


Here's the inside of my card with another little bee.


I just love "good" bees and plant tons of flowers to help attract the honey bees and bumble bees.


Copics used:
Y0000, Y17, Y32, G21, BG000

Saturday, July 25, 2020

The nice nurse is out!! by Sharon Caudle

Hello AI Fans!!

One more get well card from me this weekend!!  This card features SC0681 Get Well Set. I stamped and colored up this nurse and then cut out the image using 5062 Rounded Rectangle A2 Double Stitched Dies. A super simple and quick card to make. 


Thanks so much for stopping by for a visit today and until next time - stay crafty!!

hugs
Copics used:
E000, E00, E11, E21, E23, E33, E35, E37
BG000, BG13, BG18
R20
T2
B000


Friday, July 24, 2020

Christmas in July Inspiration | By Jessica Shier

Hello Ai Fans!
It's Jessica today and I have some inspiration to get started on those Holiday cards! It's never to soon to start right? For this card I created a Copic marker background and add the cute little igloo from the Penguin Cheer stamp set


I'll have the list of Copic markers I used down below. I started off by sketching out the mountains with a W0 Copic marker. I used the light colored marker for the sketching because it gives me the ability to hide any areas that I sketched that I don't like. Once I had a outline of the mountain shape that I liked I did the same for the snow hills. This area is where I will stamp the igloo but I didn't worry about leaving a space for it, since I was still working with light colored markers. 


I started building up the mountains then add in some small details with a Micron Pen. I also stamped the igloo and built up the snow color around it. For the night sky I did use a few dark gray markers blended into the bright green but in order to get a smoother blend I did use Distress Ink in Black Soot. This gave me the ability to deepen the outer color but really create a smokey blended look. 

I stamped the sentiment from the Penguin Cheer set " Joy to you" in a clear embossing ink and heat embossed with Alabaster white embossing powder. I then added a few stars with a Jelly Roll white gel pen. 


This panel is cut down to 4in x 5.25in and popped up on a card base with a bright green card stock adhered to the front. I used some coordinating bright green craft foam to added the dimension. 


Copic Markers used:
W0, W1, W3, W6, W9
C3, C5,C7
BG000, BG10
YG01, YG03, YG63
Y13, Y15

Don't forget about this cool sale!


Thank you so much for joining me today. Happy Stamping!


Thursday, July 23, 2020

Sparkle & Shine Challenge #287 + Week 2!


Hello Ai Fans! 

This weekend we have a jam-packed schedule full of fun summer virtual events!!

We hope you will join us for any and all of these events! There are great prize packages, special coupon codes, and tutorials with Bonnie!

Click on any of images to go straight to these events!

Now, for this week's Challenge Inspiration!!!

Jil
 dotted her 
Woodland Cubbies with some sparkle to highlight the darling critters!


Crystal's Castle Cubbies card is a fairytale with bright colors and a little gleam!


Sharon
 leapt to the occasion with her feature using the 
Jump In Set and the perfect bling!


Renee has mastered our Sea Creature 2020 Exclusive Freebies! Who wouldn't want to swim with this spangled seahorse!!


Jessica
 used our Pand-tastic Set and Coffee Gift Card Holder for an un"bear"-ably cute card!


Inspired? Make sure you submit your entry below!


This week for our new challenge, we are ready to see your creativity shine! Use your metallic embossing, sequin embellishments, Wink of Stella Pen, glitter paper--the sky is the limit!!!
If you're looking for some starter ideas, check out our Christmas/Winter CardsFloralGirlfriends, or Basics on our Pinterest Page


We want to see how you create your best sparkly, shiny card or creation! Though you can use any stamps you have, we'd love to see any Art Impressions products in your collection!
Hurry, challenge closes July 29th at 5PM PT!


Here are the Challenge Rules...
✻ Please make a new card or creation. You can make any crafty item you wish; this is not limited to cards!
✻ Limit two submissions per person. You will receive extra votes if you use Art Impressions stamps!
✻ The Ai Challenge is open to everyone, international submissions are welcome!
✻ Include a link back to the Ai Blog or grab our button on the top right of our sidebar!
✻ Share the Ai love by clicking and commenting your fellow crafters.
✻ Make sure to get your link up by the deadline to enter your creations.
✻ Good luck and happy stamping!

You are invited to the Inlinkz link party!

Click here to enter
Watercolor Wednesday


NEW VIDEO!!!


NEW VIDEO! Christmas in July is BACK! Watch Bonnie as she shares a simple snowy birdhouse project!


Happy Stamping!