Showing posts with label Cabin Circlet MTF. Show all posts

Sunday, July 23, 2023

Cabin on a lake by Reneé Matarese

 Hello Ai fans!

Did you check out the current challenge here on the blog?


For 20 years my family and I rented cottages on the lake where my husband grew up.  I've spent many hours (and miles and miles) walking around that lake and putting my toes in the water at the end of the dock.  Sadly, everyone we used to rent from sold their cottages and new owners didn't want to rent.  There are other lakes, but they don't have the same meaning as this one did. It's the end of an era.

My card took me back to the summer before COVID which was the last time we rented. (Just a coincidence)


I use the 5726 – Nested Circle Dies to cut a figure 8 shape out of the front panel and then I cut two circles and pieced them together to make a frame for the window.  The sentiments are from 5734 – Friend Sentiment Set.


For the images, I combined three different sets.  I wanted to feel like I was sitting on the dock, watching the sailboats go by and looking at the beautiful cottages across the lake.

4981 – Cabin Circlet MTF
5093 – Dock Circlet MTF
5448 – Sailboat Window Set

You might be thinking,  but Reneé, the Dock Circlet had a cabin in it.  Why did you use the one from the Cabin Circlet?  It's because that one looks much more like the one we used to rent and some others on that lake.


Random fact...it was 5:26 when I glanced at the clock while coloring the sailboat.  Thus, the addition of 526 on the sail.  The ropes/twine were added to give some texture and a bit of a nautical look.


Markers used:
TT Peach Pink
Copics:
N1, T3, E35, E3, E55, YG63, YG67,
 B14, B41, B93, YG00

Tuesday, August 6, 2019

Cabin Circlet MTF Shadow Box Card by Jil Lebel

Hello Ai fans!

I decided to make another shadow box card.  They are quite simple to make and the end result makes you look like a magician!  I followed a video on You Tube to make mine and found it very easy to do that way.  I'm sure you'll have similar results.
The images were stamped onto Copic X Press It paper with Gina K Designs Black Amalgam Ink and colored with Copic markers.  The colors used are listed at the end of this post. The top two images were cut out with a Circle Double Stitched Die as well as the matching die from the stamp set.  The image with the writing around it was cut out with a Circle Double Stitched Die. I cut my patterned papers out and added them to the cards and die cut all of them with a circle die where my circlet image would show.  I did that for the two circle images without words.  I attached the layer with words inside the shadow box so it could be seen when the card was closed.
Copic Colors Used:
Fence - E31, E33, E35
Barn - E13, E15, E18, E37
Greenery - YG11, YG03, G24
Mountains - BV0000, BV00
Sky - B000, B00, Blender
Water - B000
Boat - C1, C3, C5
Deer - E70, E71, E74

Thanks for stopping by and Have a Great Day!

Thursday, July 18, 2019

Two Circlet Cards by Crystal

Hi Ai Fans! 

This week I played with the Lighthouse Circlet MTF and the Cabin Circlet MTF stamp set. 


The first card I have to share today was made with the  Lighthouse Circlet MTF stamp set.

I stamped all of the images onto smooth card stock with Memento black ink and colored them in with Spectrum Noir markers. The coloring is really fast since the images are so small. I used th Circle double stitched die to die cut the images out. Then die cut the center out of the first to images with the dies that come in the stamp set. 


For both cards I started with a piece of card stock trimmed to 11" X 4 1/4". Scoring at 3.8" in from both sides.  I die cut a circle on the front folded panel and the first inside card panel. 


I decorated both cards with some pattern card stock.


The second card I have to share today was made with the Cabin Circlet MTF stamp set. 


The only difference from the first card was I didn't add any pattern paper on the inside.

Spectrum Noir Markers:
BT1, BT2, BT5, EB1, EB2, EB4, EB7, IG2, IB1, YG1, YG2, YG3, BGR3, TB1, TB5, MB2, IG1, IG8, DG2, DG4 

Happy Stamping!

Tuesday, July 2, 2019

Cabin Circlet MTF Flip Top Card by Jil Lebel

Hello Ai fans!

I am fascinated with all things TryFold so it won't shock anyone to know that I try to come up with different ways to use them.  I wanted to use my Cabin Circlet MTF stamp set in a way that I haven't seen before, so I came up with this fold.  I'm sure it's been done, but I haven't seen it done with the Circlet Mini TryFolds.  I hope you enjoy this different card fold! yet.  
The images were stamped onto Copic X Press It paper with Gina K Designs Black Amalgam Ink and colored with Copic markers.  The colors used are listed at the end of this post. The top two images were cut out with a Circle Double Stitched Die as well as the matching die from the stamp set.  The image with the writing around it was cut out with a Circle Double Stitched Die.
Three cardstock base layers were cut out with the We R Memory Keepers Circle Dies.  I also cut out matching layers from the American Crafts Cedar Lane 6" x 6" patterned paper and attached them to the card stock.  I also cut a smaller circle from the patterned paper for each of the three card layers using the Ai Circle Double Stitched Dies and attached them to the center of each layer. I used the matching dies from the MTF set to cut out the top two layers. Then I scored a crease at the top of each of the top card layers.  I also added two holes into each of the top two layers.  I attached the top two layers together with brads and the middle two layers together with twine.
Copic Colors Used:
Fence - E31, E33, E35
Barn - E13, E15, E18, E37
Greenery - YG11, YG03, G24
Mountains - BV0000, BV00
Sky - B000, B00, Blender
Water - B000
Boat - C1, C3, C5
Deer - E70, E71, E74

Thanks for stopping by and Have a Great Day!

Thursday, June 27, 2019

May Simple Joys Fill Your Day By Crystal

Hi Ai Fans! 

This week I have a card to share using the Cabin Circlet stamp/die set. Circlet cards are so fun to make and are done in no time at all!  


I started used water color cardstock for the base of the card and stamped directly onto the card base because I was going to water color. If I was coloring with alcohol markers I would adhere the panels to my card base. I stamped the images in Versfine black ink.


 I used the Square double stitched die to cut pattern paper out and the Circle double stitched dies for the opening in the center. 


The images on the stamps are very detailed but when water coloring them it is done very fast. I love the look of water color when it is a little messy. 


The inside is where the sentiment is. The look of the sentiment wrapped around the image is so unexpected you do see it till you open the card.


A little peak through of all three layers. 

Happy Stamping!


Thursday, July 12, 2018

Challenge 236 Masculine Cards WEEK 2!


Hello, Ai Fans!

We're back with the second week of our Masculine Card's Challenge! Last week, Dana shared a wonderful tutorial for a classic, clean and simple card that still has a lot of interest! Be sure to check it out if you missed it. The rest of our Design Team is here to share their take on the challenge! Visit the designer's personal blog by clicking their name, so you can view more info about their creation!


Cheri with Cowboy Wiggle Wobble

Crystal with Raccoon Mini Spinner

Dana with Reel Great Guys


 Renee with Weekend Warrior

Sharon with Sports Fan Shaker 
Thanks, team! These cards are perfect for that special guy!
Hey, join in the fun! Show us your favorite masculine images, colors, techniques and more for those manly cards. You won't want to miss out on this challenge for a chance to win some Ai stamps!

Here are the Challenge Rules
✻ Please make a new card or creation. You can make any crafty item you wish; this is not limited to cards!
✻ Limit two submissions per person. You will receive extra votes if you use Art Impressions stamps!
✻ The Ai Challenge is open to everyone, international submissions are welcome!
✻ Include a link back to the Ai Blog or grab our button on the top right of our sidebar!
✻ Share the Ai love by clicking and commenting your fellow crafters.
✻ Make sure to get your link up by Wednesday, July 18 at 5:00 p.m. PST to enter your creations.
✻ Good luck and happy stamping!


NEW releases are coming soon! Next week, Art Impressions will be exhibiting at the AFCI Mixed Media Event, debuting our Summer 2018 releases to store owners! You can see sneak peeks of brand new stamps and dies by watching our Facebook Live video! Mark your calendar for July 18, at 10 AM MT and hop over to our Facebook Page to view the live video. New products will be arriving in your independent local stamp stores in August!

A Facebook account is not necessary to view our Facebook Live video - simply visit our page here and if a pop-up to join Facebook appears, you can click "Not Now" at the bottom of the dialog box.

Tuesday, April 24, 2018

Cabin Circlet MTF by Diane Zechman

Hello Ai friends and happy Tuesday! I am posting on Tuesday this week instead of Monday and today I have a masculine card to share using one of the new Ai Circlet MTF sets. Here I used the 4981- Cabin Circlet MTF set. I have already shared 2 ways that I used the new Circlets and here's the third card I made. I’ll share one more style later!


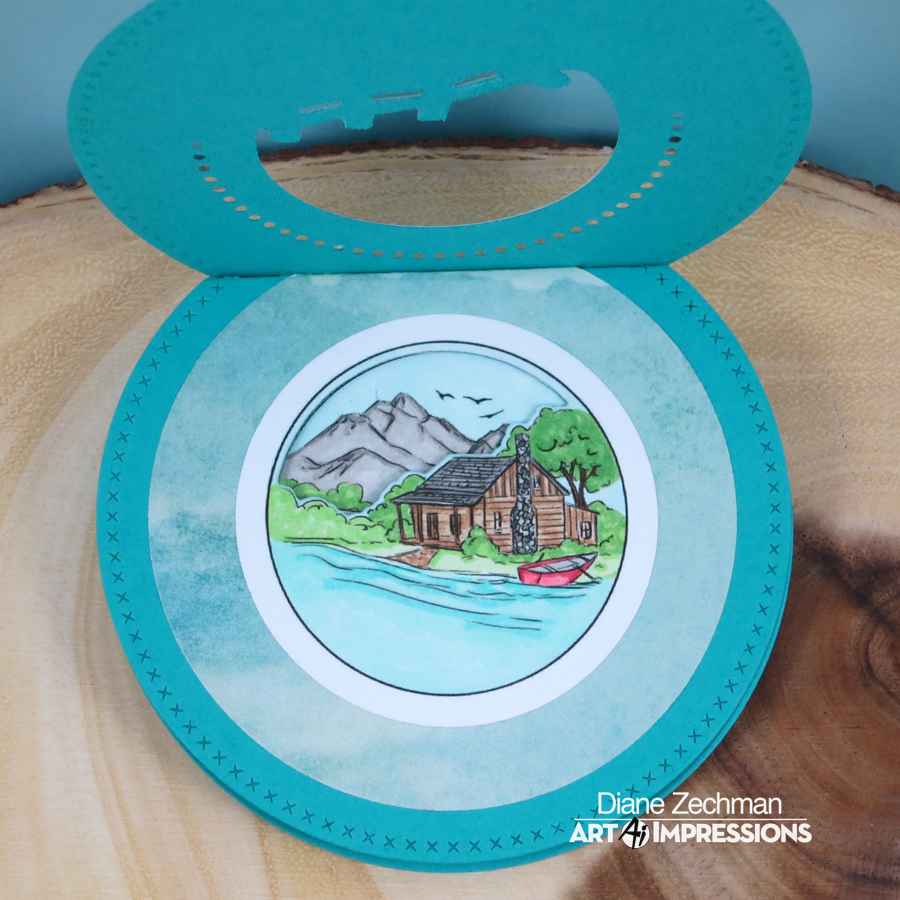
I wouldn't normally make a circle shaped card for a masculine card, but by incorporating some masculine papers and cross-stitched dies, I think it works. First, I stamped and colored each image. The first two were not fully colored where the matching dies will cut them.


Next, each image was die cut with circle dies and the inside of the first two were die cut with the dies included in the set. Then 3 blue layers were die cut. They are not attached yet here.


Some patterned paper layers were added to the first two and then the circle images were adhered. The matching dies were laid back inside the images and held in place with low-tack tape. These were run through the machine again to cut a window through the first two blue layers.


Now each layer is ready to be assembled. (I decided to add some paper scraps and die cut holes on that first one!)


Using my Scor-Pal, I scored a half inch line at the top of the SECOND and THIRD circles. I didn't want the top of my card to have score marks, for a nice finished look. Then I adhered the layers together using Scor-Tape on those top 1/2" scored areas.


I love how you can peek through from the top circle to the back one!


This circle card opens sort-of like a book.


Great masculine images!


Have a great Tuesday and… happy stamping!