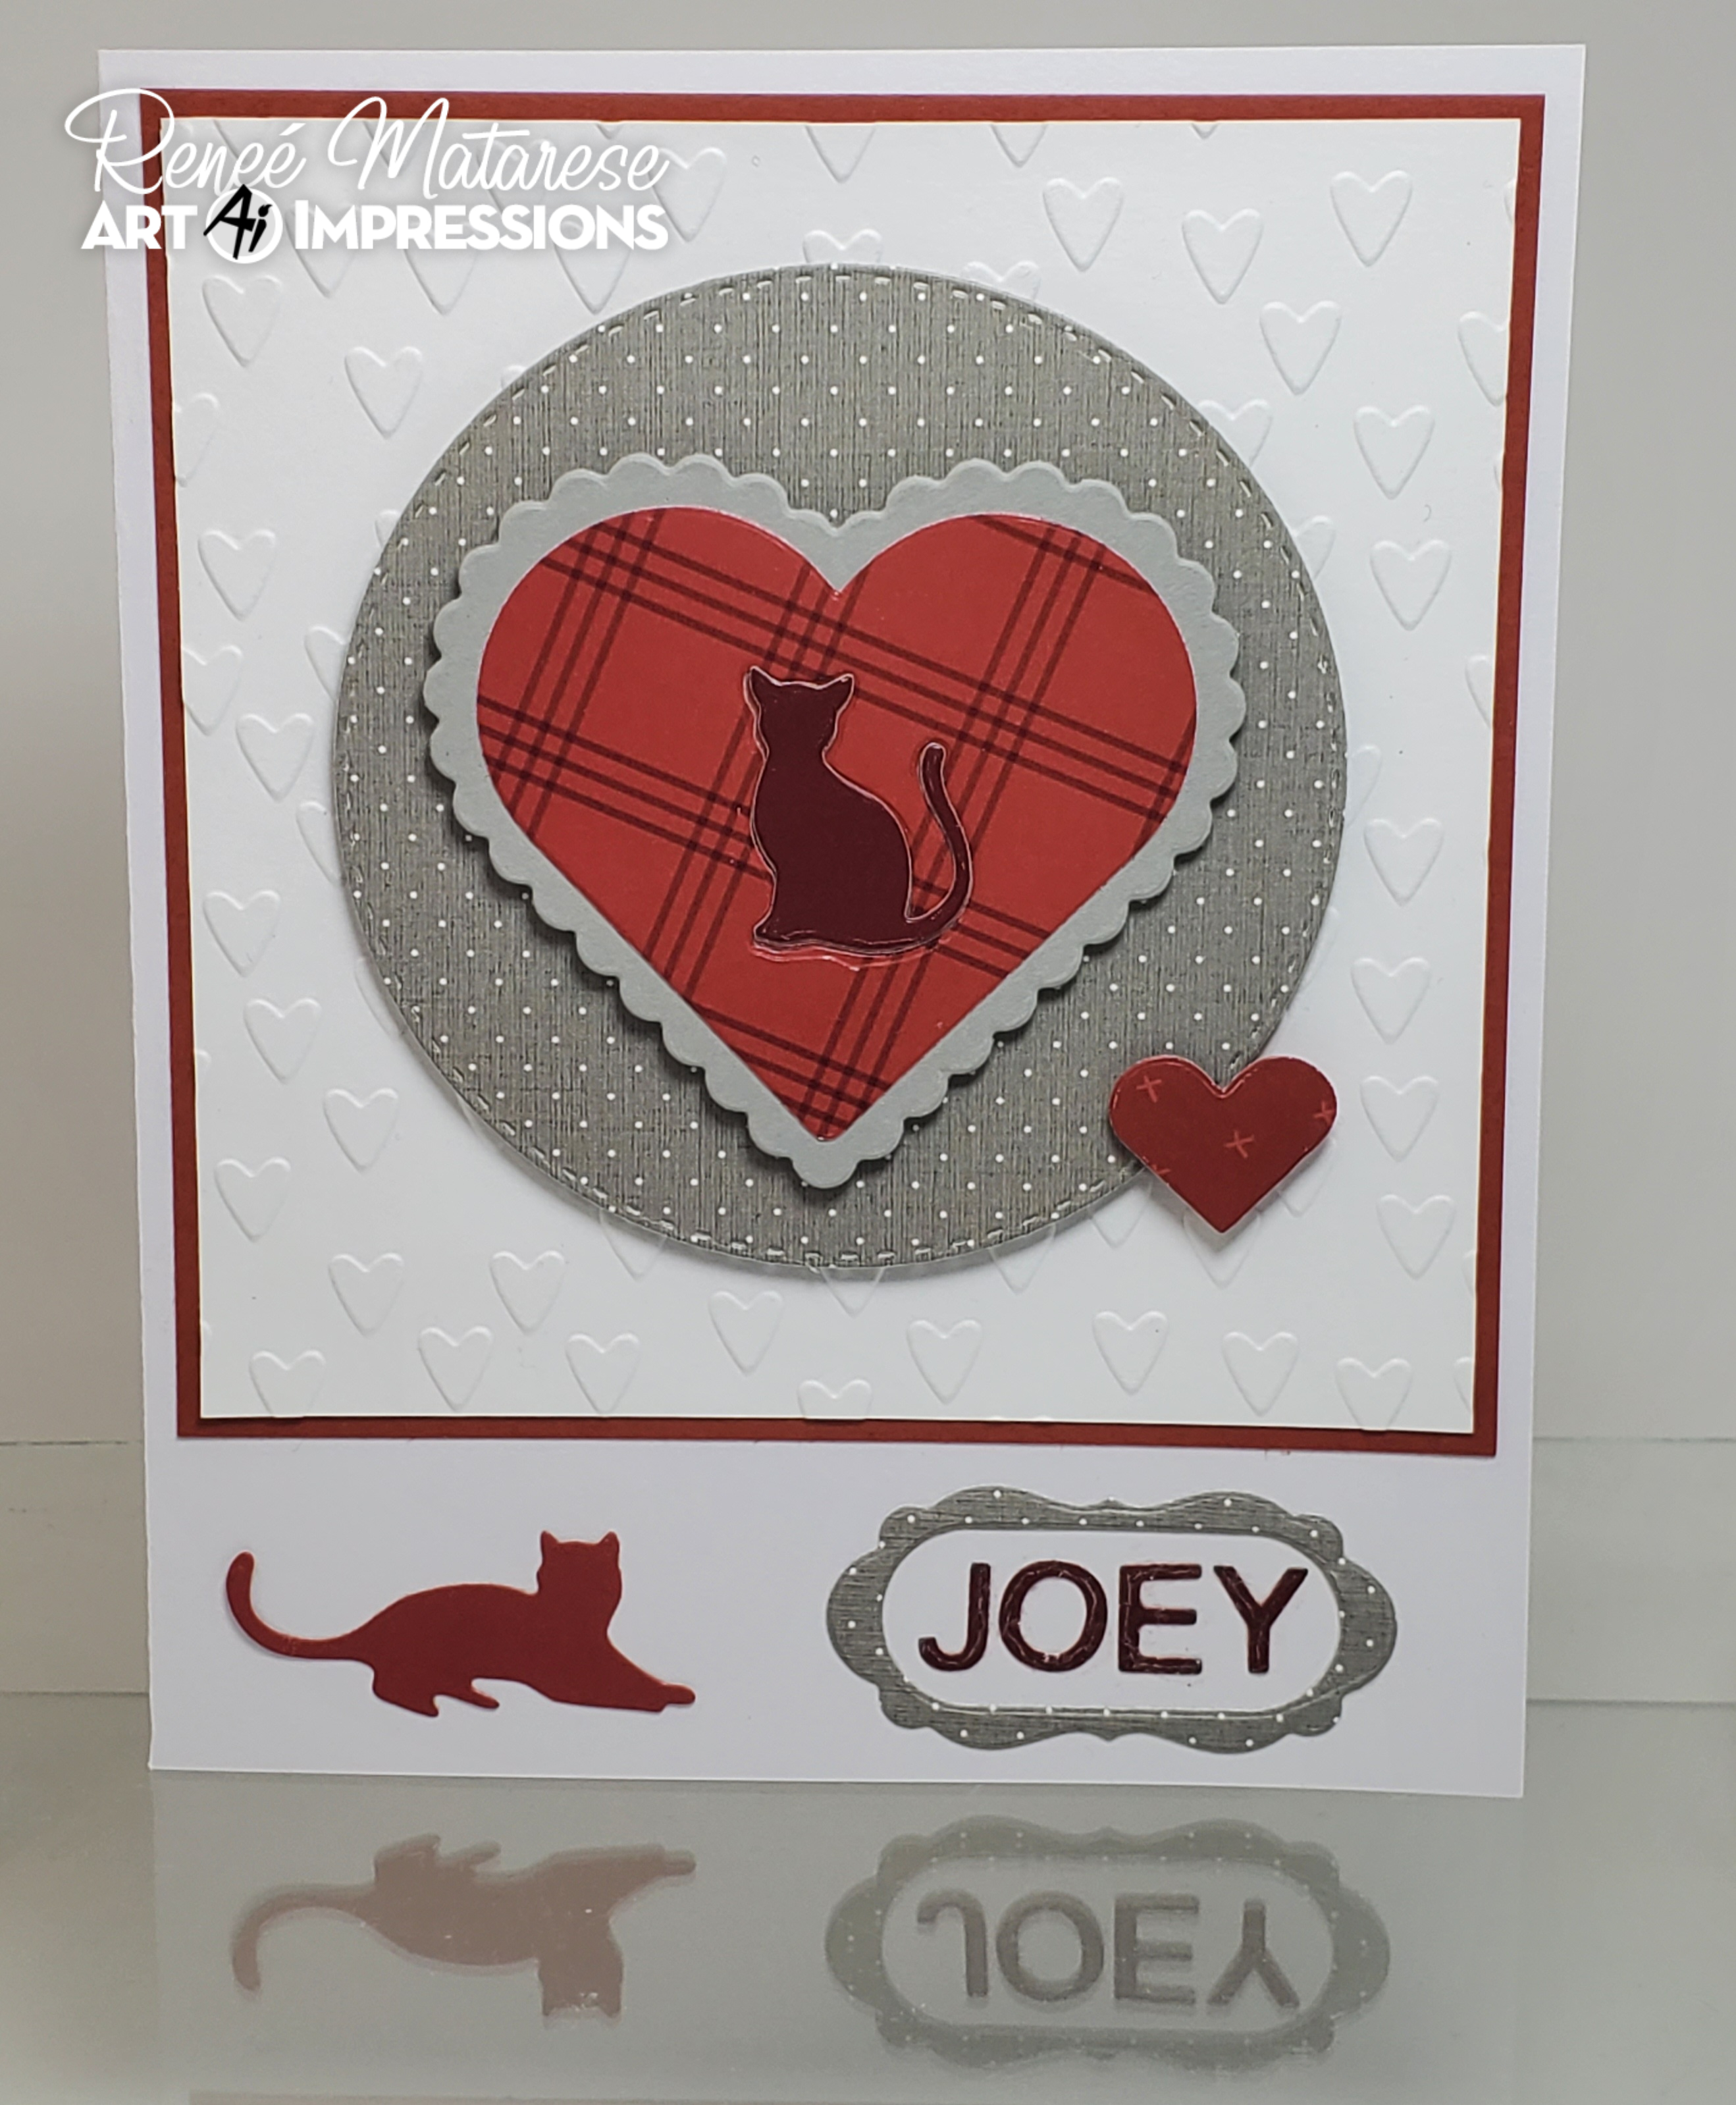
Showing posts with label Circle Double Stitched Dies. Show all posts

Thursday, August 15, 2019

Hope Your Day is Pand-tastic

Hi Ai fans!


This week I have two cards to share using the Pand-tastic stamp set


I stamped the panda with his little paw in the air twice onto smooth card stock with memento black ink. The first one I masked off so I could ink the background with a polka dot stencil.


I adhered the circle and a sentiment banner to a polka dot embossed background. I matted the polka dot embossed background to pink card stock. I then adhered the whole panel to a 5 1/2" X 4 1/4" card base.


The second stamped panda bear I fussy cut out after I colored it in. I adhered the panda to a foiled background die cut with a Circle double stitched die

I adhered the die cut circle and sentiment to a embossed background and adhered the whole panel to a 5 1/2" X 4 1/4" card base. 

Spectum Noir Markers: 
IG1, IG2, IG5, IG9, PP1, DR4
Happy Stamping! 


Tuesday, August 6, 2019

Cabin Circlet MTF Shadow Box Card by Jil Lebel

Hello Ai fans!

I decided to make another shadow box card.  They are quite simple to make and the end result makes you look like a magician!  I followed a video on You Tube to make mine and found it very easy to do that way.  I'm sure you'll have similar results.
The images were stamped onto Copic X Press It paper with Gina K Designs Black Amalgam Ink and colored with Copic markers.  The colors used are listed at the end of this post. The top two images were cut out with a Circle Double Stitched Die as well as the matching die from the stamp set.  The image with the writing around it was cut out with a Circle Double Stitched Die. I cut my patterned papers out and added them to the cards and die cut all of them with a circle die where my circlet image would show.  I did that for the two circle images without words.  I attached the layer with words inside the shadow box so it could be seen when the card was closed.
Copic Colors Used:
Fence - E31, E33, E35
Barn - E13, E15, E18, E37
Greenery - YG11, YG03, G24
Mountains - BV0000, BV00
Sky - B000, B00, Blender
Water - B000
Boat - C1, C3, C5
Deer - E70, E71, E74

Thanks for stopping by and Have a Great Day!

Saturday, August 3, 2019

Hello Spring Chicken by Sharon Caudle


Hello AI Fans! 

My card today features a stamp set I love soooo much!!  Spring Chicken Set!! I just stamped her up and cut it out using the Circle Double Stitched Die set.  Then the card base is made using the Rectangle Double Stitched Dies. I love gingham paper, it just screams "country" to me, so that is what I put behind her. 


I added as simple little bow and a couple of pearl drops to finish it off.


Thanks so much for stopping by for a visit today! Until next time - stay crafty!!


Copics used:
E21, E23, E33, E35, E51, E53, E97, E99
R24, R27
B000


Saturday, July 20, 2019

What a bird brain by Sharon Caudle

Hello AI Fans! 

Do you love plain and simple cards?  It doesn't get much simpler than this one!!  I used a scalloped circle die to make the card base, then used AI Double Stitched Circle Dies to make the layers. The stamp is from Spring Chicken Set and I colored her with Copic markers. 


Thanks so much for stopping by for a visit and until next time - stay crafty!!


Copics used:
E21, E23, E33, E35, E51, E53, E95, E97, E99
G21
B000
T1, T2, T4
R02, R22, R24, R27


Thursday, July 18, 2019

Two Circlet Cards by Crystal

Hi Ai Fans! 

This week I played with the Lighthouse Circlet MTF and the Cabin Circlet MTF stamp set. 


The first card I have to share today was made with the  Lighthouse Circlet MTF stamp set.

I stamped all of the images onto smooth card stock with Memento black ink and colored them in with Spectrum Noir markers. The coloring is really fast since the images are so small. I used th Circle double stitched die to die cut the images out. Then die cut the center out of the first to images with the dies that come in the stamp set. 


For both cards I started with a piece of card stock trimmed to 11" X 4 1/4". Scoring at 3.8" in from both sides.  I die cut a circle on the front folded panel and the first inside card panel. 


I decorated both cards with some pattern card stock.


The second card I have to share today was made with the Cabin Circlet MTF stamp set. 


The only difference from the first card was I didn't add any pattern paper on the inside.

Spectrum Noir Markers:
BT1, BT2, BT5, EB1, EB2, EB4, EB7, IG2, IB1, YG1, YG2, YG3, BGR3, TB1, TB5, MB2, IG1, IG8, DG2, DG4 

Happy Stamping!

Tuesday, July 16, 2019

Lighthouse Circlet MTF by Jil Lebel

Hello Ai fans!

This Lighthouse Circlet MTF was so fast to color in with my Tombow markers.  It's becoming one of my favorite stamps to use.  I made up two different card for today's post.  The inside portions are the same, but I used different papers for the front.  The second front is the last picture in this post.
All three images were images were stamped onto Strathmore Watercolor paper with Versafine Clair nocturne Ink and colored with Tombow markers.  The colors used are listed at the end of this post. The images were colored using a combination of a #1 and a #4 paintbrush.  Some of the markers were painted directly onto the image but some of the areas were first colored onto the Watercolor Palette and added to the image with a brush.
 The top two images were cut out with a Circle Double Stitched Die as well as the matching die from the stamp set.  The image witht he words around it was cut out with a Circle Double Stitched Die.
I attached Recollections Seaglass 6" x 6" patterned paper to the front and middle piece of a white Tryfold card.  Then I attached the front Circlet image to the card and used the matching die cut to cut through the card.  I matched up the second image and cut then attached it to the middle piece of the card before using the matching die to cut out the matching window. The last thing I did was cut a circle with the patterned paper and attach it to the center of the card before attaching the last piece of the circlet to the top of it.
Tombow Markers Used -
Sky - 296 Green, 493 Reflex Blue
Water - 526 True Blue
Grass/Bushes - 177 Dark Jade
Ground - 177 Dark Jade, 526 True Blue
Lighthouse - 526 True Blue, 969 Chocolate
Fence - 969 Chocolate
Boat - 969 Chocolate
Lighthouse Beam - 993 Chrome Orange

Thanks for stopping by and Have a Great Day!

Thursday, July 11, 2019

Light House Card By Crystal

Hi Ai Fans!

I'm back again this week playing with another circlet stamp/die set but this time it is the Lighthouse Circlet set. 


This way I played with this stamp set and made a card that was a little different then the traditional tri-fold card. I used the Circle double stitched dies to die cut three circles and to cut the center out of two of them. The last circle panel I left whole. 


I stamped all of the images with Versafine Black ink onto water color card stock that I had die cut into a circle. 


I used Spectrum Noir Aqua markers I just scribble a little color down on my glass craft mat and use a paint brush with some water to color onto the images. 


I punched a whole through all three circles and attached them with a fancy brad. 


Happy Stamping! 


Tuesday, July 2, 2019

Cabin Circlet MTF Flip Top Card by Jil Lebel

Hello Ai fans!

I am fascinated with all things TryFold so it won't shock anyone to know that I try to come up with different ways to use them.  I wanted to use my Cabin Circlet MTF stamp set in a way that I haven't seen before, so I came up with this fold.  I'm sure it's been done, but I haven't seen it done with the Circlet Mini TryFolds.  I hope you enjoy this different card fold! yet.  
The images were stamped onto Copic X Press It paper with Gina K Designs Black Amalgam Ink and colored with Copic markers.  The colors used are listed at the end of this post. The top two images were cut out with a Circle Double Stitched Die as well as the matching die from the stamp set.  The image with the writing around it was cut out with a Circle Double Stitched Die.
Three cardstock base layers were cut out with the We R Memory Keepers Circle Dies.  I also cut out matching layers from the American Crafts Cedar Lane 6" x 6" patterned paper and attached them to the card stock.  I also cut a smaller circle from the patterned paper for each of the three card layers using the Ai Circle Double Stitched Dies and attached them to the center of each layer. I used the matching dies from the MTF set to cut out the top two layers. Then I scored a crease at the top of each of the top card layers.  I also added two holes into each of the top two layers.  I attached the top two layers together with brads and the middle two layers together with twine.
Copic Colors Used:
Fence - E31, E33, E35
Barn - E13, E15, E18, E37
Greenery - YG11, YG03, G24
Mountains - BV0000, BV00
Sky - B000, B00, Blender
Water - B000
Boat - C1, C3, C5
Deer - E70, E71, E74

Thanks for stopping by and Have a Great Day!

Thursday, June 27, 2019

May Simple Joys Fill Your Day By Crystal

Hi Ai Fans! 

This week I have a card to share using the Cabin Circlet stamp/die set. Circlet cards are so fun to make and are done in no time at all!  


I started used water color cardstock for the base of the card and stamped directly onto the card base because I was going to water color. If I was coloring with alcohol markers I would adhere the panels to my card base. I stamped the images in Versfine black ink.


 I used the Square double stitched die to cut pattern paper out and the Circle double stitched dies for the opening in the center. 


The images on the stamps are very detailed but when water coloring them it is done very fast. I love the look of water color when it is a little messy. 


The inside is where the sentiment is. The look of the sentiment wrapped around the image is so unexpected you do see it till you open the card.


A little peak through of all three layers. 

Happy Stamping!