Showing posts with label Masking. Show all posts

Friday, March 31, 2023

Favorite Travel Partner Card by Tasha!

 Happy Friday Ai Fans!

Tasha here sharing a travel themed card created with the 4932-Pack Your Bags Set and 5186-Enjoy the Ride Set. I love the Ai people stamps and this traveling duo is so much fun to color!

For this project, I started by stamping the couple with black ink and colored them with Copic Markers. I used masking paper to mask off the lady before stamping the man to have the couple stand closer together.  Masking paper is a great way to get a layered look without cutting the images out. 
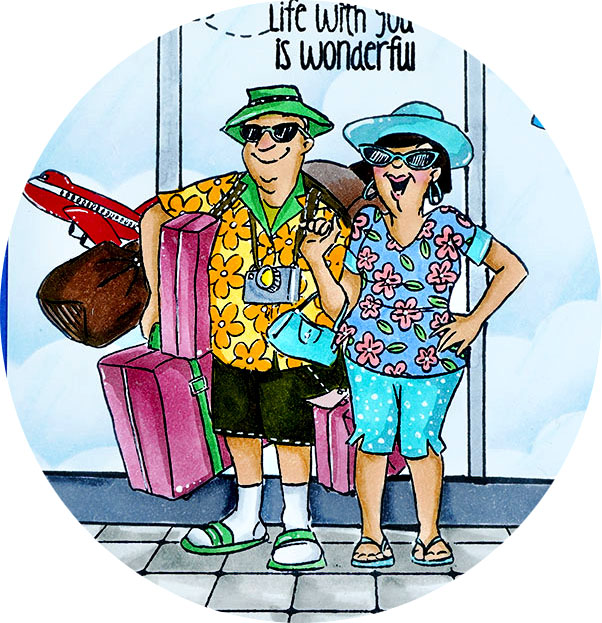

For the background, I drew in panels to look like large windows and stenciled fluffy blue clouds. I also stamped several airplanes to make it look like an airport scene. This couple is totally what my husband and I look like when traveling, but I do pull my own rolling luggage. 


Lastly, I added layers of red, gold glitter, and blue paper to coordinate with the airplanes. I also stamped "Life with you is wonderful" with black ink to look like it's connected to one of the planes. The greeting and images are from different sets, but work together perfectly to complete the design!

I hope you enjoyed today's project and are having a great day!


Friday, March 27, 2020

Cool Hat Bro | By Jessica Shier

Hello Ai Fans!

Welcome back to the blog. It's Jessica here today and I have a cute graduation card to share with you. I know we are living in a world of uncertainty but hopefully there is an end in sight and those that will graduate will still be able to, however that may look. Let's make certain to bring some cheer to those moments when we can.


I'm using the super cute Graduation set. I love all the fun animals, of course, but this giraffe is just adorable! I stamped the giraffe and his little bird friend on to a piece of Accent Opaque white card stock with Gina K. Amalgam ink. I did use Copic markers to color this one in so I'll have the list of those down below. This is another great example of the shading examples that are available on the Art Impressions packaging. I follow that and love how it turned out.


After coloring in the Giraffe image I stamped it again really quick on to a piece of Inkadinkado masking paper. You can find this masking paper in the Ai shop! I fussy cut my masked image out and placed it over the first one. I did stamp and cut the whole image. I will be using that as a mask for the ground and sun in blending too. 
In the Graduation set there is a really cool stamp that is a bunch of graduation hats. I stamped that image over the top so that it looked like the hats were falling behind the Giraffe. Before coloring the hats in I used a strip of masking paper and used it as a mask for the ground. I added some shading with some light brown inks and also ink blended the sun with a stencil. Then removed the masks and colored in the hats. After that I stamped the sentiment and die cut my panel with a Rectangle Double Stitch die. 


The Giraffe set is part of the New Release sale!
Now through March 29th 2020. 

I focused my colors on blue and yellow, which I think is a pretty popular color for graduations. Mine were orange and black though lol. I like how you can color these to fit any school colors. Alright that is it from me!

Thank you so much for joining me today.
Happy Stamping!


Friday, March 20, 2020

You Make My Heart Sing | By Jessica Shier

Hello Ai fans!

It's Jessica here on the blog today! I have a cute little Spring time card, using the HM Garden set. These accessory sets to the Holiday Mansion are fun to decorate the house with but I also love using them on their own. So that is what I will be doing today.


I stamped and die cut the birdhouse, flower pot, boots and birds from the HM Garden set. I'll have the list of Copic Markers I used below.

For the background I used Inkadinkado masking paper which you can find on the Art Impressions website. This is some of my favorite masking paper. I used two larger circle dies and die cut the masking paper. Before ink blending the background I placed the smallest circle down. Then I added the stencil over the top and ink blended with a light tan dye ink. This stencil has a cool log background that I thought went well with the HM Garden Set. 


I peeled off the circle mask and added the negative of the large circle, centering it over the first masked circle. This creates a outline that I used a darker brown dye ink. You can just slightly see the stencil through that darker ink blending! Looks layered but it is actually flat.

I added the garden scene circle with the craft foam backing to the center of the masked white circle and adhered everything to a A2 card base. Adding a sentiment and bird last. The inside has a few extra elements that I didn't use on the front along with another die cut circle.


Thank you so much for joining me today!
Happy Stamping.


Wednesday, January 8, 2020

Happy Retirement! by Niccole

Hello Ai fans!!

 I am using the newly released stamp set called Happy Trails.  This stamp set is so much fun. Tomorrow you will see another card using this set for the current challenge going on.
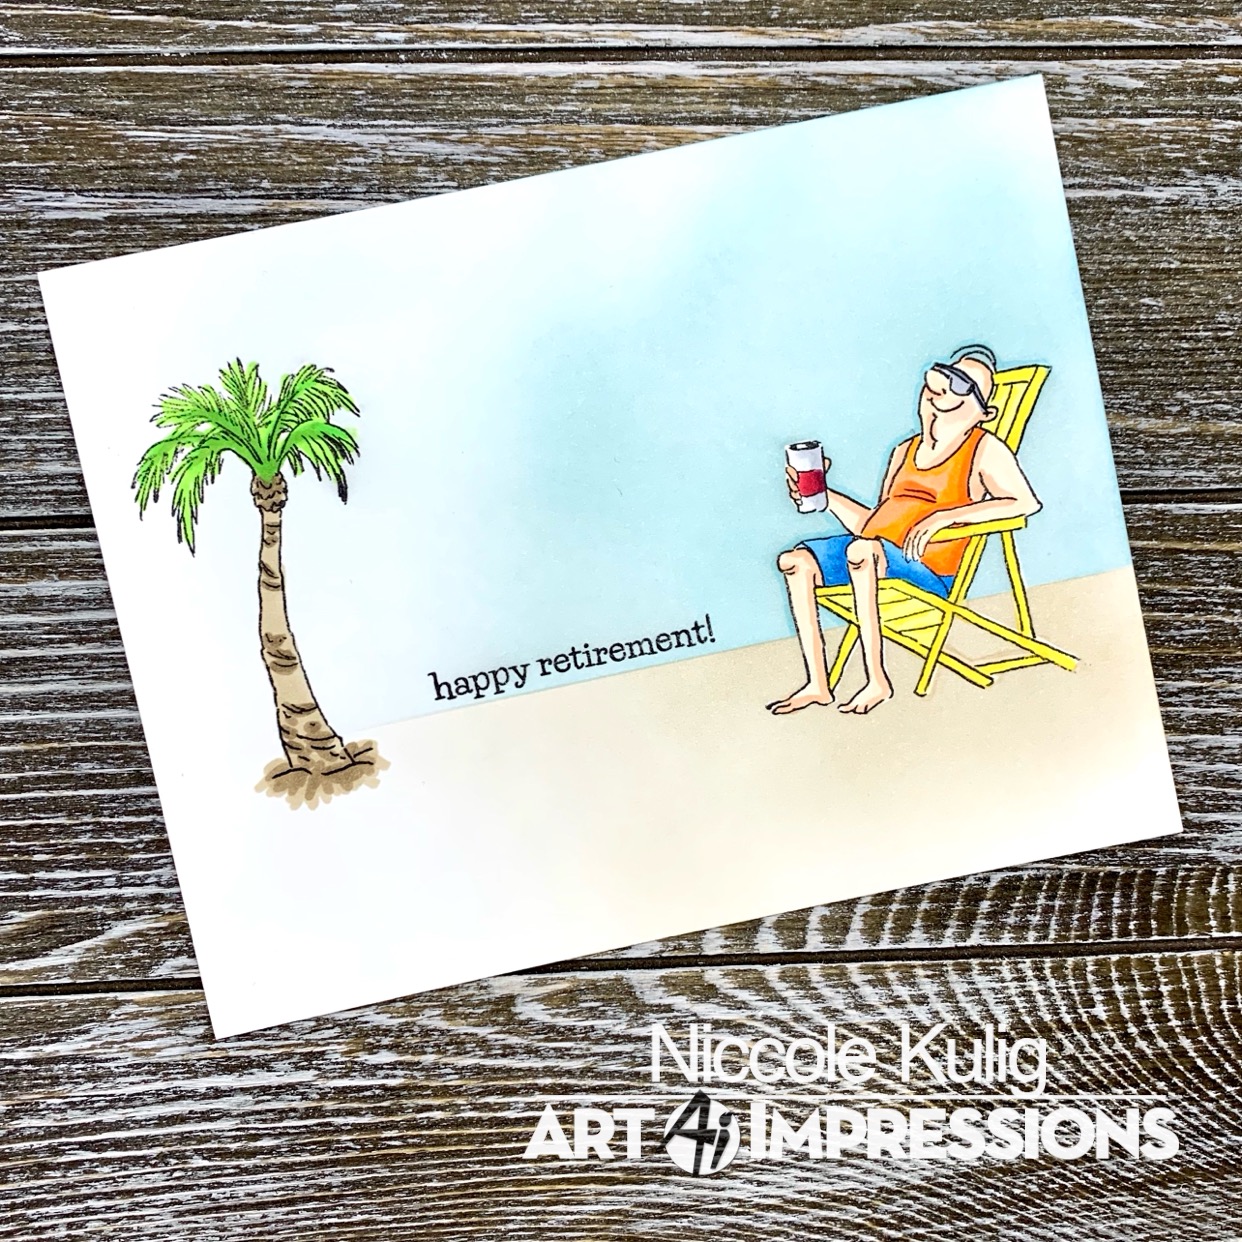
I knew as soon as I saw this set I wanted a chill, laid back retirement card.  I think I achieved it with this card; wouldn't you agree??
I started by stamping the images all at the same time with my Misti. I lined up the palm tree, the sentiment, and beach bum and stamped them at once.  I then stamped them a second time onto my masking paper and covered up my palm tree and beach bum.
Ok, here is where the magic happens.  I took another piece of masking paper and made a horizon line.  So I have the bottom portion of my card covered along with my palm tree and beach bum.  I ink blended some blue in to emulate the sky. From there I reversed the direction of my straight piece of masking paper and covered up the blue I just applied.  I ink blended some brown to emulate the sand. Peel off all your masking paper and reveal the magic scene and ares to Copic color. From here you Copic color your images and that's it, you are done.

Here is the full card again.  Isn't a simple one layer card all you need sometimes? I am so please with how this turned out.  You know you can save your cut out masked images to reuse another time, right?

Happy Wednesday everyone! Thank you so much for stopping by please come back again soon and see what we all have been up to. 

Copics used:
B00, B12, B14, B16
C1, C3, C5
E00, E11, E43, E44
R11, R35, R37, R39
Y113, Y15
YG05, YG07, YG17
YR02, YR04, YR07

Until next time ... Hugs & inky fingers!