Showing posts with label Pack Your Bags set. Show all posts

Monday, August 5, 2024

Road Trip by Sharon Caudle

 Hello AI Fans!


There's a new challenge going on right now called Never Have I Ever. We are asking you to use a stamp or die that you've had and never used.  I don't know how long I've had 4932 Pack Your Bags Set and 4931 Road Trip Set, but this is the very first time I've ever used them. Unreal! I stamped them onto Copic friendly paper with Memento Tuxedo black ink and then colored them with Copic markers which are listed below. Road trips are so much fun, don't you think? 


That's it for me today! Thanks so much for stopping by for a visit and until next time - stay crafty!!


Copics used:
E000, 00, 11, 21, 23. 33, 35, 37, and 41
Y21, 23, 26, and 28
R20, 81, 83, and 85
G12 and 24
C1


Saturday, February 17, 2024

You're Really Going Places! by Janet


 Happy Saturday everyone! It seems like everyone I know is going on a cruise lately. I am not so lucky but with Art Impressions, you can take yourself all kinds of places so today, I am cruising!

The stamped and colored images are from an oldie but a goodie, 4932 - Pack Your Bags Set. I'm not sure how it can be but this is the first time I've used this set! I was a little intimidated by all the details in this but I see now that was a silly fear. All those details make the finished images even better! I appreciate that I didn't have to draw a shirt pattern on the lady. Soooo easy!

This is an easel card which means it lies flat when closed but then stands up with a hinge mechanism when opened up. It requires a stopper to keep the easel open. In this case, I used the cruise ticket. By default, when it's open you see the inside so decorations on the inside are seen when it's displayed. In this card, I used two layers of wave border inside. I highlighted the wave tips with white ink so they'd stand out and give more dimension. In the photo below, I took a top down view of the card so you could get a good view of the stopper. So much detail in this ticket!


Sometimes creating a background is hard and when I feel stuck, I often turn to images I can find online. The cruise ship is a graphic I found on Cricut Design Space but truly you could pick from many ideas available on the internet. In the end, I chose this one because it still had a graphic look and the colors matched my theme. I printed the ship and then colored the water and sky around it. I also drew and colored a simple wooden dock at the bottom of the image so the lady had  a place to stand.  Once I finished, I mounted it on two layers of complementary card stock. 

So let's take a closer look at the lady I used on this project. She was a blast to color and of course, I used some bright pinks and blues. I'm a color addict. The brighter the better it seems! I had a last minute inspiration to add a white pearl necklace and bracelet with white acrylic paint. I love how that looks! I also colored up the luggage, life ring, airplane and camera. I should also mention that I used the flag included in the 5718 - Mini Journal Template Set to cut out the sentiment. I mounted it with a jewel brad and hung the camera off of it. The detail in the cruise ticket is really amazing. All in all, these are truly adorable images!


Thanks for stopping by today. I hope you'll stop by the store to see all the things you need for your card, journal, and tag making projects. 

Janet YouTube - Blog - Facebook - Instagram - Pinterest

Friday, July 28, 2023

Go See the World Card by Tasha!

 Happy Friday Ai Fans!

Tasha here sharing a travel-themed card inspired by the "V is for Vacation" Challenge. I love traveling and the 4932 - Pack Your Bags Set is one of my all time favorite sets!

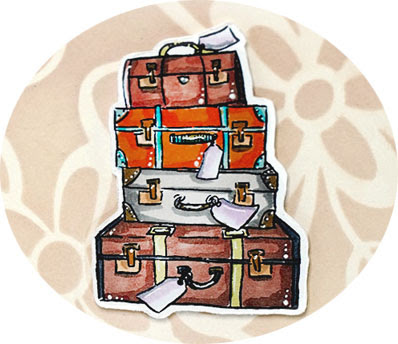
To create this card, I stamped the stacked luggage and cruise ticket with black ink and colored them with Copic Markers. I normally use the traveling couple when working with this set, but thought it would be fun to create with the included accessories and love how this turned out!


To add more color, I stenciled a floral background on to cream paper and added layers of bright colored cardstock. I also used a die to create a flap that revealed "Bon Voyage" when you lift the flap panel.


Lastly, I stamped the greeting "Go see the World!" and another stacked suitcase image on the inside to complete the design.

Thank you for checking out today's card and I hope you will join in the Ai "V is for Vacation" Challenge!


Thursday, July 20, 2023

V is for Vacation! Challenge #356

Hello and welcome to the new challenge!
This time we're all about vacations.
Summer is here (for most of us) and so...
V is for Vacation!


We want to see your summer vacation projects.
Cards, scrapbook layouts, any crafty project that says vacation.
Show us your cabins, lakes, oceans, picnics, pool parties, travel...whatever vacation means to you.

Tasha is our featured artist this week, but before we get to her Dutch fold tutorial we need to announce the winners of Bonnie's Birthday challenge.  We normally choose a Top Spot and a Lucky Random winner, but this time, since there were so many first time entries, we decided to choose them both randomly.

Bonnie sent me several text messages telling me how touched she was with all of your kind messages and how beautiful all of your cards are!  You all really helped give her a wonderful birthday!


#13 and #49 were selected. 
Congratulations Kathy and Reetta!


Please contact Leah at Feedback@artimpressions.com
to claim a free stamp set of your choice!
Also, be sure to grab our badge to display on your blog, Facebook or Instagram!

Now let's see Tasha's adorable card!

As usual...I LOVE the clothes!  She always adds so much detail. 
And...those WHITE SOCKS!  lol!


Hi Ai Fans!

Tasha here sharing a card featuring the fun 4932 - Pack Your Bags Set! When I think of vacation, I think of a cruise to warm tropical location. This stamp is totally what my husband and I look like when traveling; we also wear hats and tropical tops!


The image was stamped with black ink and I used Copic Markers to color the couple and background. I was inspired by the colors on the cruise ship paper and wanted the center card to look like a vacation photo.


For the bottom two panels, I used the back side of the cruise ship pattern paper and silver metallic paper. I love the red, white, and blue color combination!

The best part of this fold is that there are so many panels to decorate. It's great to have cards that allow you to use scrap paper and if you're like me, you tend to have plenty of scraps to select from. I think I'm a pattern paper hoarder! 

Lastly, I layered another piece of the ship pattern paper to the inside of the card and stamped a cruise ship in a light gray ink color. I also matted the center card with the same red paper used on the front panel and stamped "Bon Voyage" with blue ink to complete the design.


Thank you for checking out today's project and I hope you will join in the "V is For Vacation" Challenge!

Card Fold Base Measurements:
  • Card Base: 12" x 9-1/2"
  • Score along the 12" Side at 3" and 9"

Score along the 9-1/2" Side:
  • Score at 3-1/2" 
  • Score at 6-1/2" to the first score line.
  • Score at 6-1/2" up to the 2nd score line.


  • Cut the x4 areas as shown below.
  • Fold all the score lines (I recommend using a bone folder.)
  • Decorate and enjoy!


✻ Please make a new card or handmade crafty creation. You can make any item you wish; this is not limited to cards!
✻ Limit two submissions per person. You will receive extra votes if you use Art Impressions stamps!
 ✻Please include your first name and last initial on your submission.
✻We love to comment on your entries, but keep in mind if you use a private group or a platform that you need to sign up for, we probably won't be able to.
✻ The Ai Challenge is open to everyone, international submissions are welcome!
✻ Include a link back to the Ai Blog or grab our button on the top right of our sidebar!
✻ Share the Ai love if you can, by clicking and commenting on your fellow crafters.
✻ Make sure to get your link up by the deadline to enter your creations.
✻ Good luck and happy stamping!

You are invited to the Inlinkz link party!

Click here to enter

Friday, March 31, 2023

Favorite Travel Partner Card by Tasha!

 Happy Friday Ai Fans!

Tasha here sharing a travel themed card created with the 4932-Pack Your Bags Set and 5186-Enjoy the Ride Set. I love the Ai people stamps and this traveling duo is so much fun to color!

For this project, I started by stamping the couple with black ink and colored them with Copic Markers. I used masking paper to mask off the lady before stamping the man to have the couple stand closer together.  Masking paper is a great way to get a layered look without cutting the images out. 


For the background, I drew in panels to look like large windows and stenciled fluffy blue clouds. I also stamped several airplanes to make it look like an airport scene. This couple is totally what my husband and I look like when traveling, but I do pull my own rolling luggage. 


Lastly, I added layers of red, gold glitter, and blue paper to coordinate with the airplanes. I also stamped "Life with you is wonderful" with black ink to look like it's connected to one of the planes. The greeting and images are from different sets, but work together perfectly to complete the design!

I hope you enjoyed today's project and are having a great day!


Sunday, March 26, 2023

Happy Retirement! by ReneƩ Matarese

 Hello Ai fans!

One of my friends is retiring at the end of this school year and I wanted to make her a fun card.  She loves to travel and has done so throughout her career.  I can only imagine where she'll go once she all the time in the world to do so.

For my card I used SO MANY Art Impressions sets.

You can find links to all of them at the end of my post.


My card was made for the current Inside Out challenge.


I wanted to incorporate all forms of travel because her 3 children are scattered throughout the world.  Sometimes she hops a plane,  sometimes it's a road trip.  I'm not sure if she's cruised yet but isn't that what retirement is for?


My images were all colored using Copic markers.  Some were cut with coordinating dies and some were but with my Brother Scan and Cut.  It's a lifesaver for older sets that don't have dies.


Some of those images are tiny so I whipped out my TwinTones for the fine details.


Tuesday, August 2, 2022

Travel & Cruise Journal by Nina

 Hello Ai fans, I am so excited to share with you this fun Travel Journal that I made with the new amazing die set "Journal Template Die Set" by Art Impressions. I also used the cute "Pack your Bags" stamp set.


The set has all the dies you need to create a stunning journal. I used the biggest die to create the outer cover from white Bristol Smooth paper. I then created a single inner page and I folded its flap along the score line the die created and placed double-sided tape on the flap and attached it to the inner side of the spine of the journal.

Now that my Journal base is ready, I stamped and colored my images from Pack your Bags stamp set using Copic markers. I did not color the shirt of the travelers because I am gonna cut them from patterned paper later.

I started with my cover, I cut the lovely frame from red cardstock and placed it on the cover on top of a blue sky paper and attached the ship with tiny sun and clouds.

For the first spread I cut the letters to create the word bag and attached the bags on the left side page.


on the right side I attached the cute lady. I gave the image dimension with foam tape.


I stamped her again on a patterned paper and cut out her shirt and hat and glued them on her image.
I die cut some accessories from the Journal die set to decorate the scene.

For the second spread, I cut this sort of a window using the window die from the journal set twice to make it more sturdy and glued them to each other. 


I then cut the letters for the word Travel and placed them in the window sections and attached some images from the stamps set with some enamel dots.


I backed the male traveler image with foam tape too and added it to the last page of the journal and repeated the patterned paper trick for his shirt and added some decorations and accessories too.


Check the step by step video tutorial here..