Showing posts with label Simone Carr. Show all posts

Sunday, September 6, 2026

Garden Scenes & Storybook Dreams by Simone Carr


Hello Fellow Crafters!

Welcome to another Watercolor Weekend! I’m excited to share this week’s card with you. I was especially excited to use the new Flower and Foliage Sets with this image. I love when one stamp can create an entire scene, and this image has so many fun little details to bring to life with watercolor.

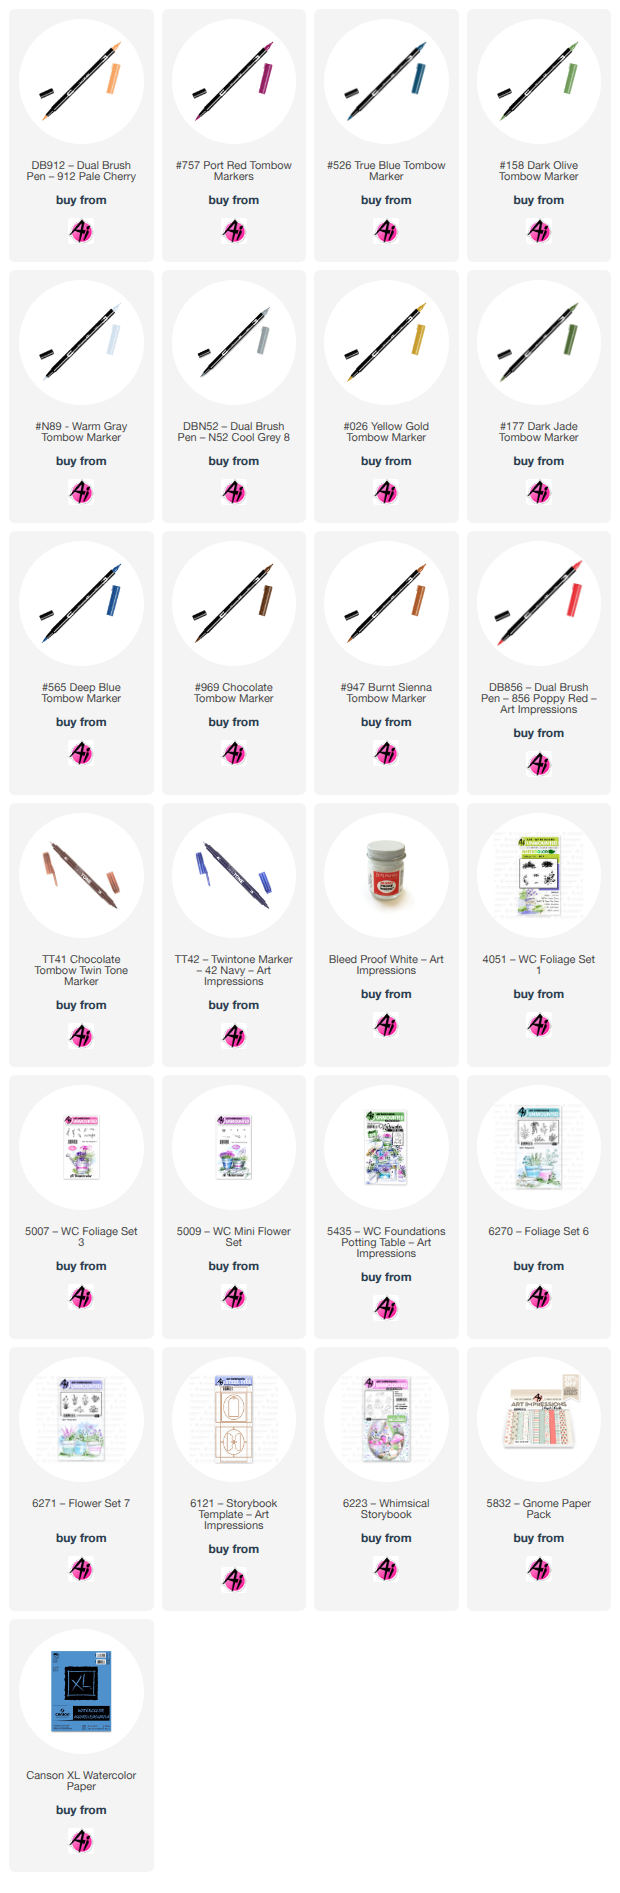
On Canson Watercolor Paper, I stamped the image using 565 + 969, stamping off twice for a softer impression. With a damp #4 brush, I pulled out the stamped color first. Before I added color to the pots, I started with the larger elements of the scene and worked my way through each of the smaller details. The Tombow colors I used for each element are listed below.

After I had my pots colored. I started to stamp in the flowers and foliage. With a damp #4 brush, I dabbed the flowers and foliage to soften the look.

Once I finished the flowers and foliage, I added the final details to complete the scene. I really enjoyed bringing all the little elements of this image to life.


Materials Used

Stamps & Dies
• 5435 – WC Foundations: Potting Bench
• 6270 – Foliage Set 6
• 6271 – Flower Set 7
• 5009 – Mini Flower Set (Dots)
• 4051 – Foliage Set 1 (Grass)

Paper
• Canson Watercolor Paper

Inks & Mediums
• Dr. Ph. Martin’s Bleed Proof White
• TwinTone Markers – Brown, Gray

Tombow Markers
• N52, 757, 158, 177, 565 – Bucket with Foliage
• 026, 177, 565 – Pot, Bottom Shelf
• 947, 158, 565 – Birdhouse
• 947, 946, 177, 026 – Pot
• 158, 026, 757 – Watering Can
• N89, 177, 817, 526 – Crate
• 991 – Hat
• N89, 565, 177, 757 – Pot Next to Hat
• 947, 946, 565, 177 – Double Pots
• 026, 757, 158, 526 – Last Pot


For an extra project this week, I decided to create a little storybook scene using the new Whimsical Storybook Set.

I stamped all of the images onto Canson Watercolor Paper using Distress Ink Lost Shadow. Once the images were stamped, I colored each piece using the Tombow markers listed below and then used the coordinating dies to cut them out.

I chose a heavier cardstock to build the main outer box as well as the three inner layers.

I used the square die that comes with the set to cut three squares. I then stacked the three squares together and used the included oval die to cut the center opening. I attached an image to each inner layer and then stacked the layers together using foam dots in the corners to create dimension.

I hope you enjoyed this week’s projects and found some inspiration for your next watercolor creation. Thanks for stopping by, and I hope to see you again next time!


Materials Used

Stamps & Dies
• 6121 – Storybook Template
• 6223 – Whimsical Storybook

Paper
• 5832 – Gnome PP
• Canson Watercolor Paper

Inks & Mediums
• Distress Ink – Lost Shadow
• Dr. Ph. Martin’s Bleed Proof White
• TwinTone Marker – Brown
• 2mm Foam Dots

Tombow Markers
• 126, 757, 565, 947 – House
• 856, 947, N49, 606, N15, 757, 177 – Wheelbarrow
• 947, 969, 177, 856, 985 – Stump
• 757, 126, 947, 969, 942, 912 – Gnome


Thursday, August 20, 2026

Boy oh Boy! Challenge #434 Week #2

 Hello Ai fans!

Welcome to week #2 or our challenge,

Boy oh Boy!

Let's see your masculine creations.
Remember, they don't have to be cards. You can create anything you like as long as you use something from Art Impressions. We'd love to see your gift card holders, gift tags, boxes and bags, bookmarks, place cards, cake picks, party decorations, designer paper, framed art and more. Anything with a masculine flair.

Last week Sharon was our Featured Artist and she made such a fun guy card!
Click her photo to see her tutorial.

Now let's see what the rest of the Design Team created.

I made a diaper bag.


Simone's little guy is hanging with his best friend.


Gennette painted a beautiful fox.


Dori created a darling slimline card.


Neema created a farm scene.

Tasha has a Halloween card for you.
Janet created a fun fold card.


Such fabulous work from everyone.
I'm sure one of these has inspired you to enter something into the challenge.
You could be the next winner of a free stamp set.

Now, onto the details of our challenge.


Please make a new project featuring any masculine themed
stamps, dies or paper from Art Impressions.
We can't wait to see your creations.

Here are the rules...

✻ Please make a new card or handmade crafty creation using either stamps, dies and or designer paper from Art Impressions. You can make any item you wish; this is not limited to cards! (unless specified)

✻ Limit two submissions per person.
✻Top Spot Winner and Lucky Random Winner each receive a free 
stamp set from Art Impressions
 ✻Please include your first name and last initial on your submission. You may include your entire last name, but it's not necessary.
✻We love to comment on your entries, but keep in mind if you use a private group or a platform that you need to sign up for, we probably won't be able to.
✻ The Ai Challenge is open to everyone, international submissions are welcome!
✻ Include a link back to the Ai Blog or grab our button on the top right of our sidebar!
✻ Share the Ai love if you can, by clicking and commenting on your fellow crafters.
✻ Make sure to get your link up by the deadline to enter your creations.
✻ Good luck and happy stamping! 


You are invited to the Inlinkz link party!

Click here to enter

Sunday, August 16, 2026

More Than a Card: A Watercolor Portfolio by Simone Carr


Hello Ai Friends!

Welcome to another Watercolor Weekend! I’m excited to share today’s project with you. This one was especially fun to create, and, as you probably know by now, I really enjoy finding new ways to use the Story Tile Die.

I actually had no plans to use it this time, but you know how crafting goes—plans can change once you start looking through your supplies! I had pulled out the Portfolio Template Die Set, and that’s where my idea began. Since the Portfolio is the perfect size for an A2 card, I realized the Story Tile Die would fit beautifully inside it.

I started by choosing the patterned paper I wanted to use and then selected the stamp set designed to coordinate with the Story Tile Die. The Portfolio Template Die Set includes instructions for assembling the base, and it only requires two pieces to be glued together. If you are using directional patterned paper, just be sure to pay attention to the angle when cutting the two pieces so the pattern is facing the correct direction.

For all of my watercolor images, I used Canson Watercolor Paper and stamped the images using Distress Ink Lost Shadow. The Tombow colors I used are listed below for each individual image.

I began by cutting a frame from my chosen patterned paper using the Story Tile Die and adhered it to the center of the Portfolio. I then cut a piece of Canson Watercolor Paper using the same die. Using my stamp positioner, I stamped each image onto the individual tiles, making it easy to get everything lined up correctly. Once all the images were colored, I glued the finished tiles into the Portfolio.

Next, I worked on the two folded sections of the Portfolio. Using the same scalloped die I used for the Portfolio base, I cut another piece from patterned paper and trimmed away the folded section. I applied adhesive along the edges, leaving the scalloped edge open, and adhered it to the left side of the Portfolio. This created a pocket that can hold a gift card, a note, or, as I chose to use it, the Mini Bookmark and envelope.

To decorate the top of the pocket, I used the long scalloped-edge die included with the Portfolio Template Die Set and cut a piece from Canson Watercolor Paper. I stamped the long-stem flower, colored it, and then selected a sentiment to stamp using Versafine Clair Lilac Bloom. I adhered the finished piece to the front of the pocket.

On the right side, I used the same die with a piece of patterned paper. Once it was adhered, I decided to add another pocket for a bookmark.

The Mini Bookmark I created had to be shortened after an unfortunate water spill! Thankfully, it happened on the bottom portion, so the bookmark was still usable. The finished bookmark measures 3 7/8" long, and I used a corner rounder to give it a more finished look.

For the front cover of the Portfolio, I cut a piece of paper measuring 2 3/4" × 3" and rounded the corners. I then selected the square frame die from the Portfolio Template Die Set and cut two frames—one from watercolor paper and one from patterned paper. I adhered the two frames together and then attached them to the paper piece.

I adhered the finished cover piece to the front of the Portfolio, attaching it only halfway so it could function as a flap. On the opposite side, I added two thin Velcro dots to create the closure.

For the back of the Portfolio, I cut a piece of Strathmore Bristol Smooth Paper using the largest Scalloped Rectangle Die and stamped the Peony image onto it. This creates a nice space to write a personal message.

Back on the inside, I stamped two quotes from the BJ Long Stem Set onto Bristol Smooth Paper using Versafine Clair Avocado. I used a die from the Portfolio Template Die Set to cut them out and adhered one to the right-side pocket and the other to the Mini Bookmark.

The Mini Bookmark is very easy to make since it is simply cut and folded. To make it stay securely on a page, I added magnets to the inside. I used a magnet sheet and a 1" circle punch. I punched one circle from the magnet sheet, then placed the punched piece back onto the sheet to find the matching position for the second magnet. Once I found the correct placement, I punched the second circle and adhered the magnets inside the bookmark.

The Mini Journal Template also includes a small clasp, which I used to attach a little dangle to the Mini Bookmark.

Finally, I assembled the envelope included in the Portfolio Template Die Set. It is also a simple cut-and-fold project. I added a small Velcro dot to keep the envelope securely closed.

I love how this project combines so many different elements into one A2-sized Portfolio. It gives you space for watercolor artwork, a personal message, a bookmark, an envelope, and even a gift card or note. It would make such a thoughtful handmade gift!


Materials Used

Stamps & Dies
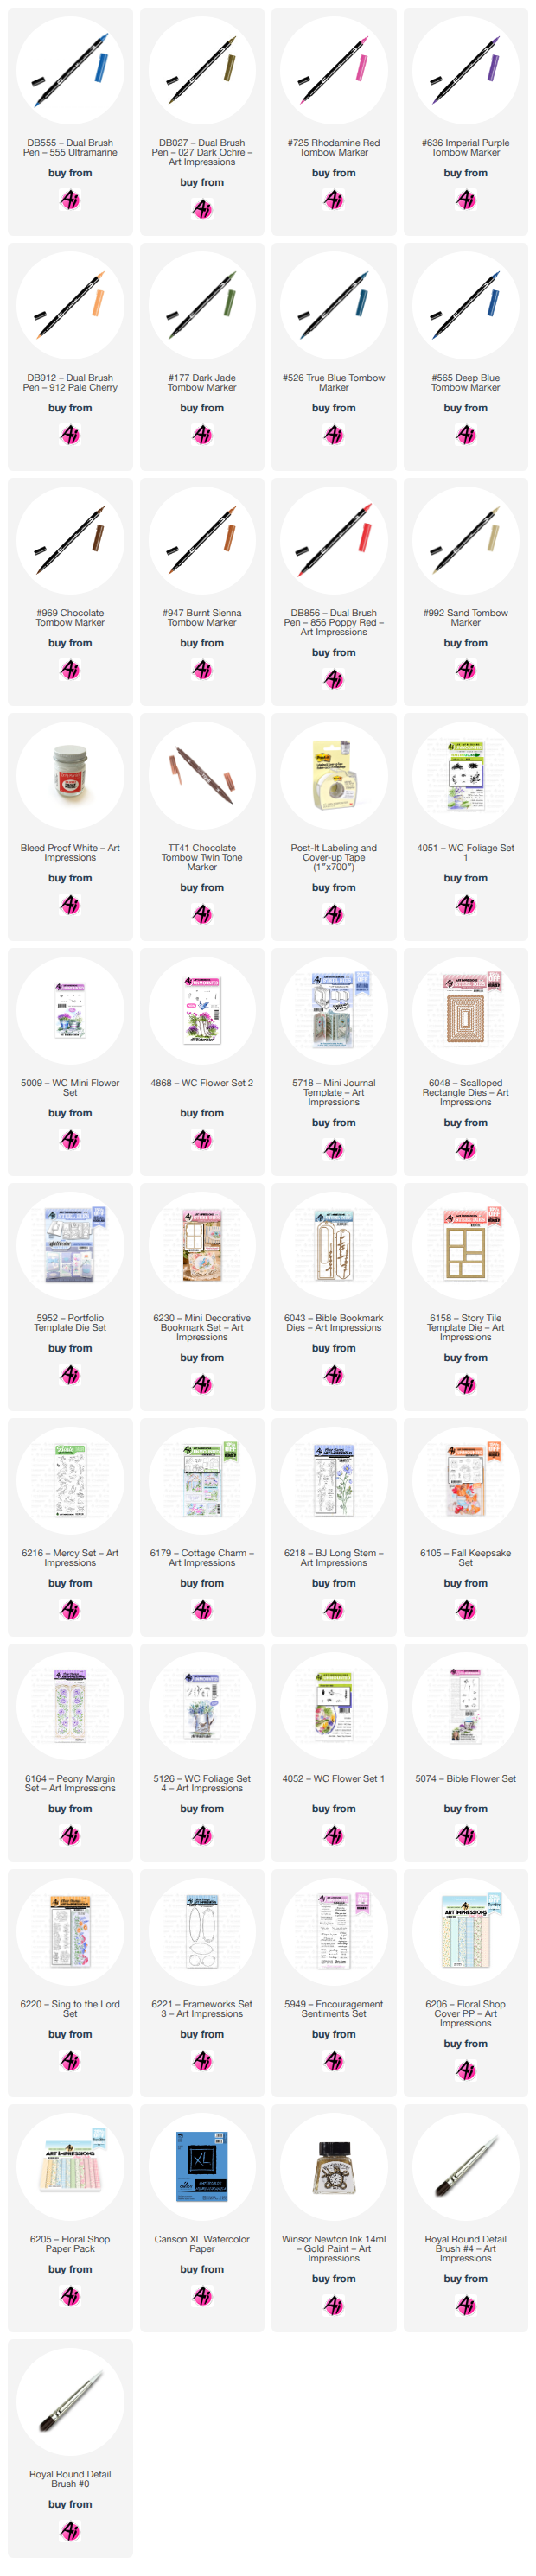
• 5718 – Mini Journal Template
• 6048 – Scalloped Rectangle Dies
• 5952 – Portfolio Template Die Set
• 6230 – Mini Decorative Bookmark Set
• 6043 – Bible Bookmark Set
• 6158 – Story Tile Die
• 6216 – Mercy Set
• 6179 – Cottage Charm
• 6218 – BJ Long Stem
• 6105 – Fall Keepsake Set
• 6164 – Peony Margin Set
• 5136 – WC Sentiment Set 2
• 4051 – Foliage Set 1
• 5126 – Foliage Set 4
• 4868 – Flower Set 2
• 4052 – Flower Set 1
• 5074 – Bible Flower Set
• 5009 – Mini Flower Set

Paper
• 6206 – Floral Shop Cover Patterned Paper
• 6205 – Floral Shop Patterned Paper
• Canson Watercolor Paper
• Strathmore Bristol Smooth Paper

Inks & Mediums
• Distress Ink – Lost Shadow
• Versafine Clair – Avocado
• Versafine Clair – Lilac Bloom
• Versafine Clair – Nocturne
• Winsor & Newton Gold
• Dr. Ph. Martin's Bleed Proof White
• TwinTone Markers – Brown, Pink
• Pitt Artist Pen – Black
• Velcro Thin Dots
• Corner Rounder
• Brushes – #4, #0

Tombow Markers
• 985, 946, 636, N49, 725, 177, 947, 565 – Bicycle
• 947, 027, 177, 815, 565 – Fence
• 947, 985, 452, N49, 027, 177 – Birdbath
• 985, 947, 565, 725, 177, 526 – Pots
• 636, 985, 946, 177 – Daisies
• 817, 985, 177 – Peony
• 947, N49, 452, 526, 177, 636, 815, 565 – House
• 947, 985, 856, 596, 177 – Birds
• 947, 992, 912 – Cat
• 815, 177 – Petunia

Finished Sizes
• Portfolio: A2 size
• Mini Bookmark: 3 7/8"
• Front Cover Square: 2 3/4" × 3"

For my second card, I decided to create a simpler design using the Sing to the Lord Set. I wanted to let the beautiful floral image take center stage and add just a few touches of gold for a little extra detail.


Materials Used

Stamps & Dies
• 6220 – Sing to the Lord Set
• 6221 – Frameworks Set 3
• 5949 – Encouragement Sentiment Set
• 6157 – Hope and Faith

Paper
• Strathmore Bristol Smooth Cardstock

Inks & Mediums
• Distress Ink – Antique Linen
• Versafine Clair – Nocturne
• Stamperia Contour Gold
• Winsor & Newton Gold Ink

Tombow Markers
• 555, N15 – Flower
• 177 – Leaves
• 526 – Sky

Thursday, August 6, 2026

Floral Frenzy Challenge #433 Week #2

Hello Ai fans!
Welcome to our challenge.

FLORAL FRENZY

Let's see your floral creations.
Remember, they don't have to be cards. You can create anything you like as long as you use something from Art Impressions. We'd love to see your gift card holders, gift tags, boxes and bags, bookmarks, place cards, cake picks, designer paper, framed art and more. Anything with flowers.

Last week Janet was our Featured Artist and she took the theme to heart,
creating the most amazing floral card.


Janet also created a second card with a bee theme.

Now for the rest of the Design Team cards.

Our Monthly Challenge inspiration artist is Debbie and she created a sweet


Watercolor artist Gennette created this lovely floral Story Tile card.


Simone created two floral cards for her Watercolor Weekend post.


Our Focus on Faith artist, Sara, created this beautiful wall hanging.


I created a floral Story Tile card.


Neema created a lovely floral panel framed with a pretty border.
4603 Blooming Birdhouse (retired but HERE are lots of other options)


And, a second card from Neema. So pretty!


Tasha has a beautiful floral Story Tile card.
Dori has a dozing gnome and his friends, enjoying some flowers.

Sharon has some stunning daffodils for you.


Wow!! Talk about some amazing floral inspiration!
We can't wait to see what you create for the challenge.

Here are the details.

Please make a new project featuring any floral themed
stamps, dies or paper from Art Impressions.
We can't wait to see what your beautiful creations.

Here are the rules...

✻ Please make a new card or handmade crafty creation using either stamps, dies and or designer paper from Art Impressions. You can make any item you wish; this is not limited to cards! (unless specified)

✻ Limit two submissions per person.
✻Top Spot Winner and Lucky Random Winner each receive a free 
stamp set from Art Impressions
 ✻Please include your first name and last initial on your submission. You may include your entire last name, but it's not necessary.
✻We love to comment on your entries, but keep in mind if you use a private group or a platform that you need to sign up for, we probably won't be able to.
✻ The Ai Challenge is open to everyone, international submissions are welcome!
✻ Include a link back to the Ai Blog or grab our button on the top right of our sidebar!
✻ Share the Ai love if you can, by clicking and commenting on your fellow crafters.
✻ Make sure to get your link up by the deadline to enter your creations.
✻ Good luck and happy stamping! 


You are invited to the Inlinkz link party!

Click here to enter

Sunday, August 2, 2026

Single Flower to Story Tile by Simone Carr


Hello Fellow Crafters!

For today’s card, I wanted to create something soft and elegant with a touch of vintage charm. I love how a simple floral image can be transformed with a little watercolor, texture, and a few special details.

Using Canson Watercolor Paper, I stamped the image using N95. I colored the stems and leaves first with 177. Then I colored the flower, starting with 985. I used 055 to add highlights to the bloom and 933 in the center of the flower. I used 526 around the flower to add a soft touch of color to the background.

Once the coloring was dry, I splattered some Winsor & Newton Gold paint over the flower for a little extra shimmer. I then used the Antique Frame Die (from a different company) to cut out my panel.

Using Memento Toffee Crunch, I distressed the edges of the panel to enhance the vintage look. Next, I stamped my sentiment using Versafine Clair Nocturne.

I then selected a frame that would fit around the sentiment from the Frameworks Set 4 and stamped it using Memento Toffee Crunch. Using a small brush, I painted over the stamped frame with Winsor & Newton Gold paint to add a subtle metallic accent.

I felt the card still needed a little something extra, so I used a textured stamp with Distress Ink Antique Linen and stamped it randomly over the card panel. This added just the right amount of texture and finished off the vintage feel of the card.

Materials Used

Stamps & Dies
• 6218 – BJ Long Stem Set
• 6222 – Frameworks Set 4
• 5063 – Double Stitched Rectangle Die (Largest)

Paper
• Canson Watercolor Paper

Inks & Mediums
• Distress Ink – Antique Linen
• Memento Toffee Crunch
• Versafine Clair Nocturne
• Winsor & Newton Gold Paint

Tombow Markers
• N95 – Stamped Image
• 985 – Flower
• 055 – Flower Highlights
• 933 – Flower Center
• 177 – Stems & Leaves
• 526 – Background


For my second card, I used the Story Tile Die to cut a piece of Canson Watercolor Paper. I then arranged my flowers onto each section and stamped the images using Distress Ink Antique Linen.

Once the images were stamped, I colored each section using the Tombow markers listed below. I then cut another frame from patterned paper and adhered it to the watercolor frame. After attaching the layered frame to my card base, I glued each watercolor tile back into place to complete the card.


Materials Used

Stamps & Dies
• 6158 – Story Tile Die
• 6220 – Sing to the Lord
• 6218 – BJ Long Stem
• 5735 – Birthday Sentiments Set

Paper
• 6012 – Basic Yellow Patterned Paper
• Canson Watercolor Paper

Inks & Mediums
• TwinTone Marker – Purple
• Pitt Artist Pen – Black
• Versafine Clair Nocturne
• Distress Ink – Antique Linen

Tombow Markers
• 177, 985, 025, 925, 526 – Tulips
• 606, 177, 526 – Petunia
• 856, 177, N15, 526 – Poppy Flower
• 312, 685, 837, 985, 856, 555, 565, 177, 526 – Wildflowers

Thanks for stopping by, and happy crafting!


Sunday, July 19, 2026

Birds, Blooms & Dimensional Designs by Simone Carr


Hello Crafty Friends!

Art Impressions has some really beautiful patterned paper packs, and I feel like the designs get better and better with each new release. Some of the patterns are simply too pretty to hide behind layers, so I wanted to create a card that showcases both the patterned paper and my watercoloring. I've admired eclipse-style cards for a long time but had never made one myself, so I decided to give it a try!

I started with a 5" × 5" card base and cut the top layer to 4⅞" × 4⅞". Next, I cut a piece of cardstock measuring 4¾" × 4¾", along with five strips of patterned paper measuring ½" × 4¾". Be sure to keep the strips in order so the pattern stays aligned.

I adhered the first strip directly to the cardstock. For the second strip, I added 2 mm foam tape before placing it next to the first strip. I continued alternating between adhesive and foam tape until all five strips were attached, creating the eclipse effect.

Next, I cut another piece of cardstock measuring 2⅛" × 4¾" and a piece of Strathmore Bristol Smooth Paper measuring 2" × 4⅝". After adhering them together, I placed the panel into my stamping platform.

I stamped the image using Distress Ink Lost Shadow and the sentiment using Versafine Clair Twilight. Once the ink was dry, I colored the image using the Tombow markers listed in the materials section below.

To finish the card, I added 2 mm foam tape to the stamped panel and adhered it beside the patterned paper strips. After attaching everything to the card base, I finished the design with a few embellishments for a little sparkle.

The finished card measures 5" × 5".


Materials Used

Stamps

• 6216 – Mercy Set
• 6061 – Tulip Floral Set

Paper

• 6082 – Bible Journaling S1 Paper Pack
• Strathmore Bristol Smooth Paper

Inks & Mediums

• Distress Ink – Lost Shadow
• Versafine Clair – Twilight
• Pitt Artist Pen – Black
• TwinTone Marker – Brown
• 2 mm Foam Tape

Tombow Markers

• 947, 969, 985 – Bird
• 528, 565, 177, 985 – Flower
• 526, 565 – Sky

For my second card, I reached for one of my favorite products—the Story Tile Die. While there are currently four stamp sets designed specifically for this die, it's also a wonderful way to showcase many of your other Art Impressions stamps.

I started by die cutting the tiles from Canson Watercolor Paper. Before stamping, I arranged the images on the tiles to determine the layout I wanted. Once I was happy with the placement, I stamped the images using Distress Ink Lost Shadow.

After everything was stamped, I colored the images using the Tombow markers listed in the materials section below.

Next, I selected a patterned paper from the Woodland Christmas Paper Pack that complemented the scene and die cut it using the Story Tile Die. I adhered the patterned paper frame to a second frame cut from watercolor paper for added stability and dimension.

To finish the card, I adhered the layered frame to an A2 card base and glued each watercolor tile back into place. I stamped the sentiment using Versafine Clair Nocturne to complete the design.

I hope these two cards inspire you to look at your stamps and dies in new ways and create something uniquely your own. Thanks for stopping by, and happy crafting!


Materials Used

Stamps & Dies

• 6158 – Story Tile Die
• 6216 – Mercy Set
• 6062 – Hydrangea Flower Set
• 4051 – Foliage Set 1
• 5126 – Foliage Set 4
• 4868 – Flower Set 2

Paper

• 6143 – Woodland Christmas Paper Pack
• Canson Watercolor Paper

Inks & Mediums

• Distress Ink – Lost Shadow
• Versafine Clair Nocturne
• Pitt Artist Pen – Black
• TwinTone Markers – Brown, Purple
• Dr. Ph. Martin's Bleed Proof White

Tombow Markers

• 947, 969, 985 – Birds
• 985 – Daisies
• 837 – Small Flowers
• 606 – Petunia
• 177 – Leaves, Grass
• 401 – Water in Leaf
• 526 – Sky
• 565 – Shadows