Saturday, August 31, 2019

You're still my everything by Sharon Caudle

Hello AI Fans!!

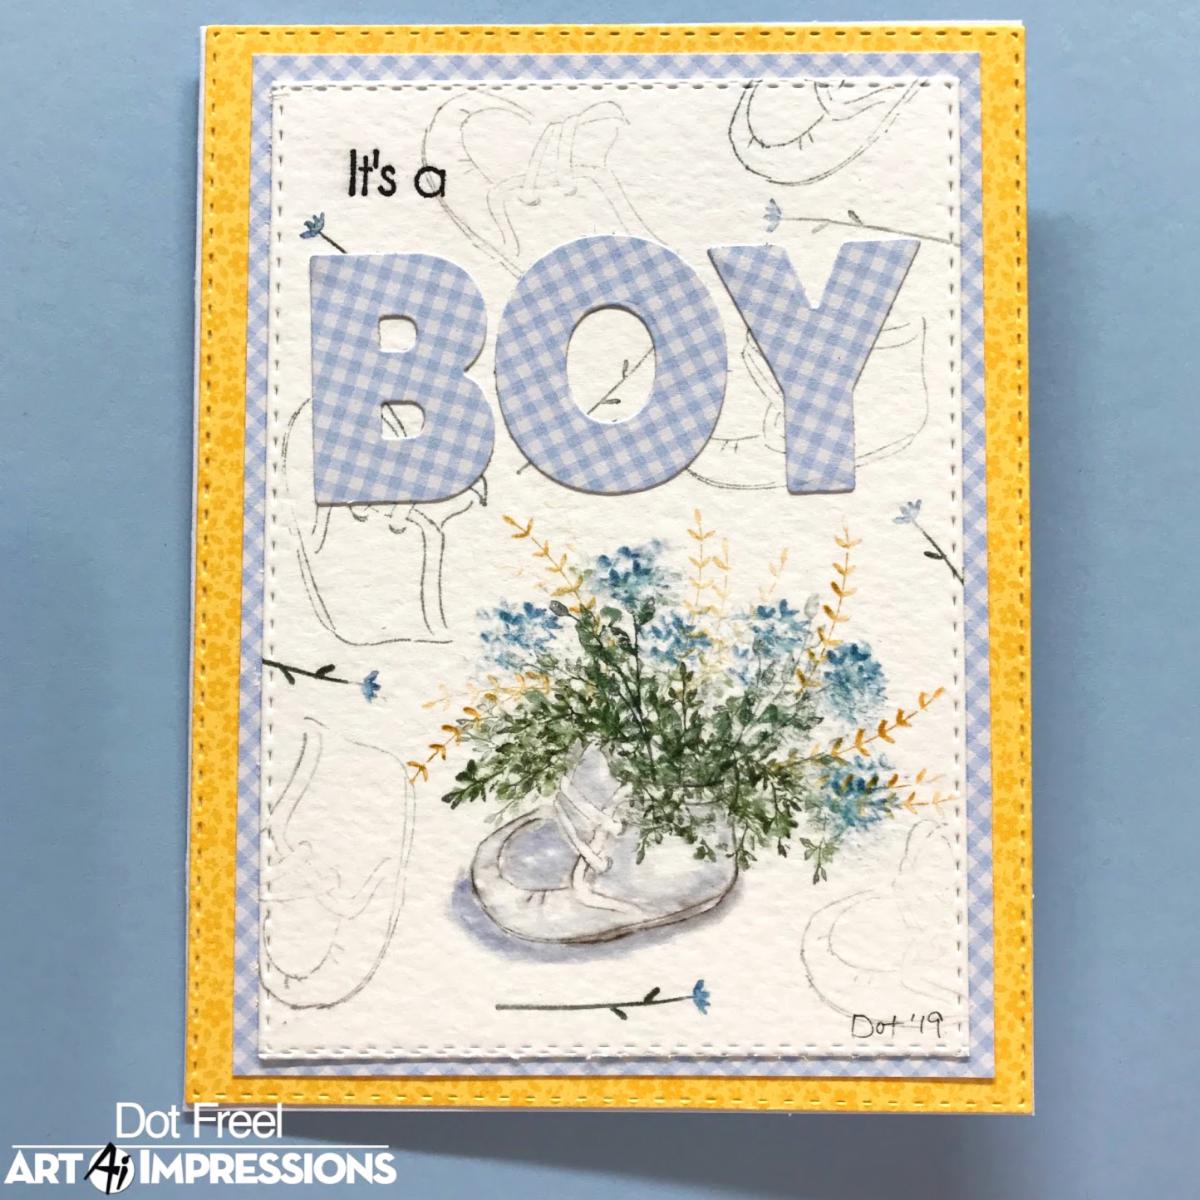
Happy Weekend!!  Hope you're enjoying the start to your weekend!  For my card today, I used #4803 Mouse Slider Set,  but I made a different kind of slider with them.  I just think this little mouse couple is adorable, and I paired them up with a sentiment from one of my favorite sets - Love Birds


Thanks so much for stopping by for a visit today and until next time - stay crafty!


Copics used:
E51, E53
BG32, BG34, BG49
R22, R24, R27, R20
C2, C3, C4


Friday, August 30, 2019

Here for the party | Art Impressions Sloth-Some set


Hello Ai Fans!

I thought this little sloth looked like he was ready to party and I thought it would be fun to mix up a few Art Impressions stamp sets. For this one I used the hanging sloth from the Sloth-some set and also the sentiment from the Never Too Old Laugh Lines set. This Sloth may be slow but he is ready to party.


For the last card I did using the sloth-some set I used colored pencils, so I thought I would use Copic Markers this time. You can find the list of colors I used below. I really didn't know what colors I was going to use this time, but I have been using a lot of blue lately. Which then led to orange and yellow. So that is what I basted the pattern paper off of. 


I used the largest 3 ovals from the Oval Double Stitch die set and stacked them over the sloth. Creating a tunnel focal point. For the sentiment I used some navy blue cardstock and heat embossed it, with white embossing powder. I decided to cut the sentiment apart with a paper trimmer because i didn't want to cover the balloon lol. So I cut it and stacked it right above the branch. 


For the inside I used several of the sentiments from the Sloth-some set to continue the party theme from the outside. I die cut that with a Rectangle Double Stitch die and layered that over top of the plaid pattern paper oval, which is a left over from the front! 

Copic Markers Used:
W9, W3, W0, R81, E81
B99, B95, B93, B91
E18, E17, E15, E31
Y38, Y35
Y02, Y00

Alright that is it from me today! Thank you so much for joining me. Happy Stamping! 


Thursday, August 29, 2019

NEW VIDEO! Vintage Shoes Watercolor

Hello Ai Fans!

Bonnie is BACK with a new Watercolor Wednesday! We are excited to kick off our latest release with this video! Bonnie designed two of our WC Shoe Set images, including an antique boot and adorable baby bootie! This set is so fun to fill with your flowers and foliages and design with colors for any recipient!

Make sure to check out artimpressions.com today to view all FIVE new Watercolor sets from our summer release!


View on YouTube: https://youtu.be/VP9gLvGkT-E


NEW Watercolor Sets NOW Available! PLUS, Challenge 265 Watercolor Stamping!

New Watercolor Sets
Watercolor enthusiasts rejoice! We have FIVE new Watercolor sets available today at artimpressions.com! Bonnie's newest favorite is our WC Shoe Set, featuring footwear from baby to antique boots, which you can fill with your flowers and foliage. As we draw closer to the holiday season, Bonnie created a WC Winter Kids Set, with the littles dressed in their snow gear and one even giving a hug to a snowman. Use your critters or kids sets with our new WC Swing Set for nostalgic outdoor scenes. For our southwest friends, we included a WC Desert Set featuring cacti, an adobe house, tall grasses, rocks, and twigs. You can also use the WC Mountain Set plateaus with our Desert Set, or add a snowy mountain in the background of your watercolors! The possibilities are endless!


Watch the video below, as Bonnie introduces the summer release and all her favorite details. You can add all five sets to your collection at artimpressions.com!
 
WC Mountains   Winter Kids Winter Kids  
WC Shoe Set   Boy Shoes
Swing Set Swing Set   WC Desert Set Desert Scene  

Let's take a look at what the designers have created today! Remember, you can visit the designer's blog or social media by clicking the pink links by their name - and give them a follow while you're there for more inspiration in your feeds!

Dot Freel - Instagram - Blog - Pinterest
 
Hello Friends,

Have you seen Art Impression's brand new stamps 5194 - WC Shoe Set? There are 6 different shoes! I actually had these little white leather shoes for all three of my sons, long ago, when they were babies. Some people even had them bronzed and mounted on a plaque. I stamped the shoes in two colors, first the 969 then the 565. I stamped them off on scratch paper first and then pulled the color out of the lines. I added the foliage from the 5126 - WC Foliage Set 4 in 177 and 249. I stamped the longest ones in 105 lt. teal for the girl card and in 993 for the boy card. I stamped the heart flowers from the 4868 - WC Flower Set 2 in 725 for the girl card and in 526 for the boy card. I used 565 to paint the shadows under and on the shoes. I stamped the shoe again in random orientations all over the background using Memento grey ink. I stamped the long stem flower all over both cards as well. I used the 5072 - Block Letters Die Set to cut out the words "girl" and "boy" and ran the letters through a Xyron Create-a-Sticker. I used the 5063 - Rectangle Double Stitched Dies to cut out the background pieces and the watercolored pieces to complete my cards.


Karen Day - Blog - Facebook - Pinterest
I had the idea to combine these two sets on my projects, so decided to use the tire swing from 5195 WC Swing Set, the mountains from 5198 WC Mountain Set, and created a scene around them. I first sketched out my idea on scrap paper to determine exactly where I wanted things to be - nothing worse than being half way through a scene like this, and stamping your mountains too high! It also helped me determine that my tree swing would be up on a hill overlooking a lake and the mountains beyond. I started by diecutting my Canson XL watercolour paper with the 3 3/4" x 5" Rectangle Double Stitched Die, and I sketched in my tree with a pencil. Using #N45 Cool Grey 10, I coloured and stamped the tire, and then masked it. With my stamp positioner, I placed the little girl from 5053 WC Little Girls Set, coloured in #992 Sand. With my #1 paintbrush, I added #850 Flesh to her skin, and #899 Redwood to her hair. With the fine point of the #992 marker, I added short sleeves to her t-shirt. #565 Deep Blue was painted as her jeans, and after adding more water to it, I used it to add shadows. I added several layers of the N45 to the tire to build up the colour, creating it darker on the underside of it. Next I stamped the mountains, after colouring them with 2nd generation #565, and a layer of #533 Peacock Blue over top. I used my damp #4 paintbrush to soften the lines and pull out the colour to add shading to the mountains. I painted in the hills in front of them, and the lake - pulling the colour from my palette, and used a light wash for the sky. I used my Twintone marker in #41 Chocolate to outline my tree, and added a few texture lines to the trunk. I painted shades of #969 Chocolate over the entire tree, keeping it darker on the undersides of the branches, and added #565 as shadows. With the large leafy image from Foliage Set - 4051 coloured in #158 Dark Olive, I added greenery on either side of the swing, and softened it by dabbing with a damp brush. I also used the Jumbo Grass stamp with #158 stamping it multiple times, then using the colour from them to paint a suggestion of a grassy bank. I picked up #992 from my palette and painted in the shore line around the lake. And finally, to add leaves to the trees, I used the larger leafy image from 4867 - WC Foliage Set 2 New. Oh - and the last step was to use a fine point grey marker to draw in the chain of the tire swing. I matted my image with a light kraft cardstock, and used pop dots to mount it on some textured dark grey cardstock.


Tricia O'Bin - Blog - Instagram - YouTube - Pinterest - Facebook
First I inked up the entire cactus from the NEW Desert Set with 126. I then added some 249 to just the areas I wanted to be a little darker. I stamped it towards the bottom right hand side. Next, I masked it off, re-inked it with the same colors and stamped it to the left of the first one but down a little. I pulled the color out of the lines. 

I inked up the southwest house with 969 and stamped it to the left of the cacti close to the middle of the paper. I masked it off and stamped the Large mountain from the NEW Mountain Set inked with 969. I also used the same smaller mountain inked in 969 and stamped it a little up and to the right. I wanted it to appear to be further back. I pulled the color out of the lines, making sure to leave white highlights. I pulled some additional color underneath the mountains to give them some depth.

I added some 565 to my palette and added it between the mountains for a small river flowing between the mountains. I added 969 to my palette and added some additional ground around the river and darkened beneath the mountains. I added some 969 and 847 to the small grass and stamped it on either side of the house. I pulled the color up and out of the lines. I added water to the house making sure to make the left really dark. I pulled color out of the lines around the house. I continued to add 969 from my palette to create more ground.

I added some 969 to the small rocks and placed them to the left in the white space. I pulled the color out of the lines making sure to leave a highlight. I added some pink to the cactus and added water. I replaced the mask on the cactus, inked up the other cactus in the set with 177 and using my positioner stamped it to the right of the cactus. I pulled the color out of the lines and added some additional 126. I added the small cactus near the rocks and pulled the color from the lines. Using my fine tip, I added some dark shadows beneath the house and softened them with water. I continued to add 969 and 847 to the ground.

Finally I used some 565 watered down to create clouds in the sky. Lastly, I signed it.


Thanks, team! Your projects are so inspiring and fun to see in your unique styles!

For our new challenge, we want to see you try watercoloring stamping! You can watercolor the art impressions way or another watercolor stamping technique, we can't wait to see!

Here are the Challenge Rules...
✻ Please make a new card or creation. You can make any crafty item you wish; this is not limited to cards!
✻ Limit two submissions per person. You will receive extra votes if you use Art Impressions stamps!
✻ The Ai Challenge is open to everyone, international submissions are welcome!
✻ Include a link back to the Ai Blog or grab our button on the top right of our sidebar!
✻ Share the Ai love by clicking and commenting your fellow crafters.
✻ Make sure to get your link up by the deadline to enter your creations.
✻ Good luck and happy stamping!

You are invited to the Inlinkz link party!
Click here to enter

Before we go, let's recognize the winners of last week's Gotta Gingham challenge!

Top Spot goes to...

Reeta!

Congrats, Reeta! We love your Perfect Duet singing on this easel card with pretty pink and red gingham paper! Such a sweet anniversary card! Email annelise@artimpressions.com with your address to claim your prize pack!

Honorable Mentions go to...

Mary Ann!

Helen F!
 Congrast, you two! Mary Ann, we love how you created a nostalgic card with your class WC Truck image! Thanks for joining us in class at Scrapbook Expo! And Helen, we love your blue-toned gingham with this snowy scene with our retired Whoots set! Too cute. Email annelise@artimpressions.com with your address and a stamp set of your choice!

We hope to see your entires and more in our new challenge! Have an awesome weekend!

Happy Stamping!


See the Chocolate...


Hi Ai fans! 


This week I played with My favorite things stamp set which is perfect for me. I love chocolate so I love the sentiment with this stamp set. 
"See the Chocolate
Seize the Chocolate 
Be the Chocolate" 

This is my 100% I love all things chocolate. 


I used this stamp set to make two cards this week. I stamped the image twice with Memento black ink and colored them in with alcohol markers.  The first card I shared I stamped the sentiment onto the front of the card.

I adhered the ladies faces looking through the window on the inside of the card.


The second card I adhered the sentiment die cut out inside of the card.


Spectrum Noir Markers:
GT1,GT2,GT3, TB2, TB3, TB4, EB1, EB2, EB3, HB1,HB2, HB3, CT2, CT3, CT4, BG2, BG3, BG4, FS6, FS7, FS8, CR1, CR3, CR6, BT3, BT4, BT6, IB1, IB2, IB3, DG1, DG2, DG3, IG2, IG4, IG5, GB1, GB3, GB5, DR1, DR3, DR4
 Happy Stamping!

Wednesday, August 28, 2019

Halloween Pumpkins by Niccole Kulig

Hello Ai fans!!

I am stopping by today to share a Halloween card I made using the 5038 - Ghoul Friend set  and some Wink of Stella. I was a fun card to make that's for sure.
It is a pretty straight forward card layout this week.  I stamped my Happy Halloween bottom center. I layered my orange paper, and black paper. The white paper is on top of the black paper. I only use what I have to of my stripe paper so I cit 1/4" strips and added them to the top and bottom of my white paper stamped with my strand of pumpkin lanterns. I colored my pumpkins last with my Copic markers. 
As you can see above I used a super fine Sharpie marker to join the two stamps together.  I thought the loop in the string would add to the card, like a loop in the stand of pumpkin lanterns. I didn't let the imperfections of my marker skills bother me because when you look at the whole card the strand is not perfectly straight to begin with. 
I thought the cute pumpkins needed a little something so I finished them off with some Wink of Stella. Why ... because everything looks better with Wink of Stella in my opinion LOL.
Here is one more look at the card.  You will probably see more Halloween cards from me ... it is my favorite holiday after all. Pumpkin everything for this girl 😊  Thank you for spending a little time with me and please check back again real soon for more Ai inspiration.

Copics used:
YR02
YR04
YR07
YR09

Until next time ... Hugs & inky fingers!