Showing posts with label WC Flower Set 3. Show all posts

Thursday, August 29, 2019

NEW VIDEO! Vintage Shoes Watercolor

Hello Ai Fans!

Bonnie is BACK with a new Watercolor Wednesday! We are excited to kick off our latest release with this video! Bonnie designed two of our WC Shoe Set images, including an antique boot and adorable baby bootie! This set is so fun to fill with your flowers and foliages and design with colors for any recipient!

Make sure to check out artimpressions.com today to view all FIVE new Watercolor sets from our summer release!


View on YouTube: https://youtu.be/VP9gLvGkT-E


Wednesday, June 12, 2019

Watercolor Throwback - Glass Vase with Flowers

Hello Ai Fans!

As you probably know, Art Impressions premiered on HSN yesterday (you can watch a replay here)! So we are throwing it back to one of our most popular videos from 2018! Bonnie created a translucent glass vase, showing the submerged stems of her beautiful bouquet of wildflowers. We LOVE this technique and hope you enjoy this tutorial, whether it's new to you or and old favorite!

Don't forget to subscribe to our YouTube challenge for the latest notifications of new uploads! And you can check out all our Watercolor Throwback favorites on our special YouTube playlist!

Happy Stamping!


View on YouTube: https://youtu.be/GnLVJeRrqfY


Wednesday, May 1, 2019

NEW VIDEO! Cascading Flowers from Jar Watercolor

Hello Ai Fans!

Welcome friends to another bright and beautiful Watercolor Wednesday! This week, Bonnie uses our Decorative Jar Set in a different way, with it spilling beautiful blooms in a cascade downward! We love this unique take on this stamp and hope you enjoy the colorful flowers, reminding of us the springtime outside!

Do you have some favorite flowers from our Watercolor collection? Hop over to the video and let us know what your go-to flower stamps are! Subscribe and click the bell on our YouTube channel for all the latest Ai videos!

Have a colorful Watercolor Wednesday!


View on YouTube: https://youtu.be/qSMpCQ4hDNg


Tuesday, April 16, 2019

Enjoy the Day Watercolor by Jil Lebel

Hello Ai fans!

I was really inspired to make a bright flowery card because of the warmer weather here. This card is more of a general card, but it could easily become an Easter card if you use a basket in place of the pot.

I started by inking up the sitting bunny with 979 - Brown and stamping it in the center of my watercolor panel. I also stamped it onto a piece of masking paper, cut it out and placed it over the stamped bunny.  I then inked up the tall bunny with 947 - Burnt Sienna and stamped it to the left of the sitting bunny.  The next step was to ink up the pitcher with 969 - Chocolate and 565 - Deep Blue before I stamped it to the left of the bunny.  I used the stamp positioner to help me with the placement of all of the items before I stamped them.  I removed the mask from the bunny and pulled the color out of the lines on all of the images.  I also added more color as needed by scribbling my colors onto my Watercolor palette. I darkened the eyes and noses on the bunnies with the Chocolate Marker.  I also added the detail to the pitcher with the 565 - Deep Blue. I added grass with the tiny and small grass with 177- Dark Jade.  The Flowers were added with 177 - Dark Jade for the stems and 925 - Scarlet and 885 - Warm Red.  The sky is done with 493 - Reflex Blue and plenty of water.  The last thing I added was the greeting with 565 - Deep Blue.  I used my Misti so I could stamp it several times to get a dark impression.  It is cut out using the Circle Double Stitched Dies.

Thanks for stopping by and Have a Great Day!

Wednesday, August 15, 2018

NEW VIDEO! On The Farm Watercolor by Kendra Krebs

Hello Ai Fans!

Welcome to another fabulous Watercolor Wednesday video by our August guest designer, Kendra Krebs! This week, Kendra creates a beautiful farm scene, with rustic cottage along a distant road, with a sweet cat sleeping in the foreground. We hope you enjoy this week's video! Make sure to give it a "thumbs up" on YouTube and leave Kendra a comment on the video!

Happy Watercolor Wednesday!


View on YouTube: https://youtu.be/jTvUjfetOoA


Saturday, June 16, 2018

Watercolor Weekend Roundup - Flags, Fields, and Flower Quilts!

Happy Watercolor Weekend, Ai fans! Today we have three more fabulous projects for you, are you ready?! Check out the different twists our designers have used in their projects today! Don't forget you can follow these ladies on social media (links above their project photos) so you can enjoy even more inspiration throughout the week!

Dot Freel - Instagram - Blog - Pinterest
Hello Watercolor Friends,

I made another red, white and blue card for the Watercolor Weekend roundup. I needed a flag so I drew that one using a pencil, a ruler and that Veteran card for my inspiration. Maybe Art Impression's Creator/Owner Bonnie can create a flag stamp for us to use in the future. 
This is day 16 of #thedailymarker30day coloring challenge. Join the fun! The goal is to color something daily even if it's a few minutes because we are all happier when we color or be creative. You can find out more info by going to the fabulous Kathy Racoosin's blog, click here.

I used five stamp sets and seven markers to create my card. See the list of supplies below:

Other Supplies: White Prismacolor Pencil, Canson Watercolor Paper

Tricia Kennedy - Instagram
My project for today’s Watercolor Weekend celebrates summer with “Bright and Beautiful Blooms”. Watercolor the Art Impressions Way by inking up the multi-flower long stem from Flower Set 2 in Scarlet and Olive Green. Stamp the single long stem from Flower Set 2 in Violet and Olive Green. Add greenery to the bottom from Foliage Set 1 in Olive Green. Fill in around the previously stamped blooms and add height with the small flower from Flower Set 3 in Brilliant Yellow. Scribble a little Olive Green and Salvia Blue onto your palette. Brush Olive Green into the greenery and finally Salvia Blue for the sky.
Marvy Le Plume II Markers: 8 Violet, 15 Olive Green, 43 Brilliant Yellow, 60 Salvia Blue, 94 Scarlet

Tricia O'Bin - Blog - Instagram - YouTube - Pinterest - Facebook
I have really been into trying to create quilt patterns with my dies and stamps. My mom is a spectacular quilter and I wanted to try some with paper, so here is what I came up with. 

I die cut several watercolor squares using the Spellbinders Die. Using one of the squares, I stamped the mini watering can from the WC Wishing Well Mini Set in Sepia. I added some foliage with the vine from the WC Foliage Set 2 in Olive Green. I added some flowers from the 5009 – WC Mini Flower Set in Violet and Magenta. I added some grass using the WC Foliage Set 1.

On two more squares, I stamped the flowers from the 5008 – WC Flower Set 3 using Olive Green and Magenta. I cut them in half. To create the batik triangles, I scribbled color onto a craft mat and sprayed them with water. I dipped the watercolor paper into the pools of color. I die cut these with the Spellbinders Die. I also used this die to cut some additional triangles from the Gina K Designs Heavy Base Weight Card Stock- Plum Punch cardstock. I assembled my quilt and used a stitched rectangle to cut out the center. I ran the piece through my die cut machine using the Quilt Top Textured Impressions Embossing Folder by Stampin' Up!. I cut the Gina K Designs Heavyweight Cardstock- Fresh Asparagus and Heavy Base Weight Card Stock- Wild Lilac mats using the next two stitched rectangles. I adhered them together and placed them on a white card base.

I hope you will try some new techniques with your stamps. We would love to see what you come up with!

Marvy Le Plume II Markers: 45 Sepia15 Olive Green8 Violet20 Magenta

Thanks, team! We LOVE to hear what you think of our watercolor projects, so be sure to drop us a line in the comments below! Also, don't forget to use your #aistamps if you are joining the #thedailymarker30day challenge on Instagram this month!

Happy Stamping!

Saturday, June 2, 2018

Watercolor Weekend Roundup - Happy June!

Happy June, Ai Watercolor Fans! With summer on the way, we are dreaming of blooming flowers and sunshine! Today we have three gorgeous projects from the Watercolor Guest Design Team that we hope will inspire some summery cards! Perhaps you'll find a few ideas to use your stamps a little differently!

Dot Freel Instagram - Blog - Pinterest
Hello Watercolor Friends,

I made this card during the Memorial weekend for this week's roundup and I guess I was feeling patriotic. I needed to make the log base bigger than it was so I used the stamp positioner to make it wider which made the larger birdhouse fit better. I used eight stamp sets and nine markers to create it, and a white gelly pen for stars on the flag. See my list of supplies below:

Other Supplies: Sakura Gelly Roll, Tim Holtz Distress Watercolor Cardstock

Tricia Kennedy - Instagram
Take a look “Through the Porthole” for today’s Watercolor Weekend project. Watercolor the Art Impressions Way by inking up the round door from the WC Hobbit Door Set (omitting the cobblestones and the little window) in Sepia. Draw in the bottom of the circle with the fine tip of Sepia to achieve the porthole. Stamp the same round door onto a post-it note and cut out a mask. Next stamp the siding from the WC Wall Texture Set in Sepia on both sides of the porthole. To get the wooden plank look, draw in lines, squiggles and knots with the fine tip of Sepia. Scribble a little Manganese Blue, African Violet, Olive Green and Salvia Blue onto your Watercolor Palette. Mix Manganese Blue with African Violet and brush into the porthole for the sea. Take Olive Green and brush in for the land and finally Salvia Blue for the sky.


Marvy Le Plume II Markers: 15 Olive Green, 36 Manganese Blue, 45 Sepia, 60 Salvia Blue, 86 African Violet
Other Supplies: Darice Wave Embossing Folder, Post-It Notes

Tricia O'Bin - Blog - Instagram - YouTube - Pinterest - Facebook
I really loved using this bird bath as a container for some spring flowers. I was inspired by one of my neighbor’s bird bath that was turned into a flower pot. I love using the AI Stamps in unique ways. I am hooked on the flowers in the Flower Set 3 along with the original foliage set. We would love for you to join us for Watercolor Weekend. Tag us on Instagram with #AIWatercolor!!

Marvy Le Plume II Markers: 15 Olive Green7 Orange8 Violet3 Blue20 Magenta45 Sepia

Aren't these projects so fun? Each projects offers ideas on how to stretch your stamps! Whether you are "extending" a stamp like Dot's larger tree stump, transforming a door into a porthole like Tricia K, or filling your bird bath with lovely flowers, there is something for everyone!

Do you ever save these projects to your Pinterest board? Every single one of our blog posts has a small Pinterest icon at the bottom so you can easily pin your favorite posts! While you're at it, be sure to visit our Wonderful Watercolor board on Pinterest to find more of your favorites! Also, check out Dot and Tricia O's boards while you're at it! They are seriously jam-packed with beautiful cards!

Dot Freel - 
Pinterest
Tricia O'Bin - Pinterest

Happy Stamping!


Saturday, May 19, 2018

Watercolor Weekend Roundup - Friendship Blooms!

Hello, Ai Watercolor Fans! Today we have three fabulous projects to share, featuring gorgeous florals. Our friends Dot and Tricia O. have paired a friendship sentiment with their card, while Tricia K. framed her poppies for a perfect gift!

Dot Freel Instagram - Blog - Pinterest
Hello Watercolor Friends,

Spring has surely arrived for most of us and I made a Spring birthday card for the Art Impressions Watercolor Weekend roundup. A friend gave me the heart shaped balloon. I used eight stamp sets and nine markers to create it. See my list of supplies below:

Marvy LePlume II Markers: 45 Sepia15 Olive Green72 Pine Green55 Iris Purple75 Sky Blue, 70 Peppermint, 35 Coral Pink, 52 Yellow Green, 62 Wisteria
Other Supplies: Canson Watercolor Paper

Tricia Kennedy - Instagram

Just three stamps and four markers were used to create my pretty “Poppy Painting” for today’s Watercolor Weekend project. I watercolored the Art Impressions Way by stamping the container from WC Containers in African Violet, then the foliage from WC Foliage Set 2 in Olive Green and finally the long-stemmed flowers from Watering Can in English Red and Olive Green (I added a few more buds by just stamping the single top flower several times). To achieve the “poppy” look, I placed a small black dot with the fine tip of Black into the center of each flower making sure to leave a little white space too.


Tricia O'Bin - Blog - Instagram - YouTube - Pinterest - Facebook
Lately I have really been into creating watercolor projects that have a frame of some kind in the design. I decided to share one for Watercolor Weekend that is really simple to achieve. It only requires 3 stamps and 3 markers. You can use a shaped die or really anything you have around the house to use as a template. This project can also be used for any occasion, just stamp the sentiment you need. Don’t have an occasion yet, leave it blank until you need one, then you will have a card ready to go at a moment’s notice.

I traced a square lightly on my watercolor paper using my stitched square die with a pencil. Then, I used 2 flowers from the new 5008 – WC Flower Set 3 inked with 20 Magenta and 15 Olive Green and the small leaves from the new 5007 – WC Foliage Set 3 also inked with 15 Olive Green. I used the square as a guide to where I wanted to place my flowers. I used the 40 Brownish Grey on my palette to create the square. 

If you would like to see how I created this card, come check out the video on my YouTube channel. I hope you will join us for Watercolor Weekend and share your projects with us using #AIWatercolor. 
Marvy Le Plume II Markers: 20 Magenta15 Olive Green40 Brownish Grey
Other Supplies: VersaFine- Onyx Black Ink PadHeartfelt Hydrangea- ClearHeavy Base Weight Card Stock- Bubblegum PinkSimon Says Stamp SHAPES WITH STITCHES SetSS160 In Stitches

Thank you for your beautiful cards, ladies! We are celebrating our gal pals this week with our newest Girlfriends release, and a hand-stamped and painted card is a wonderful way to share some love. We hope you'll get a chance to make and mail a card to one of your friends this weekend! Happy Stamping!

Wednesday, May 9, 2018

NEW VIDEO - Glass Vase with Flowers Watercolor

Hello Ai Fans!

Welcome to a new Watercolor Wednesday! This week, Bonnie creates a translucent glass vase, showing the submerged stems of her beautiful bouquet of wildflowers. She starts by stamping part of the left side of the container in Brownish Gray, and then uses her Stamp Positioner to stamp part of the right side to create a smaller vase. Bonnie masks the top of the vase and stamps her flowers and some foliage, then switches her masking to add some stems on the inside. Next, she adds some blue to the glass and a wash of purple on the outer edges. For the final touch, Bonnie adds some white pen details to give the glass a sheen and a highlight on the flowers.

We hope you like this new project and how you can extend the use of your stamps with this cool technique! Don't forget to subscribe to our YouTube challenge for the latest notifications of new uploads!

Happy Stamping!


View on YouTube: https://youtu.be/GnLVJeRrqfY


Tuesday, April 17, 2018

Sleeping Doe Watercolor by Jil Lebel

Hello Ai fans!

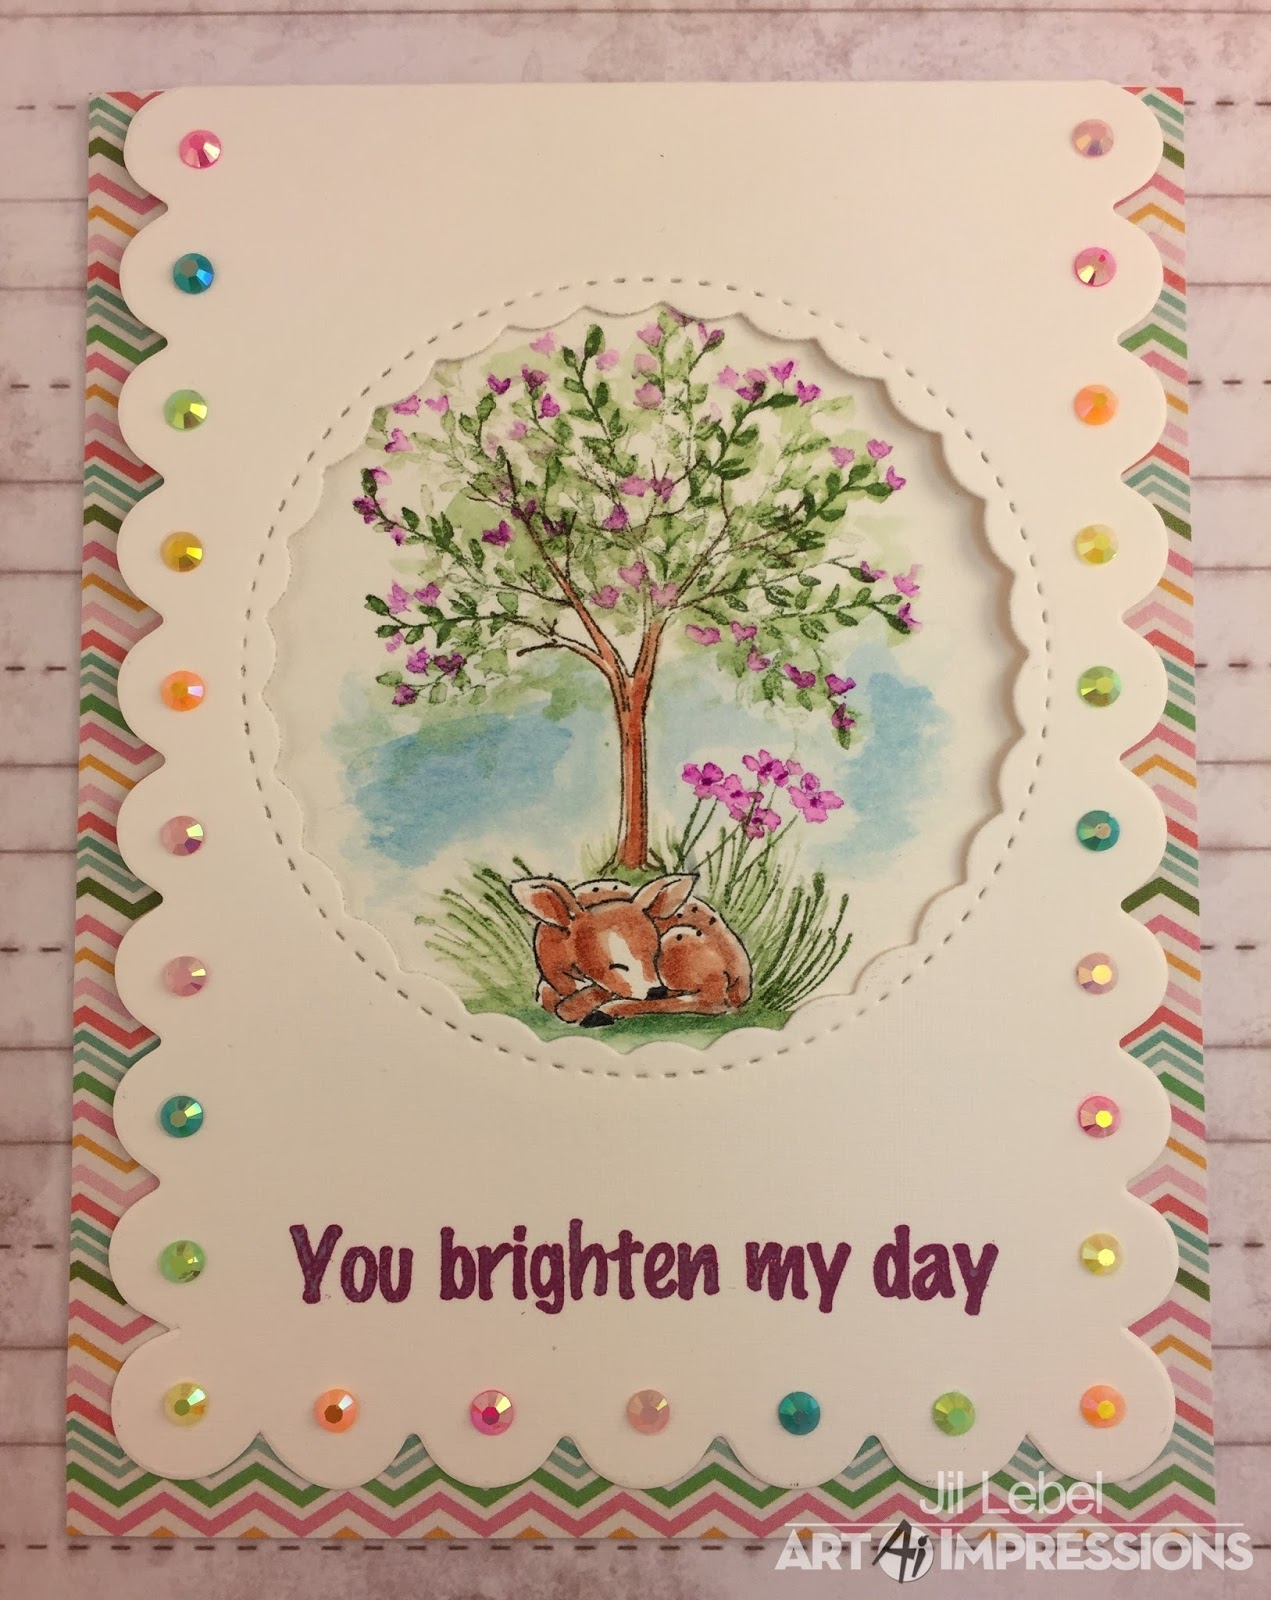
When I first saw this new watercolor release the doe sleeping under the tree image was my absolute favorite.  I knew I wanted to recreate that image from the packaging.  I just needed to think of a way to work it into a card.  My birthday was two weeks ago and my sweet friend, Tere, gave me several pretty card bases.  As soon as I saw them I knew one design would be perfect for my doe scene! I love it when things work out like that.


I started with a piece of Canson XL watercolor paper.  I inked up my tree from the WC Tree Set 1 5010 with Sepia and stamped the tree in the center of the paper and did not pull the color from the lines. I used my Acrylic Stamp Positioner to add the doe from the WC Mini Critter Set 5016 with Black. I used Brown with my Brush that I scribbled onto my Watercolor Palette to add color to the tree and the doe.  Once I'd added enough color to the doe, I used the fine tip of the Black marker to add back any lost features. I used Stamping Mask Paper to create a mask for the doe. Once it was covered, I used the tall grass from the WC Foliage Set 3 5007 with Olive Green to add in the grass around the doe.  I used my brush to pull the color up from the grass. I added leaves to the tree from the WC Foliage Set 3 5007 with Olive Green and used my damp Brush to pull out some color. I inked the three tiny blooms from the WC Mini Flower Set 3 5009 with Magenta and stamped it over the leaves and used my damp Brush to pull out some color.  I used the WC Flower Set 3 5008 and inked up the stem with Olive Green and inked up the bloom with Magenta.  I stamped it a few times below the tree.  I pulled the mask off of to reveal my untouched doe.  I used a circle die cut to cut out the entire scene.


I selected a single piece of pattern paper that would match everything on my card because it would show from the back to the front.  I chose a piece from the Pebbles Garden Party 6x6 paper pad and attached it to the inside of the card. I used a decorative die cut to cut the circle in the top portion of the card front where you would see the scene.  I attached my doe scene to the inside of the card so you could see it through the opening.Then I used Seedless Preserves Distress Oxide Ink to stamp the greeting.  I also added several different colored acrylic gems along the scallops on the card front using my jewel picker.  I selected them to match the paper.


Thanks for stopping by and Have a Great Day!

Wednesday, April 4, 2018

NEW VIDEO - Watering Can & Bricks

Hello Ai Fans!

Welcome to a new Watercolor Wednesday! This week, Bonnie creates a decorative watering can from our WC Wishing Well set, sitting on paved bricks!

Bonnie starts by inking the watering can in two colors. She adds multiple colors to her palette to add different shades to get a rustic lavender color on the container. She then draws in a grid pattern on the band with the fine tip of her Pine Green marker. Next, she adds a decorative flower and draws in a small embellishment in the center of the watering can. Bonnie adds in our favorite vines and our new tall flowers to fill in the container. To set the container on the cobblestones, she uses our stamp positioner to get the bricks in the perfect spot. For the final touches, Bonnie adds a flower laying on the bricks and some tiny grasses around.

Another fabulous Watercolor Wednesday! If you like our videos, please hop over to YouTube and give this a "thumbs up" and don't forget to subscribe to our channel for all our latest videos!

Happy Watercolor Wednesday!


Watch on YouTube: https://youtu.be/_mPImXbJ8Mw