For todays video and card, I am so excited to be sharing a brand new Art Impressions product with you today! We will be creating a Windows to the World Card which is a wonderful shadowbox on the inside of our card!!! I will be giving you a few tips on how to easily and quickly create this shadowbox design!
We will be using the brand new Bridge Window Accessory Set (5412) to create our little scene. However, there are several new designs available. They include the Deer Window (5411), Mailbox Window (5410) and Boat Window (5409) Accessory Sets. These are all so beautiful and each one comes with the coordinating die for the pop-up element on your shadowbox as well as a sentiment around each of the images! Please keep in mind that you will need the Shadowbox Window Set (5408) in order to create any of these shadowbox cards!
I decided to go with a simple yet elegant black, gray and white color scheme but you can certainly go as colorful as you wish. That is the fun of these little scenes....and they are fun on their own or as part of this shadowbox design!
Thank you so much for joining me today! Have a great day!!!
Happy Easter! I used the Bunny Pop Up stamp set to make one last Easter card. I have really enjoyed using some of the bunny & Easter Ai sets over the last month.
I started by stamping the images onto Spectrum Noir Ultra Smooth card stock with Gina K Black Amalgam ink and colored them with Copic markers. The colors I used will be listed at the end of this post. I then cut the images with my Cutterbee scissors, not the matching dies that come in the set. The matching die will create scoring lines to make the bunny pop up.
To finish the card I cut squares out of decorative paper from Simple Stories patterned paper. I cut the top square with Hemstitched Squares from Spellbinders. I added the bunny to the card with foam tape. The greeting is from the Sweet Easter set and stamped onto a rectangle of cardstock with Versafine Clair Nocturne ink and attached it over the bunny's hand. I attached the flower onto the bunny's ear with foam tape.
Hello Ai Fans - Bri here! Today I am sharing some cards featuring the new ShadowBox Windows series. These cards are perfect for the newest challenge, Ai Squared. For more details on this challenge, check out the announcement here. These cards are also featured on my personal blog, check it out here!
I chose my background paper to look like wall paper and the inside of cabins. I also wanted the paper to coordinate with the window scenes. I used the ShadowBox Windows Die Set to create the 3D interior fold for the scenes, the window and window ledge die cuts for the front panel, and the "hello" die cut on each card.
I colored each of the window scenes with Spectrum Noir Triblend markers. I love the smaller images like the bridge, mailbox, boat and deer that are mounted in the foreground of the scenes. The images below provide a zoomed in view of the four different window scenes.
Check back next week for more Ai inspiration made by me!
I love all of the laugh lines so much. They're just perfect for making a little fun of getting older. Hey! That doesn't mean you need to slow down, right?!
I also used some of the flowers that I stamped and cut out from the Floral Twister Set. I thought they were a good match with the designer paper that I used.
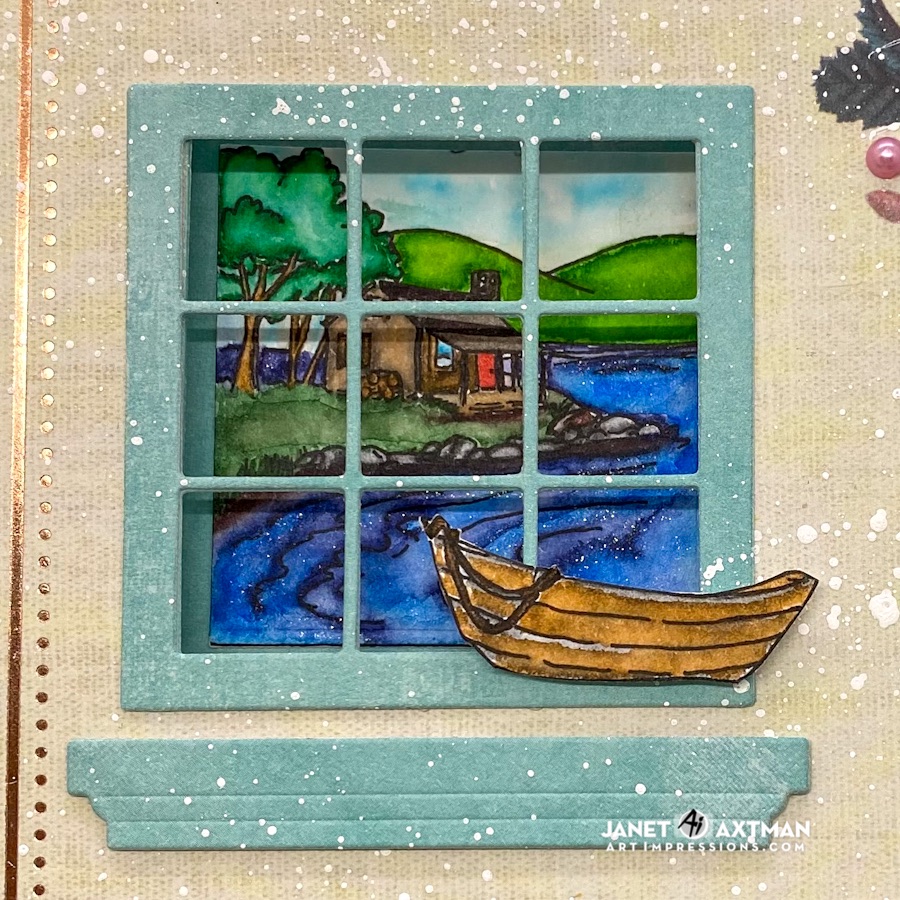
The boat and cabin scene is so peaceful and so easy to quickly color and work with. It's a mini scene that is great alone or combined with other scenes. The new releases include a Shadowbox Window die for a 3D element that can be used with any of the Window sets. The boat in this scene can be used in many ways to add dimension and perspective to the scene.
These little window scenes are perfect to color in any way you like. I chose to watercolor my window scene using Zig Clear Color Pens. I added shine to the water with a coating of clear Wink of Stella. The sparkle reminds me of lake water on a summer day. My little personal touch is the red door. My house has a red door so I usually color doors red as a nod to my own home.
Zig Clear Color Pens Used: May Green, Deep Green, Light Green, Green, Deep Blue, Persian Blue, Cobalt Blue Oatmeal, Light Gray, Mid-Gray, Dark Gray, Gray Brown, Black, Dark Brown, Beige
I have a video on this card and show you how to make a 5" x 7" easel card with basic supplies. You'll also see how easy it is to install the Shadow Box Window Die to create really stunning dimension.
Like many card makers, I love patterned papers and I try to use them to make my cardmaking a little easier. This 4 1/2" x 6 1/2" paper caught my eye and I've been waiting for an opportunity to use it. It has rose gold foil details and pretty vintage bird and floral images. I splattered the card with watered down white acrylic paint for additional rustic vibes. The window sets pair beautifully with the new Shadow Box Window Die 5408. It comes with the dies to recess your image behind the window frame and includes a window box. It lays flat when shut but pops up when the card is opened. It's a great way to add some unexpected dimension to your card.
I thought it would be fun to create an easel card with this so that the window would be at a perfect angle when displayed. I made my own 5" x 7" easel card base and used the Rectangle Double Stitched Dies to make a stopper and a birthday sentiment. When displayed, the box part of the die is free to pop up and provide the 3D effect it is designed for. I placed the boat on the outside of the window frame but it could also be used inside the shadow box or not at all. You get to decide!
Thanks for stopping by today. I hope you enjoyed this card and seeing the cool effect that the Shadow Box Window Die provides for your Window Accessories stamps.
This window die set makes a wonderful card front to show off the beautiful bridge scene. I added a piece of plastic against the back of the window and attached the little bridge image. The squared paper layers were cut with the Square Double Stitched Dies; the stitched border adds so much detail to the layers!
The little scene was attached to the inside of the card and colored with watercolor markers. I love the friendship sentiment and little flower!
Lastly, I used the Hello die to cut the word from glitter paper for sparkle and added three enamel dots to complete the card.
I hope you enjoyed today's project and will participate in the Ai Squared Challenge!
Hi Ai fans! This week I played with the Hoppy Easter stamp set and made a set of three cards. Easter is coming soon I'm loving this spring weather and seeing all of the flowers starting to bloom and trees have buds on them. For this card set I planned on adding all three bunnies to one card but after I had them all colored and cut out I changed my mind and made a set of three cards.
I layered pattern paper on this card and stamped the sentiment "Here comes the Easter Bunny" onto a die cut double stitched circle and adhered the bunny on the top of the circle.
The second card I layered more pattern paper and stamped the sentiment "Some bunny loves you!" onto banner. This card could be given an time during the spring I don't think it only needs to be for Easter.
I added more pattern paper for this card but I cut the center out to show some solid blue paper that I had matted the pattern paper with. I added the sentiment "Hoppy Easter!" to a die cut oval double stitched die cut.
I used coordinating paper and all three of the bunnies clothes and eggs are colored with the came colors to make this a set of cards.
In today’s card and video we will be using the adorable little Easter Bunnies Stamp Set (5274)!
We will be doing some easy and fun acrylic block stamping. If you haven’t tried this yet you will definitely want to give it a try. To apply the ink to our acrylic blocks we will be using the water based dual tip markers from Tombow. You will see that just by using different size acrylic blocks or different shapes you will get a fun variety of looks! I will give you fair warning...this is a very addicting technique!!!
I have intentionally not colored in the images to show you how you can quickly create several cards with this technique! And if you don’t love coloring then you will love the simplicity of the black stamping on white cardstock!
Thank you so much for joining me today! Have a great day!!!
I used the Basket of Blessings stamp set to make two egg shaped cards. Art Impressions has such an impressive collection of Easter stamps. I've been using them all month and still haven't used them all.
I started by stamping the images onto Spectrum Noir Ultra Smooth card stock with Gina K Black Amalgam ink and colored them with Copic markers. The colors I used will be listed at the end of this post. I then cut the images out with Cutterbee Scissors
I made a card base from an A2 card base by cutting the egg shape into the closed card using partial die cutting. I positioned the die a tiny bit off the card front so it left a hinged area in the card. I cut a full egg from yellow cardstock and attached it over the card. I cut another layer from a smaller die cut from the same set from white cardstock. I then colored them with Distress ink and a blending brush. I used Bundled Sage and Spun Sugar Distress ink. I added the bunny images to the cards with foam tape. The greetings were stamped with Versafine Clair Nocturne ink and cut out with the flag Double Stitched dies.
Hello Ai Fans - Bri here! Today, I am sharing my creation for the Itty Bitty Challenge. This tiny creation features a new set that is part of Ai's Matchbook collection, the MB Coffee Shop set. These matchbook sets are just so adorable and so itty bitty! This card is also featured on my personal blog, check it out here!
First, I die cut the matchbook frame using the Matchbook Template die set. I used the same die set to cut the sentiment strip, rug, windows, and window frames. Next, I stamped and colored the images from the MB Coffee Shop set. I colored the images with Spectrum Noir Triblend Brush markers. I die cut all the images with the coordinating outline dies included in the MB Coffee Shop set. The flaps make it so easy to determine the placement of all of the images.
I used the MB Envelope Dies set to create a coordinating envelope for the coffee shop matchbook out of espresso-themed paper. I used Vintage Photo Distress ink to create the splatter effect on the mini envelope. I stamped the "Live life in full" sentiment from the Succulents Set onto the back of the envelope with pigment black ink.
Check back next week for more Ai inspiration made by me!