Showing posts with label Sweet Easter Set. Show all posts

Tuesday, April 11, 2023

Easter Bunny Tag by Nina

  Hello Ai fans, Nina here and today I am sharing an Easter tag addition to my Tag Journal of Art Impressions.

Today I am using the Sweet Easter Set and the Tag Stitched Dies Set.


I cut my Tag from White paper multiple times and attached them together to make them sturdy. then die cut another one from blue plaid pattern paper and attached it to the tag.

I stamped my images using Versafine Onyx Black Ink that is watercolor friendly because I used my Zig Brush Markers to color them.

I then colored them with these shades:

Reds: 260

Greens: 043

Blues: 036

Pinks: 026 230

Browns: 061

Greys: 099 904

I then cut my images, backed them with foam tape and attached them to the tag on top of a strip that I cut to have my images stand on.


I then stamped my sentiment on a smaller tag and attached it on the top. and decorated using enamel dots and stickers.

I then opened the metal ring of my tag album and added my new tag to it.


Tuesday, March 30, 2021

Pop Up Easter Bunny by Jil Lebel


Hello Ai fans!

Happy Easter! I used the Bunny Pop Up stamp set to make one last Easter card. I have really enjoyed using some of the bunny & Easter Ai sets over the last month.  
I started by stamping the images onto Spectrum Noir Ultra Smooth card stock with Gina K Black Amalgam ink and colored them with Copic markers.  The colors I used will be listed at the end of this post.  I then cut the images with my Cutterbee scissors, not the matching dies that come in the set. The matching die will create scoring lines to make the bunny pop up.


To finish the card I cut squares out of decorative paper from Simple Stories patterned paper.  I cut the top square with Hemstitched Squares from Spellbinders. I added the bunny to the card with foam tape.  The greeting is from the Sweet Easter set and stamped onto a rectangle of cardstock with Versafine Clair Nocturne ink and attached it over the bunny's hand.  I attached the flower onto the bunny's ear with foam tape.
Copic Colors Used:
Bunny - E43, E42, E41
Shirt - B95, B93, B91
Flower - R85, R83, R81
Leaves - YG63, YG61

Thanks for stopping by and Have a Great Day!

Saturday, March 21, 2020

Happy Easter by Sharon Caudle

Hello AI Fans!!

First, I'd like to say I've got everyone in my thoughts and prayersToday my card features the beautiful Sweet Easter Set from Art Impressions. I love the feeling I get when I look at this precious Easter Bunny snuggled up in the spring tulips! Do you have your Easter cards ready to go yet? 


Thanks so much for stopping by for a visit today, and until next time - stay crafty!! 

Saturday, February 8, 2020

Happy Easter by Sharon Caudle

Hello AI Fans!!

I'm starting on my Easter cards now and I just love #5004 Sweet Easter Set from Art Impressions! I used three of the individual stamps to make this. I just used my stamp platform and stamped them all at the same time. Easy Peasy! And even if you don't have a platform, it's super easy to get it right because these stamps are clear! 


Thanks so much for stopping by for a visit today and until next time, stay crafty!!


Copic markers used:
E33, E50, E51, E53, E97
Y15, Y18, Y32, Y35
R20, R81, R83
B000
YG13, YG17, YG21


Tuesday, April 2, 2019

Sweet Easter Cards by Jil Lebel

Hello Ai fans!

I love all the fun bunnies in the Sweet Easter Set.  I had to throw in the cute little chick for a bit of yellow. I decided to make two similar, yet different cards showcasing them. I feel that this stamp set and these cards show the more playful side of Easter.
The images were stamped onto Copic X Press It paper with Gina K Designs Black Amalgam Ink and colored with Copic markers.  The colors used are listed at the end of this post. The bunny in the egg was cut using a double stitched egg die. The other images were fussy cut. A piece of the 6" x 6" Lawn Fawn Perfectly Plaid Spring paper pad was cut to 4" x 5 1/4". An egg shape was cut out of it using one of the double stitched egg dies. A smaller egg shape was cut out of a white A2 card and the plaid layer was attached to it. A greeting was stamped with Versafine ink and cut out with the Circle Double Stitched Dies and attached tot he center of the card along with the flower image.  The bunny in an egg image was attached to the front of the card so it could be seen through to the front.  The chick image was attached over it.  The other bunny was attached over it with a mini action wobble spring.  A few enamel dots were attached to the card front.
Here is a close up view of the inside of that card. 
The second card started out the same way, but ended up quite different!  The images were stamped onto Copic X Press It paper with Gina K Designs Black Amalgam Ink and colored with Copic markers.  The colors used are listed at the end of this post. The bunny in the egg was cut using a double stitched egg die. The other images were fussy cut.
Two layers of patterned paper were cut with the egg die from the 6" x 6" Lawn Fawn Perfectly Plaid Spring paper pad.  Another layer was cut to 4" x 5 1/4" and attached to a peach A2 card. A green plaid strip of the patterned paper was cut to 1 1/4" x 5 1/4" and added to over the larger layer to the left side. The egg dies were used to cut three layers out of peach card stock.  The colored and plaid egg layers were attached to the peach layers and then attached to the card.  The chick and bunny were attached to the center of the card. A few enamel dots were attached to the card front.
Copic Colors Used:
Large Bunny - C00, C0, C1, C3, R00, R20
Egg, YR000,YR00, YR01, YR02,E13
Bunny - E30, E32, E55, E57, R00, R20
Chick, Y11, Y13, Y15, R14, R00, 
Flowers - C00, C1, YG03
Mug - R81, R83, R85
Bow, Y11, Y15, Y17
Background- B000, B00, B01, B02

Thanks for stopping by and Have a Great Day!

Friday, March 29, 2019

Color Changing Slider with Sweet Easter Set By Jessica Shier


Hello Ai Fans!

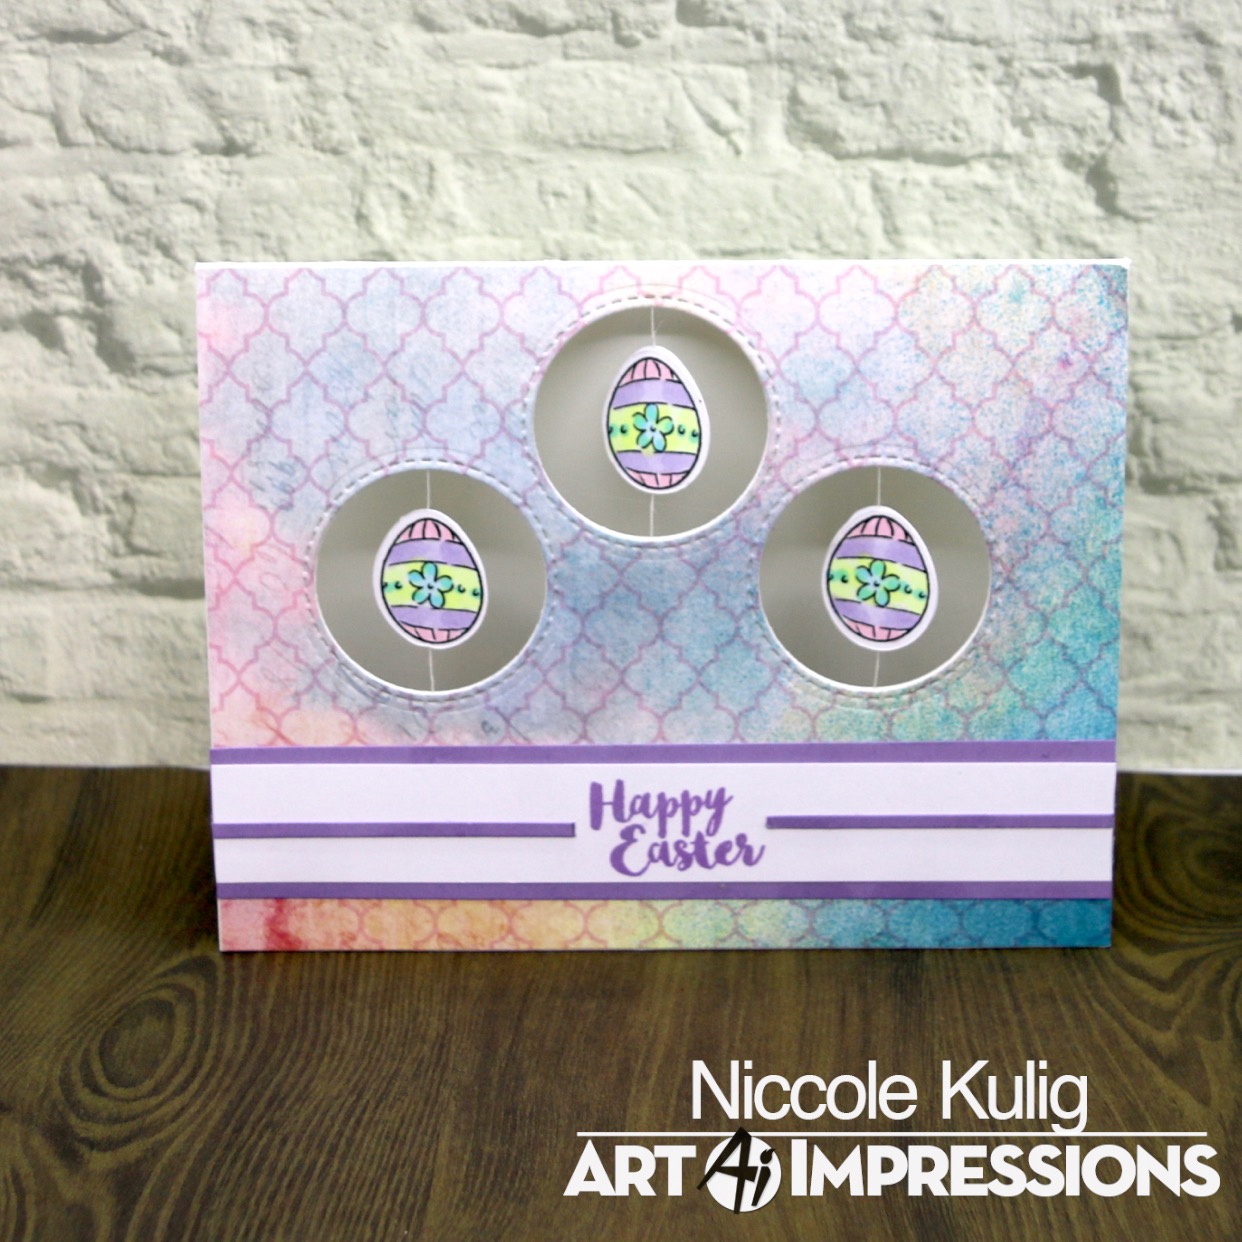
Today I'm showing you the slider card I made using the Sweet Easter set in combination with the Slider die. I thought it would be fun to mix it up and make this a color changing slider. Just a few additional cuts made this pretty easy to assemble together. 


To start with I die cut a piece of kraft cardstock with the Art Impressions Slider die. For this you will also need some acetate for the window and Staz-on ink to stamp on that clear slick surface. I trimmed the acetate down to 17/8'' x*4  5/8''. This will fit just inside of the slider so that the edges can be glued. I also used those same measurements to trim a piece of 80lb Neenah Solar white cardstock which is what I stamped and colored the bunnies on. I was going for a robin's egg blue with the shells and added splotches with a white gel pen. 

I used a stamp positioning tool to stamp the bunny images evenly and in the same places on both the acetate and Neenah 80lb cardstock. The acetate I used the Staz-on and on the Neenah I stamped the images with Amalgam ink. Then I started coloring the bunnies on the Neenah cardstock with Copics, colors I used listed below.


For the background I ink blended several Distress Inks over Neenah cardstock in soft spring colors. I blended the Pumice Stone distress ink over the top of the colored cardstock through a stencil that reminded me of a basket weave. One dry I splattered it with the Gansai Tambi Starry Colors watercolor in champagne.

I also did a lot more die cutting. I used a grass border die and colored it green with Distress Ink. The sentiment is from the Sweet Easter set and is die cut with the Flag Double Stitched die, using the double end flag and trimming it to fit. The most die cuts I used is for the polka dot banner. Easily made by die cutting the dotted paper with the second to smallest Banner Double Stitched die 6 times.


I glued the acetate bunnies to the inside top of the slider pocket, centered it with the colored version of the bunnies and attached that underneath. Leaving enough room to for a cut to fit inside which is long enough to grab a hold of to make the slider work. I attached a black piece of ribbon to the end with the tiny attacher stapler. 


Copic Colors used:
C7, C5, C3, C1
W3, W1, W0
E81, E35, E31
BG78, BG15, BG13, BG11, BG10, BG09
B02, B00
G17, YG03, RV11

Alright that is it from me guys! Thank you so much for stopping by today. Happy Stamping!


Wednesday, March 6, 2019

Egg-Cellent!

Hello Ai fans!

Today I am working on a couple Easter cards.  I wanted to use my Mini Bunny Spinner Set.  I picked it up a while ago but I wanted to wait until closer to Easter to use it. Well ... it is getting closer to Easter, so what better time than now.


I knew I wanted to try and add three circles, but I also knew that I am not good at lining this up so I figured I would stagger the circles in case there were boo boo's.  The circles were from the Circle Double Stitched Dies. I really like how they turned out.
As you can see I die cut from both my card base and my pattern paper so they would line up once adhered together.  What I like to do when adding my thread I glue the thread to the inside of one image and then attach the matching image to the other.  From there I use double sided tape and place on both ends of the circle to attach my thread to, as you can see above.  From there I add glue all over and around the thread so I know it will be secure once all put together. Another trick I like to do is tape my card base down where the fold is so there is no reason for any slack with the thread.

 I finish it off by adding my card front to the panel.  Not hard at all, right?? And from here I decorate my card with all of the finishing touches. As you will see below I added some purple card stock to my image.  I stamped the sentiment "Happy Easter" from the Sweet Easter Set.


I thought it looked to plain with just the white strip with the sentiment on it so I Added some more purple to it.  I cut a very thin strip of purple, centered it ant framed out the phrase.  Don't you agree it adds to the sentiment?

'I made two so I could send them to my Mom and my Mother in Law.  I can't tell if I like the one that is more pink or the one that has more blue in it.  Which one do you like better? I know they are both the "same" but sometimes the shades of color matter ... I think I am going with the more blue card! You?

Here they are side by side again.  Happy Wednesday everyone!

Until next time ... Hugs & inky fingers!

Copics used:
BG000, BG01
BV000, BV00
RV10, RV11
Y0000, Y000, Y00


Tuesday, March 20, 2018

Easter Egg Watercolor Truck by Jil Lebel

Hello Ai fans!

Happy First Day of Spring!

When I first saw the truck in the new Ai watercolor release I knew I wanted to get it because I could fill it with tons of things.  It was a given that I would put flowers and leaves in it, but Easter eggs was not one of the first things I thought of. This blog post is falling on the first day of spring, but it is also my last post before Easter, so I had to come up with a way to combine the two.  After looking at the sets I had planned to use this month, I decided to combine a few of them into this one post.


I started with a piece of Canson XL watercolor paper.  I inked up my truck from the WC Truck Mini Set 5011 with African Violet and Sepia and stamped the truck in the center of the paper and pulled the color from the lines.  I masked the truck and used Steel Blue to ink just the eggs from the HM Easter Set 4976 Basket Image.  I stamped them once around the cab of the truck and used masking paper to create a mask before I stamped them again towards the back of the truck bed.  Then I colored the eggs with Iris PurpleVioletTropicalBrilliant Yellow and Steel Blue markers from a WC Palette using a # 4 brush. I inked the three tiny blooms from the WC Mini Flower Set 3, 5009 with Violet and stamped it in small clusters.  I inked up another small bloom from the same set with Brilliant Yellow and stamped in a few different areas.  I filled in the gaps using the tiny grass from the Foliage set 4051 inked with Pine Green.  I also added some vines from the WC Foliage Set 3 5007 with Pine Green.  Once I was happy with everything, I cut my image out with Spellbinders Nestabilities 4.


I stamped the set of three eggs from the Sweet Easter Set 5004 onto the Canson XL paper with Jet Black Archival Ink.  I colored them using my same supplies.  I fussy cut them out with detail scissors and added them to my layer with foam tape. I also stamped the Happy Easter greeting from that same stamp set with the Jet Black ink and cut it out using the Spellbinders Nestabilities Labels set 17. I also added that with foam tape.


Thanks for stopping by and Have a Great Day!

Tuesday, March 13, 2018

Easter Bunny Spinner Card by Jil Lebel

Hello Ai fans!

I'm using the Mini Bunny Spinner Set 4732 as the focal point for this weeks Easter card.  I also had to use some more stamps from Sweet Easter Set 5004 as accents.  I love that the mini spinner sets come with the stamps and matching die cuts.  It makes them really easy to fit the front and back images together.  Plus, spinner cards create that wow factor every time.


I started by stamping the back and front of the bunny spinner images and the mug of flowers onto Spectrum Noir Ultra Smooth Premium White Card Stock with Simon Says Stamp Intense Black ink.  I colored all of the images in with my Copic markers. I went over some areas with my Prismacolor colored pencils to deepen the shadows. I've listed the colors at the bottom of this post.  I cut both sides of the bunny spinner with the die cut.  I cut the mug of flowers with my detail scissors. I cut two pieces of the Authentique Latest and Greatest 6x6 paper pad with the Mama Elephant All Prettied Up die Cut. They are going to go on each side of my card front, so I cut a circle opening a white A2 card with a circle die right behind the scalloped circle opening. I used a circle die that was a bit larger than the scalloped circle so the white paper wasn't visible through the Authentique patterned paper once I added it to the card.


It was very easy to assemble the spinner portion.  I cut a 5" piece of pink DMC floss.  It has six strands.  I pulled them apart because I only needed one.  I applied a thin layer of Tim Holtz Collage Medium to one side of the bunny spinner and added the DMC floss right down the center and tapped it into the collage medium. Then I attached the other side of the bunny spinner so the two colored sides are facing out and lined up perfectly.  I pushed the two together with my fingers to make sure everything was sticking together and then placed it under a hard, flat surface to dry.

Once the Bunny Spinner was dry, I was ready to put together the card.  I added a tiny piece of 1/8" adhesive to the top and bottom of the circle cut out area on the card front. I stuck down the bunny spinner string into the adhesive.  I was sure to position the bunny where I wanted it in the center of the circle. I added 1/8" adhesive to the back of the blue piece of patterned and die cut paper, centered it on the card and stuck it down.  I repeated the process on the back of the card front with the pink piece of patterned paper.  This created a sandwich to hide all of the spinner workings.


I created a few other items to accent the card.  I was going to add a plain pink piece of paper to the inside of the card but it looked really plain.  I used my Tim Holtz Bubble stencil and my mini ink blending tool to go over it with Spun Sugar Distress ink to create my own pattern paper. I cut a small piece of the Authentique paper from a Spellbinders Labels Two and added a sentiment over that with foam tape. I added the mug of flowers to the card front with foam tape.
the last thing I did was wind up the bunny to place it in an envelope.  When the card is opened, the bunny will spin around!

Copics:
Bunny - W5, W3, W1, RV10
Mug - R81, R83, R85
Ribbon - YG61, YG63, YG67

Prismacolor Colored Pencils:
Mug - Mulberry 995
Lily - Spring Green 913, Chartreuse 1004


Thanks for stopping by and Have a Great Day!