Showing posts with label Easter Chicks Set. Show all posts

Friday, April 18, 2025

This Easter Card is All Ears (and a Little Beak)! by Tasha

 Happy Friday Art Impressions friends!

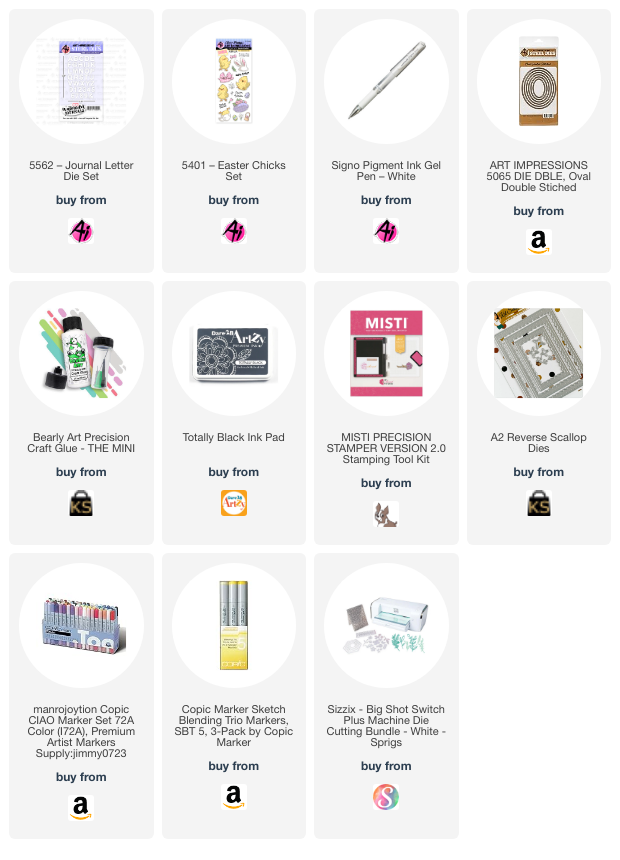
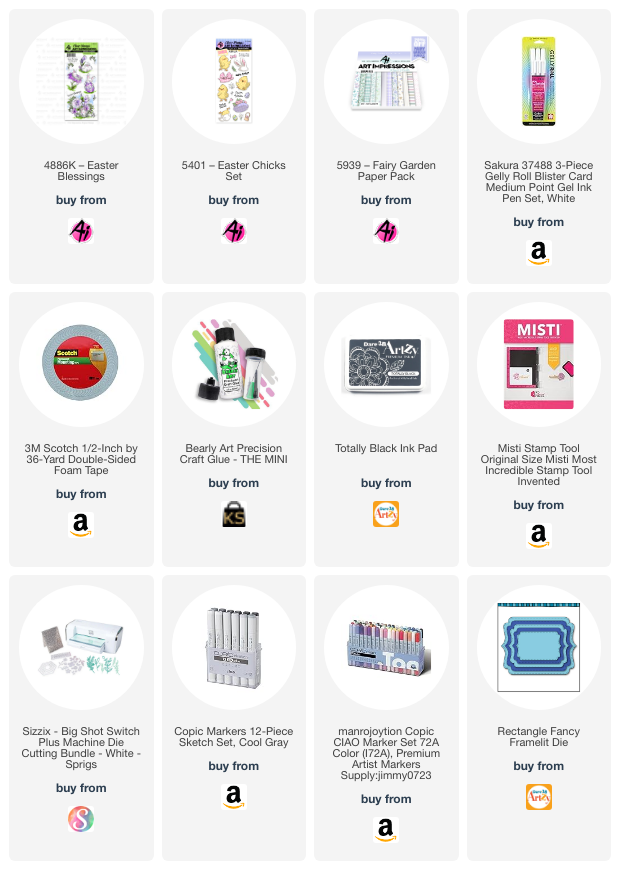
Tasha here sharing an Easter card inspired by the current "ABC, 123" Challenge. The project features the fun 5401-Easter Chicks Set and these bunny ears are just too cute!!!

To go with the Challenge theme, I used the 5562-Journal Letter Die Set for the greeting. Instead of having the letters go straight across, I decided to have them curve around the oval frame. I think this looks awesome and love the pop of pastel blue!


Lastly, I attached layers of yellow, white, and pastel blue cardstock and a piece of carrot pattern paper to bring in tons of Spring colors. I also added a scalloped frame to complete the design. This card makes me happy and I can't wait to send it to someone special this Easter!

I hope you enjoyed today's card and will join in the "ABC, 123" Challenge.

Happy Easter!


Friday, April 11, 2025

Easter Blessings! Card by Tasha

 Happy Friday Art Impressions Friends! 

Tasha here sharing a new Easter card featuring the sweet 4886K-Easter Blessings Set. The bunny stamps included in this set are so cute and have a whimsical look that I love.

To begin, I stamped the bunny with the tulip on to white paper to start creating the Spring scene. After stamping, I used Copic Markers to color the grass and sky before attaching little white clouds. It's hard to tell in the photo, but I used foam tape on one cloud to raise it up a bit. 

The greeting "Easter Blessings" was also included in this set and I used a small scissors to cut around the letters. This greeting fit perfectly in the center of the card and I like the handwritten lettering.


To complete the card I added two little Easter eggs to go with the theme and attached layers of pastel colored card stock, and a piece of Art Impressions floral pattern paper. This paper is so pretty and I love the purple flowers!

Thank you for checking out today's card and I hope you are inspired to create an Easter card using the 4886K-Easter Blessings Set!

Have a wonderful day!


Thursday, April 10, 2025

Easter Card and Treat Containers by Dori Mendiola

 Happy Thursday AI Friends!

Today I have a couple of fun Easter items for you.  I was having too much fun and got carried away which is so easy to do with all of the fun AI Easter stamps sets.

  Let's start with my Easter card using the #5401 - Easter Chicks set.  The images, sentiment and the little Easter accessories come with this set as well as the dies.  The interactive slider was created using the Lawn Fawn Magic Picture Changer die.  The pattern papers are from the #5892 - Easter S2 and the #6012 - Basic Yellow Paper packs.  


 For the other Easter project, I got carried away with the #5872 - Bunny GCH set and the #5742 - Easter Journal Paper Pack.  I decided to make treat containers and this was sooo much fun.  One I made as a box for treats and the other is a shaker, but I used small jelly beans to fill it.  It opens so the candy can be eaten.  However, you could use shaker bits and glue it shut.

For the treat box, I cut a 6" x 6" piece of heavy cardstock.  I scored it at 2" and 4" then turned 1/4 turn and scored again at 2" and 4".  On one side, cut the two score lines to the first fold.  On the opposite side, cut the two score lines to that first fold.  You should have three connected squares on the left of first cut score line and three on the right of the second cut score line.   Fold in the middle pieces and then fold in the sides and glue down each flap.  Your open box is ready.  I then cut a panel of pattern paper to cover the sides as well as a belly band using the #5804 - Decorative Belly Bands die.  For the back side of the bunny, I cut two extra paws for the back feet.  I used the eye die to cut the bottom of the paw and a hole punch for the toes of the paw and glued a solid pink paw to the bottom.  I also used a small white pom pom for the bunny tail.

For the second treat container, I used a round container from the Dollar Tree (or you can use condiment cups).  I cut the bunny face from a nested circle die vs. the square die included in the #5872 - Bunny GCH die set.  I also altered the headband to fit the circle face.  I adhered the top of the container to the back of the bunny face with strong adhesive.  I decorated the bottom of the container with the paws and tail prepared the same as above.  I filled the cup with the desired candies and sealed the lid to close.  The candy cup is complete and ready for your little one.

I hope you enjoyed my projects today.  Have a great day and keep creating!!

Copics used on card:  T0, T2, R30
YR12, YR14, YR18
Y13, Y15, Y17
G40, G43, G46
B000, B00, B01

Tuesday, April 1, 2025

April 2025 Monthly Challenge with Guest Designer Simone Carr

Hello Ai fans and welcome to our April Monthly Challenge.

These monthly challenges will have no theme. It's just fun to create something using Art Impressions products and then possibly win some free stamps!

April is Simone Carr's turn to be our Guest Designer.

How do you win free stamps? Add your creation (it doesn't have to be a card) using Art Impressions products below for your chance to win a free stamp set from Art Impressions or a freebie from me. (US addresses only for my freebie...The free stamp set from Ai is open world wide)
Let's see what Simone has created to inspire you this month.

Hello Crafty Friends,

I chose to create two cards with the Happy Easter Set (4754) because I absolutely loved the cute egg-shaped heads of the Easter bunnies.
For my first card, I started by stamping the images onto masking paper and fussy cutting them out. Using an egg-shaped die, I drew a pencil outline to guide where to place the bunnies. I stamped the smaller bunny first with Memento Toffee Crunch and placed the masking paper over it. Then, I stamped the second bunny next to the first one and masked it as well. Finally, I stamped the standing bunny behind the two smaller bunnies.


After all the bunnies were stamped, I removed the masking paper and began coloring the images. I used Tombow markers to color in the bunnies and added details to the grass and foliage around them. Once the coloring was complete, I cut a piece of white cardstock to 3 ¾” x 5”, centered it on my die, and ran it through the die cutting machine. I then embossed the frame with a lovely texture and used two dies to cut out a frame that fit the opening. I added some double-sided foam behind the frame to give it a bit of dimension before adhering it to the watercolor paper. To finish the card, I stamped a sentiment on white cardstock, die cut it out, and added a sweet bow to complete the design.
Materials Used:
Stamps:
  • Happy Easter Set (4754)
    Foliage Set 1 (4051)
    Foliage Set 3 (5007)
    Bible Flower Set (5074)
    Gift Card Pocket Set (5811)
    Easter Chicks Set (5401)
Dies:
  • Egg-shaped Die (for drawing the outline)
    Die for Frame
    Bow Die
Paper:
  • White Cardstock
    Easter PP (5742)
    Canson Watercolor Paper
    Mirri Paper
Inks & Markers:
  • Memento Toffee Crunch
    Bleed Proof White
    Tombow Markers: 177, 526, 977, 992, N55, 925, 195, 452, 703, 985
Other:
  • Masking Paper
    Embossing Folder
    Double-sided Foam Tape

For my second card, I created a design using the Postage Die on Strathmore Bristol Smooth Cardstock. I started by cutting out the postage shape and placed it in my Stamp Positioner to ensure proper alignment for the stamping. I used Post-it tape to mask off certain areas of the stamp to prevent overstamping. Once the areas were masked, I stamped the images using Memento Toffee Crunch and then colored them in with Tombow markers using a #4 brush for a soft watercolor effect.


The result was a whimsical Easter scene framed by the postage die, which really helped to highlight the stamped images. I finished the card by adding some patterned paper from the Basic Yellow PP (6012) to add an extra pop of color behind the frame.
Materials Used:
Stamps:
  • Happy Easter Set (4754)
    Foliage Set 1 (4051)
    Foliage Set 3 (5007)
    Bible Flower Set 2 (5418)
Dies:
  • Postage Die
Paper:
  • Strathmore Bristol Smooth Cardstock
    Basic Yellow PP (6012)
Inks & Markers:
  • Memento Toffee Crunch
    Versafine Clair Nocturne
    Bleed Proof White
    Twintone Brown and Black
    Tombow Markers: 025, 055, 993, 905, 933, 195, 856, 703, 526, 401, 177, N55, 947
Other:
  • Stamp Positioner
    Post-it Tape

I hope these cards bring some Easter joy to your crafting! It was such a pleasure to create them, and I can't wait to see what you come up with for your own Easter projects.
Happy Crafting,
Simone

Here is the fine print...
✻ Please make a new card or handmade crafty creation.
✻You can make any item you wish; this is not limited to cards and it can be any theme you like.
✻ Limit two submissions per person. 
✻You MUST use Art Impressions stamps or dies! You may use other companies products but the main focus should be on Ai items.
✻If you win, you will receive one free stamp set of your choice. 
This will be a random drawing so all levels of ability are encouraged to enter!
 ✻Please include your first name and last initial on your submission.
✻We love to comment on your entries, but keep in mind if you use a private group or a platform that you need to sign up for, we probably won't be able to.
✻ The Ai Challenge is open to everyone, international submissions are welcome!
✻ Good luck and happy crafting!

You are invited to the Inlinkz link party!

Click here to enter

Monday, March 10, 2025

Easter Shadow Box card by Sharon Caudle

 Hello AI Fans!

Are you loving all the beautiful Easter projects everyone is posting??!! I love this time of year! A time of renewal, faith, and hope. I'm starting to see a few sprigs of green grass slowly peeking out. Winter is definitely not done yet, but spring is coming! I wanted to create a fun shadow box card using a bunch of different Easter images available from Art Impressions. This box was a lot of fun to make! I started out by stamping all these fun images onto a Copic friendly paper and then coloring them with the Copic markers I've listed below for you. I just noticed I forgot to put the cute little white dots on the Peeking Bunny image, but I don't think it detracts from his adorable face. I built up the shadow box from a shadow box die set I have in my stash, and then cut out some strips from AI paper and used a grass die to create a fun polka dotted grass element. It just adds to the whimsy of this project. I used I love that this folds flat for mailing! 


That top cross piece is supposed to add stabilization to the shadow box, but I used such a heavy cardstock I didn't really need it.  I wasn't sure if I was going to hang anything, so I went ahead and added it anyway. 


And here's a good look at how dimensional this really is. I love it! 


So that's it for me today! I hope you enjoyed my project. Thanks so much for stopping by for a visit and until next time - stay crafty!! 
Copic markers used:
E21, 33, 40, 41, 97, and 99
Y02, 13, 15, 19, 35, and 38
YG01, 03, and 05
R01, 02, and 20
V01
G00
B00, 91, 93, and 95


Friday, February 2, 2024

Here for the Chocolate Card by Tasha!

Happy Friday Art Impressions Friends! 

Tasha here sharing a delightful Valentine's Day card featuring the adorable 5401 - Easter Chicks Set. Mixing and matching sets is one of my favorite crafting techniques, and this card was so fun to create.


To start, I stamped the two darling chicks, along with a bow tie, flower, and a tiny chocolate heart box from the 5493 - Front Porch Valentines Set. It's amazing how different sets can complement each other perfectly! Once I finished coloring all the images, I used the coordinating dies included in the sets to cut them out. Having the dies makes crafting so much easier.


For the background, I cut grass out of plaid paper and used the sweet heart pattern paper from Art Impressions for the sky. These vibrant colors and hearts work perfectly with the Valentine's Day theme.

To add a fun sentiment, I stamped "Here for the Chocolate" from the 5733 - Easter Sentiments Set. I then used a small banner die to cut out the greeting and layered it on a larger banner cut from pink glitter pattern paper because who doesn't love a bit of sparkle?


Lastly, I added layers of cardstock, glitter pattern paper, and a few glitter enamel dots to add dimension and shine to the card. The final result is a cheerful and whimsical Valentine's Day card that's sure to bring a smile to someone's face.


I hope this project inspires you to mix and match your stamp sets and get creative with your cardmaking this Valentine's Day season! Have a wonderful day!


Monday, April 17, 2023

April Showers Challenge by Sharon Caudle

 Hello Ai Fans!


My card today fits right in with the April Showers Challenge that is going on right now at Art Impressions! I used the new adorable #5716 Little Boy Front and Bac, #5719 FB Fence and Window Set, and for the cute little flowers #5401 Easter Chicks Set.  Both the rainbow and cloud die set as well as the sentiment are from my stash.


Thanks so much for stopping by for a visit and until next time - stay crafty!


Copics used:
E000, E00, E11, E33, E40, E42, E44
Y17, Y35, Y38
YG23, YG61, YG63, YG67
B000
T1


Monday, April 10, 2023

One last Easter project by Sharon Caudle

 Hello AI Fans!


I hope you had a wonderful weekend and if you celebrate Easter, I hope it was a joyous one! I have one last Easter project to show you today.  I created some tags for all the treat bags for the kids when they came over yesterday.  I used the two cutest Easter and Spring sets! I love them both and simply HAD to have them as soon as I laid eyes on them! LOL! #5504 Happy Spring Set and #6401 Easter Chicks Set! LOVE them!! I made four each of three different tags.I stamped the images onto cryogen white paper and colored them with Copic markers. Then since the dies are included in the sets, I cut them out and popped them up onto the tags. The tag was cut out of pattern paper using 5132 Tag Stitched Dies. Then I just cut a rectangle to fit on top of the tag to create the little scene. 


This was all the bags waiting for the kids to show up. There were 12 in total. 


Thanks so much for stopping by and hope you have a great week! See you next time! 


Friday, April 7, 2023

Hoppy Easter Card by Tasha!

 Happy Friday Ai Fans!

Tasha here sharing a fun Easter card inspired by the Ai Easter Wishes Challenge. For my project, I used the new 5732 - Front & Back Bunny Set and 5401- Easter Chicks Set. I just love this bunny! 

To begin this card, I stamped the little bunny with black ink and used Copic Markers for the coloring. Also, this set includes a coordinating die that made is super easy to cut the image out. 

After coloring the bunny, I used the new 5719 - FB Fence & Window Set to cut the center of the card and make the cute fence. I used pattern paper for the background and fence, but you could also cut the fence with any color paper to make a custom scene. I was thinking this fence would also be fun to decorate for the Fall/Winter holidays!


After attaching the fence and grass to the card front, I added a stamped "Hoppy Easter" greeting from the 5401- Easter Chicks Set. This cute greeting works perfectly with this bunny! 

Lastly, I added several white enamel dots and attached layers of white card stock and teal glitter paper to complete the card; I love the sparkle!

Thank you for checking out today's card and I hope you all have a wonderful Day!
Happy Easter!


Friday, March 24, 2023

Easter Wishes Card by Tasha!

 Happy Friday Ai Fans!

Tasha here sharing a new Easter card created for the Ai Inside & out Challenge. My card has a little Spring scene featuring the super cute 5401-Easter Chicks stamp set and 5733-Easter Sentiments Set. I love Spring cards!

These little chick stamps are adorable and this set also includes several hats to add to your projects. Since we are so close to Easter, I added the little bunny ears to one chick and attached a tulip to the second chick. I wanted it to look like one chick was gifting the other chick a pretty Spring flower. 


For the front greeting, I stamped "One Cute Chick!" from the  5733-Easter Sentiments Set and added "Easter Wishes" to the inside of the card. I also stamped a little yellow chick with tulip to the inside of the card to go with the Inside & Out theme. 

Lastly, I added purple card stock, glitter paper, and pattern paper to bring in more color. I also attached several white enamel dots to complete the card.

Thank you for checking out today's card and I hope you are having a wonderful day!