Tasha here sharing one last Easter card featuring the lovely bunny from the 5116 - Basket of Blessings Set. I recently got this stamp set and immediately wanted to color this sweet bunny image. I love her dress and large Spring hat!
For the background, I decided to use my stencils to create a Springtime scene. I love clouds, but thought adding some pink stars would give the card a unique look; I think it looks so cool! I also used a grass stencil for the ground and layered on different shades of green ink to make the layers.
After the green ink was dry, I stamped "Easter Blessings" with black ink. This greeting is from 5733 - Easter Sentiments Set and fits in perfectly with the Easter bunny.
Lastly, I added layers of pink card stock, pink glitter paper, and plaid pattern paper. I also attached three glitter enamel dots to complete the card.
I hope you enjoyed today's project and are having a wonderful day!
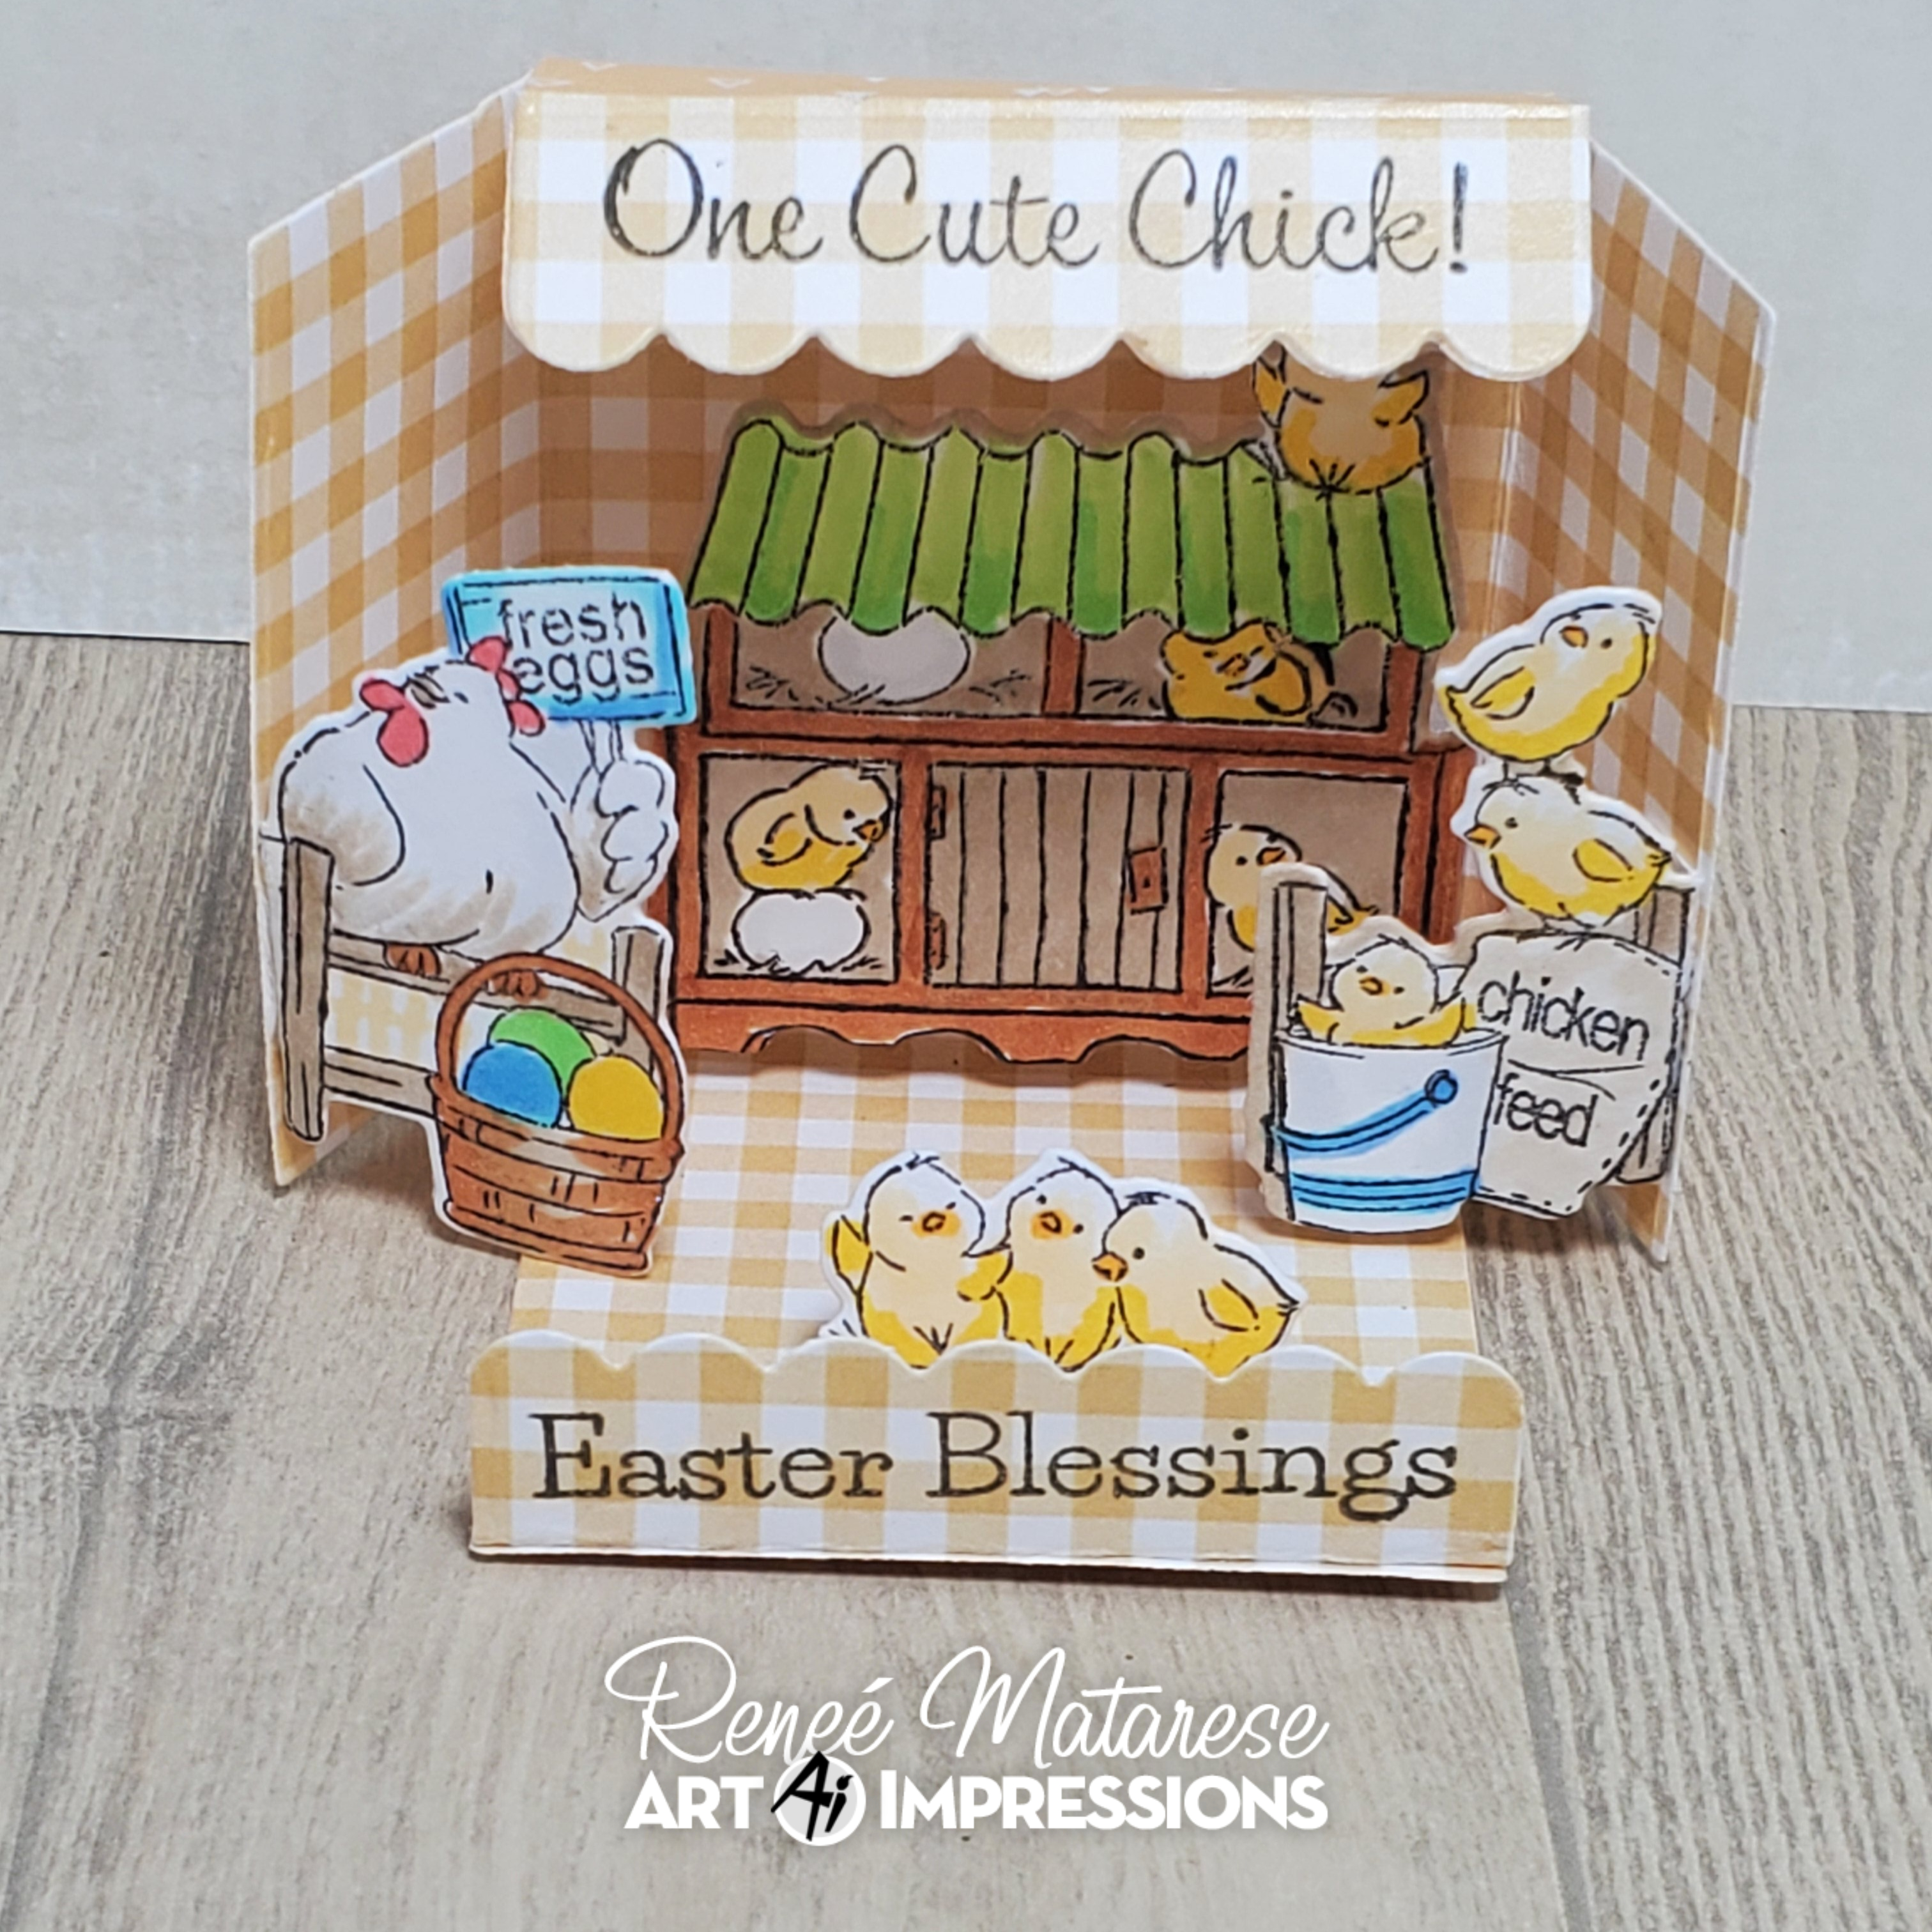
Tasha here sharing an Easter card inspired by the current Pop It Up! Challenge. I have been having so much fun creating Easter cards featuring different bunny stamps from Art Impressions, but this little pop-up bunny may be my favorite! He is from the new 5870 - Peeking Bunny Set and looks so happy with the sweet chicks!
I started the card by stamping the bunny and Easter wagon, and colored the images with Copic Markers. To decorate the eggs, I used different ink colors and a white gel pen; I enjoyed making the patterns. After coloring, I used the coordinating dies (included in the set) to cut out the images. The dies cut a perfect opening for the bunny to pop up, so you don't have to worry about the bunny not fitting.
For the sentiment, I stamped "Happy Easter to All My Peeps!" from the 5733 – Easter Sentiments Set; I thought this worked great with the little chicks!
Lastly, I added pretty floral pattern paper, gray card stock, and gold glitter paper. I just love how this little card turned out and hope you are inspired to join in the Pop It Up! Challenge.
Easter is almost here and I'm making my last Easter cards. I am having fun creating window cards lately and this week I decided to make a pair of them using the super cute images from the 4754 Hoppy Easter Set. There are several adorable bunnies wearing their Easter finest and hugging their eggs. I used two of them plus the mini border of Easter eggs. The hanging egg is also in the set and it was perfect for the oval window and frames I cut from the 5727 Nested Oval Dies. The patterned papers on these are from the 5892 Easter S2 Paper Pack. I made the pink marbled backgrounds on watercolor paper with ink and then cut out the windows and trimmed them with patterned papers. The sentiments are from the new 5733 Easter Sentiments Set. The last little touches were a few gems and a crinkle bow.
The card base is created by folding a piece of 5 1/2" x 11" cardstock evenly in three panels on the long side. The window is cut out of the middle panel and the outer panel folds inside and becomes the background for the window. I put patterned paper on that panel before gluing it down behind the window. At that point the card opens like a normal side fold card. It's one of the first "fancy folds" I learned when I started card making but it works well and makes a nice little card.
Thanks for stopping by today. I hope you'll visit the store to see all the things you need for your card, journal, and tag making projects. Have a GREAT Saturday!
Now that it's March, Easter will soon be here and that means it's Easter card making time! Yay! Today I chose to use one of the newest Easter sets called 5869-Easter Bunny Puppet Set. This set has many pieces and allows you to dress a boy and girl bunny. The pieces are so cute and a lot of fun to work with. Here I used all the pieces so that you could see them all. The polka dot paper comes from 5873-Mini Birthday Journal Paper Pack and the Easter egg paper is from 5742-Easter Journal Paper Pack. The sentiment is from the super cute 5733-Easter Sentiments Set. Just for fun, I thought it would be cute to make a pink girl bunny.
It starts with a white 6 x 6 card base. I cut a green square at 5 3/4" and glued it to the card. Then I cut a slightly smaller blue polka dot paper square from the Mini Birthday Journal Paper Pack. I cut two layers of grass and tucked the two dressed up rabbits into it. Then I cut a border for the top of the card and stamped and cut out the sentiment. I added three heart enamels as the finishing touch.
Thanks for stopping by today. I hope you'll stop by the store to see all the things you need for your card, journal, and tag making projects.
Tasha here sharing a delightful Valentine's Day card featuring the adorable 5401 - Easter Chicks Set. Mixing and matching sets is one of my favorite crafting techniques, and this card was so fun to create.
To start, I stamped the two darling chicks, along with a bow tie, flower, and a tiny chocolate heart box from the 5493 - Front Porch Valentines Set. It's amazing how different sets can complement each other perfectly! Once I finished coloring all the images, I used the coordinating dies included in the sets to cut them out. Having the dies makes crafting so much easier.
For the background, I cut grass out of plaid paper and used the sweet heart pattern paper from Art Impressions for the sky. These vibrant colors and hearts work perfectly with the Valentine's Day theme.
To add a fun sentiment, I stamped "Here for the Chocolate" from the 5733 - Easter Sentiments Set. I then used a small banner die to cut out the greeting and layered it on a larger banner cut from pink glitter pattern paper because who doesn't love a bit of sparkle?
Lastly, I added layers of cardstock, glitter pattern paper, and a few glitter enamel dots to add dimension and shine to the card. The final result is a cheerful and whimsical Valentine's Day card that's sure to bring a smile to someone's face.
I hope this project inspires you to mix and match your stamp sets and get creative with your cardmaking this Valentine's Day season! Have a wonderful day!
I accessorized my card with lots of little add on stamps. The bird, basket of eggs and tulips are from 5488 – Front Porch Easter Set. With this type of card, you pull the tab and it reveals a hidden panel inside.
Please contact Leah at Feedback@artimpressions.com
to claim a free stamp set of your choice!
Also, be sure to grab our badge to display on your blog, Facebook or Instagram!
Now for our Lucky Random Winner.
The random selector chose Becca Yahrling. Congratulations!
Please contact Leah at Feedback@artimpressions.com
to claim a free stamp set of your choice!
Now to introduce Lynn's challenge feature. She created the cutest interactive PIVOT-POP UP card! We've never seen one of these before and can't wait to watch her video tutorial!
Okay Lynn...show us your card!
Welcome to today's feature card!
Watch video tutorial here!!!
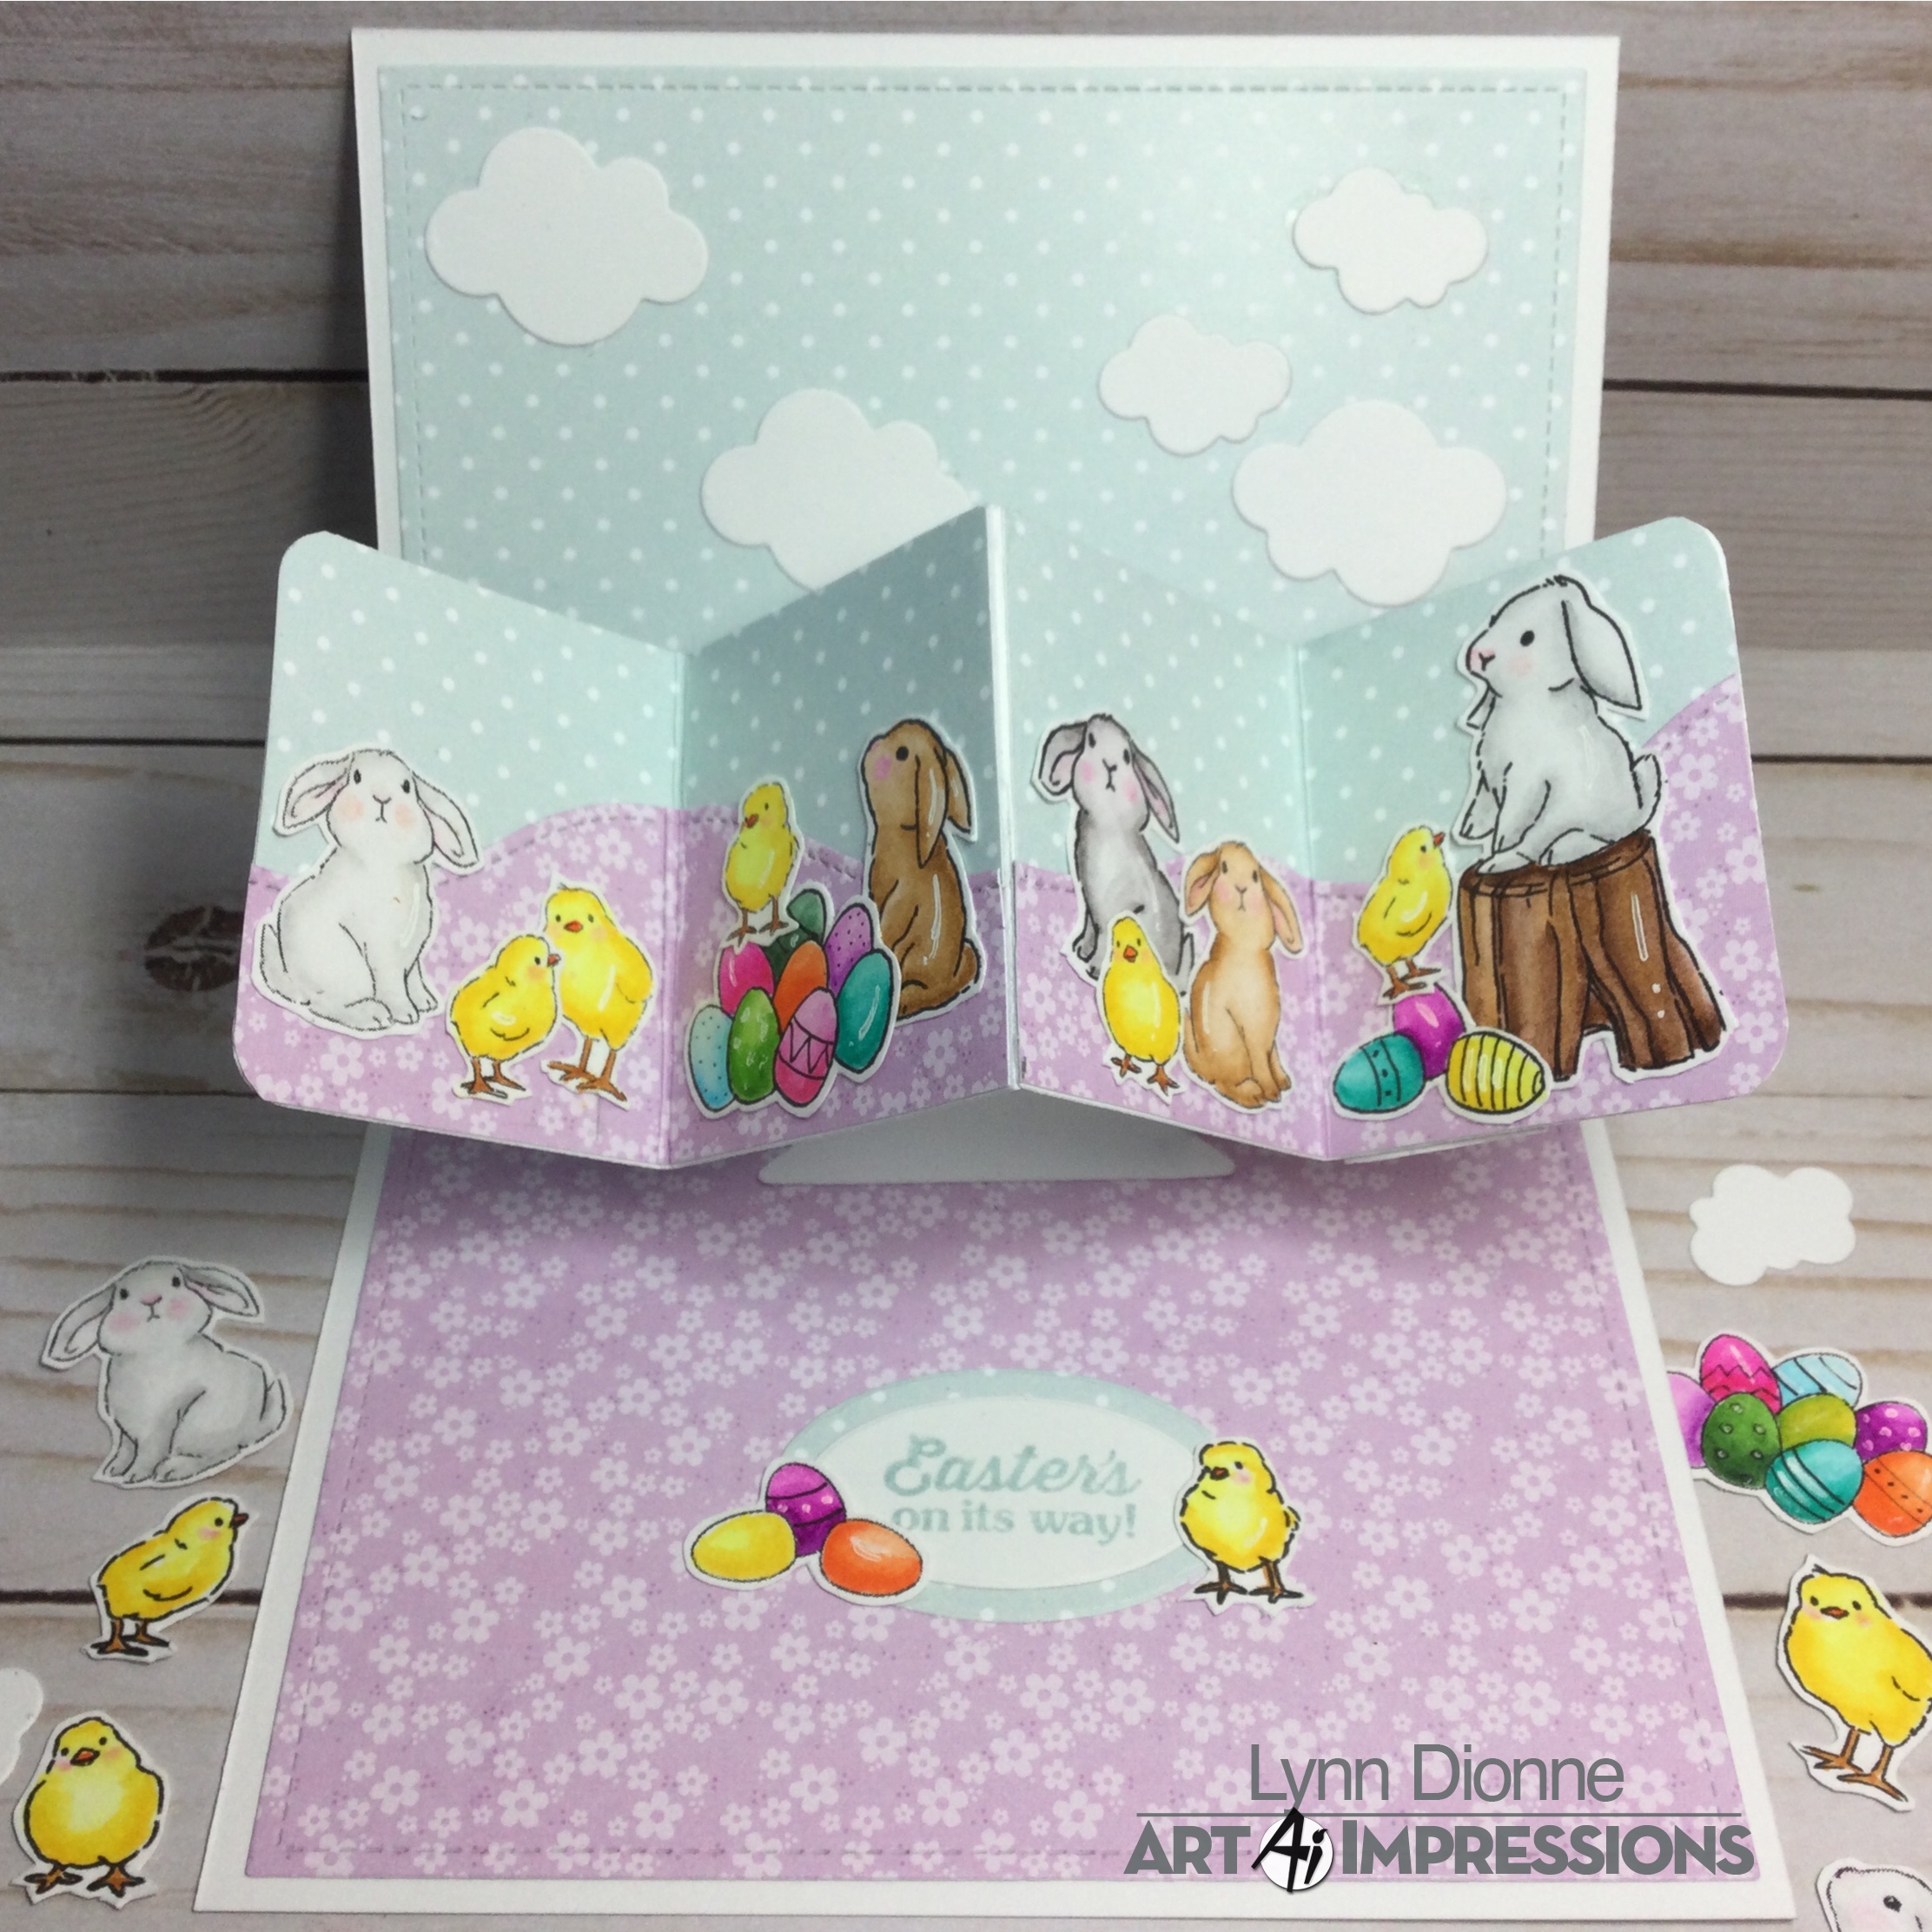
For my feature card today, and to kick off our new Ai Blog Challenge, we will be using some brand new images from the Art Impressions Spring 2023 Release to create a super fun and interactive PIVOT-POP UP card! This challenge is to create both the inside and front of your card....so this card will really highlight the inside of our card in a special way!
We've got the cutest little bunnies and chicks from the Bunny and Chicks Set (5737) and some festive Easter eggs and a cute little basket from the Easter Egg House Set (5738). These images are part of the Ai Watercolor Journal Series but we will be using them a bit differently today!
Let's go ahead and stamp, color, and cut out all of our images using the Zig Clean Color Real Brush Pens in the following colors: Blender, Sugared Almond Pink, Peach Pink, Pink, Lemon Yellow, Yellow, Orange, Lt Violet, Purple, Lt Blue, Lt Green, Turquoise Green, Deep Green, Lt Brown, Beige, Mid Brown, Lt Gray, Platinum Brown. We will leave a little white border all the way around the images when we cut them out.
To set the scene for our card we will be using the brand new Ai Easter Journal Series Paper Pack (5742). This paper is just perfect for Easter and Spring cards! Lots of pastels and pretty patterns! The sky will be die cut from the pastel blue polka dot paper and the ground will be a purple floral pattern. This will look like a beautiful field of flowers!
Now we can create the Pivot Pop-up mechanism for the inside of the card. I will give you all of the instructions for die cutting and assembling this mechanism in today's video!
We can attach all of our cute little images to the card and pop-up. We will also die cut a collections of pretty clouds for the sky. On two of the clouds, on the front of the card, we will be stamping "Hippity" and "Hoppity" in a soft blue color. And for the inside of the card we will be using the brand new Ai Nested Oval Dies to create a cute place for our inside sentiment which says "Easter's on its way!". All of these sentiments are from the brand new Ai Easter Sentiments Set (5733).
I had a great time creating this card and I hope it has inspired you to give it a try!!!
Thank you so much for joining me today! Have a fun and crafty day!!!
Your card is amazing and is so perfect for this challenge.
Everyone loves an interactive card.
If you'd like to join in our challenge be sure to link your project below...
✻ Please make a new card or handmade crafty creation. You can make any item you wish; this is not limited to cards!
✻ Limit two submissions per person. You will receive extra votes if you use Art Impressions stamps!
✻Please include your first name and last initial on your submission.
✻We love to comment on your entries, but keep in mind if you use a private group or a platform that you need to sign up for, we probably won't be able to.
✻ The Ai Challenge is open to everyone, international submissions are welcome!
✻ Include a link back to the Ai Blog or grab our button on the top right of our sidebar!
✻ Share the Ai love if you can, by clicking and commenting on your fellow crafters.
✻ Make sure to get your link up by the deadline to enter your creations.