Showing posts with label Sweet Wishes MTF. Show all posts

Sunday, February 19, 2023

Mailbox Full of Love by Reneé Matarese

 Hello Ai fans!

Today I have some fun news!

I had a card published in Creative Scrapbooker Magazine
Spring 2023 issue!

You can see it in the current issue in craft stores right now.
My card was for the fussy cutting/cards for mom categories.

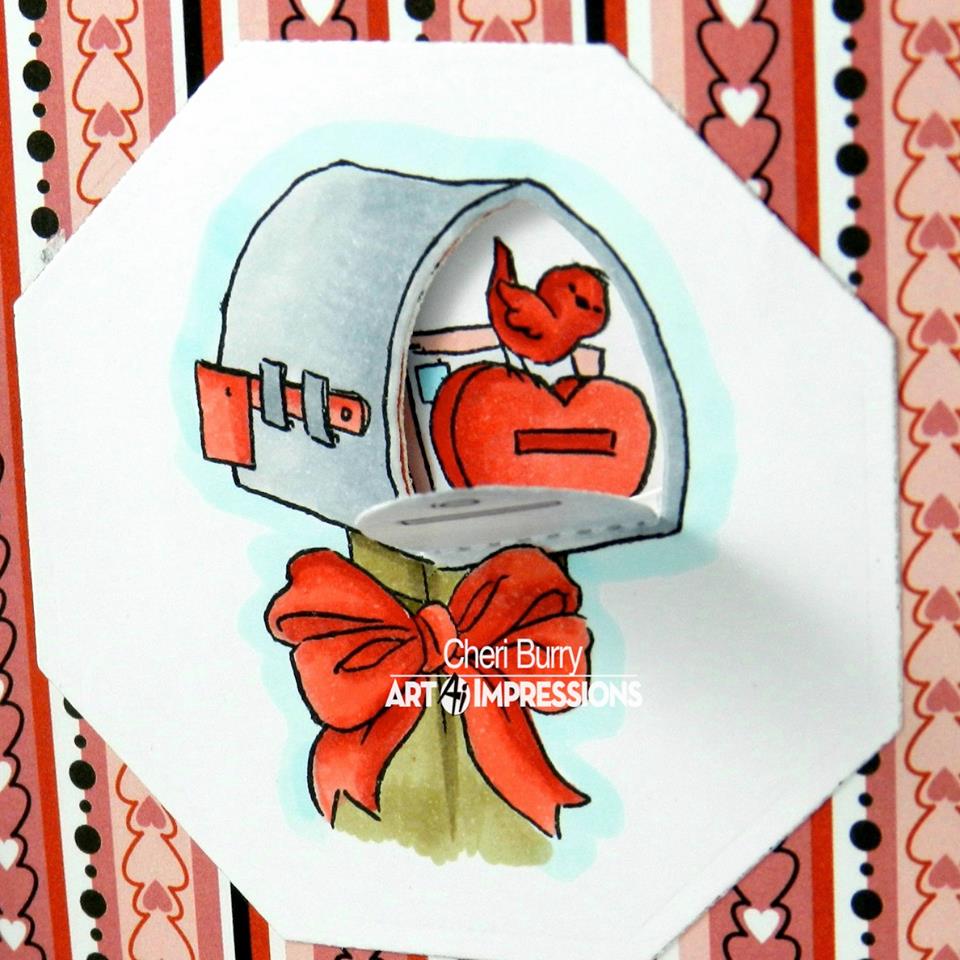
Though this set comes with dies, the mailbox does not have a die to cut it out.
The die only cuts the mailbox open so I fussy cut that.


For my card I used several sets.

The image is from 4848 – Sweet Wishes MTF. 


 The mailbox is interactive, opening and closing,
 to reveal a little bird and some happy mail.


I cut some squares and rectangles to mount my image on using
and


The little heart is from 5317 – MB Template Dies.


It's never too early to start thinking about making your mom, mother-in-law, daughter/daughter-in-law who's a mom,  or special mother-like figure in your life, a card for Mother's Day.


Copics used:

B0000, RV93, E23, E35, N1, T2, T3

Friday, February 10, 2023

"It's a Love Thing" Valentine's Day Card by Tasha!

 Happy Friday Ai Fans!

Tasha here sharing a Valentine's Day card inspired by the Ai "You're My Everything" Challenge. For my project, I used the sweet 4752-Love Thing Set to create a Valentine's Day card for someone special.

This set is one of my favorites to use for Valentine's Day; I just love this cute couple sharing a box of chocolate. For the main image, I cut a heart out of white card stock and stamped the couple with black ink. I used markers for the coloring and added a pretty scalloped heart frame. I love the layered hearts!


For the greeting, I stamped "Happy Valentine's Day" from the 4848 - Sweet Wishes MFT Set. I like the script font and the red ink on white paper looks so elegant. 


Lastly, I added layers of red and black card stock, gold glitter paper, and a fun heart pattern paper to complete the card. The red, black, white, and gold colors look great together!

I hope you enjoyed today's card and will participate in the "You're My Everything" Challenge. 


Saturday, May 14, 2022

Sweet Wishes Treat Box by Janet Axtman


Hello Ai fans! I have a sweet project for you today! I created a mini treat box using the 4848 Sweet Wishes Mini TryFold set. This is a great way to use any of the TryFold sets at the store. 

Steps for Creating this Card:

  1. First cut out the treat box using a Cricut file. 
  2. I cut the first TryFold layer into the front with the included die and placed acetate behind the window on the inside of the bag and then assembled the box. 
  3. I stamped, colored and fussy cut all the images in the set. 
  4. I cut a green hill from a die in my stash and glued the mailbox on it. 
  5. I folded tabs on the left and right side of the hill and attached it to the interior of the bag so that the mailbox would show through and have a pop-up layered look. 
  6. I adhered the wreath and the bird with mail on the outside of the bag. 
  7. I cut a small tag and stamped it with the sentiment in the set. I attached the tag with some twine and ribbon to the bag's handle. This also helps to shut the bag so there's no peeking!   
  8. I finished by using a little Wink of Stella on the roses and some bumpy clear bling. 
Thanks for stopping by today. I hope you enjoyed this little treat box! It's a fun way to give something sweet, a small gift or even a gift card. Anything small is perfect for this unique way to present a gift.  

Wishing you a crafty weekend!
Janet - YouTube - Blog - Facebook - Instagram - Pinterest 

Friday, March 15, 2019

Sweet Wishes & Happy Anniversary By Jessica Shier

Hello Ai Fans!

This week I'm mixing up the Love Birds and Sweet Wishes sets, to make some anniversary cards. I love the beautiful floral wreath paired with the cute love birds. For this one I tried no line coloring with Copic markers. Colors I used are listed below. 


I stamped the the wreath and birth images with a light gray ink, which gives me the no line color effect. Then colored them in with Copics. To add texture I used a 3D embossing folder for the wood pattern background. Then used Distress Ink in Pumice Stone to add color and really make the texture show. To add even more texture I add a circle of pattern cork paper. It was fun to mix up some patters.


I thought the wreath needed a cute little tag. Both of the Love Birds and Sweet Wishes have great sentiments so I added the one from Sweet Wishes to the little tag from the Tag Stitched Die set and attached it to the wreath with some glue after tying a baker's twine bow through the tag. The sentiment Happy Anniversary is embossed on black card stock with white embossing powder. 


Copic Markers Used:
YR27, Y35, Y18, Y13
R17, R02
BG75, BG18, BG13, BG11
G17, G14, W6

I hope you enjoyed this card design today! Thank you all so much for stopping by. Happy Stamping!


Thursday, January 4, 2018

Sweet Wishes by Jil Lebel

Hello Ai fans!

Welcome 2018! I hope your holiday's were amazing and filled with joy. I really missed blogging and having daily inspiration from my fellow design team members.
I'm going to kick things off with a Valentine's Day card using the Sweet Wishes Mini Try Fold Set 4848.  I am in love with that adorable little bird sitting inside the mailbox.

I followed the directions on the package and folded my watercolor paper into three even panels. I stamped the images with Versafine Onyx Black ink.  I stamped each layer and then cut the inside with the included cutting die. As I cut each layer I would line up the stamp for the next layer.  I added a border using a Lawn Fawn die from the Valentine Borders set.


I colored this image with Tombow Brush Tip Markers.  It was a very fast and easy process.  I even colored the wreath twice and layered it on the front panel and added it with foam tape for some extra impact.  I colored in layers with a very loose style.  I mostly followed what was on the package of the stamps. 


The cutting die on the second layer also scores the bottom of the mailbox so you can have it open or closed when you give away the card.  I added color to both sides of the door.  I added some sequins to this layer, as well as the front, using collage medium.


This is the last layer.  I usually fold it the other direction, but I changed it up a bit this time.  That's part of the fun with these stamps.  You can experiment and come up with new folds.  Let me know if you've come up with a different fold that you think I might want to try out.  

Thanks for stopping by and Have a Great Day!

Thursday, February 9, 2017

Challenge 201 Lots Of Love WEEK 2!

Hello, Ai Fans!


We are back with week two of our Lots of Love challenge! We're celebrating spring and the season of love with the release of our three new spring Mini Tryfolds! Aren't these sets darling? Our new and improved sets include clear stamps for easy alignment and dies that perfectly align inside the image. Two sets feature dies with score lines for doors that open and close! Order your sets today at artimpressions.com!

New Mini TryFolds

Paws to LoveCelebrate SpringSweet Wishes

Last week we gave a sneak peek! Today, all the designers are here to show their Mini TryFold creations! Be sure to visit the designer's blog by clicking their name for more information and pictures!

Cheri with Sweet Wishes


Dana with Paws to Love


Diane with Sweet Wishes


Karen with Celebrate Spring


Kerry with Paws to Love


Renee with Sweet Wishes


Sharon with Celebrate Spring


WOW, designers! Gorgeous cards! I can tell a lot of love went into creating them!


Will you join our challenge? We want to see your love themed card! It could be for Valentine's, anniversary, or just to show love to a friend or family member! Share the love!

Here are the challenge rules …
✻ Please make a new card or creation. You can make any crafty item you wish; this is not limited to cards!
✻ Limit two submissions per person. You will receive extra votes if you use Art Impressions stamps!
✻ The Ai Challenge is open to everyone, international submissions are welcome!
✻ Include a link back to the Ai Blog or grab our button on the top right of our sidebar!
✻ Share the Ai love by clicking and commenting your fellow crafters.
✻ Make sure to get your link up by Wednesday, February 15 at 5:00 p.m. PST to enter your creations.
✻ Good luck and happy stamping!