Showing posts with label 5916–Woodland Castle Set. Show all posts

Tuesday, May 27, 2025

Happy Wedding Day Tara! by Reneé Matarese

 Hello Ai fans!

My niece is getting married soon and she'll be married at a castle.

My first thought was to use 5225 – Castle Cubbies, which is a favorite of mine, but then I remembered 5916 – Woodland Castle Set, and although I think I've used it several times, I don't think I've used the castles.


I'm very happy with how it turned out. She is very into flowers and I tried to incorporate all of the colors in her bouquet.

This card took a complete turn as I was creating it. I initially set out to use the 5902 – Mini Scalloped Frame Dies as intended, with a window and maybe something to pull out. For some reason I switched gears and decided to cut off the little flap and just use it as a mini card. The

May all your wishes -Come True- 

sentiment is from the discontinued Art Impressions/Hobby Lobby exclusive 5438HL Fairy Cubbies Set.

I didn't use a wedding sentiment on it but I don't think it needs it. I think these verses are perfect and I can handwrite a wedding wish when I fill out the card.


I apologize that I don't have marker colors for this. This was my 3rd attempt and I had such a pile of markers that I don't know which ones I used for this final copy.

Don't forget to enter the current We 💚 Dads! Challenge 
for your chance to win a free stamp set.

Monday, February 3, 2025

Double slider magical birthday card by Sharon Caudle

 Hello AI Fans!

I've got a double slider card to show you today that I created for the current Highlights Challenge. So it looks like this small, unassuming card when you first look at it. But when you pull on the pull tabs, it turns into this amazing scene. I loved creating this and I really do like how it turned out. I started by stamping all these amazing images onto a Copic freindly paper using Memento Tuxedo black ink and then coloring them with Copic markers. The colors I used are listed below. I cut the three panels and stenciled a cloud background using distress oxide ink and a cloud stencil. This card might look impressive, but it's really quite easy to assemble.  There's a piece on the inside that you wrap a slick piece of plastic baggie or something along those lines.  (I acutally used one of my doggie waste bags - unused of course...yuck!! - LOL! Then you attach one of the pull panels to the front of the baggie, and the other panel to the back of the baggie. So when you pull on them, they slide right out of their little pockets! It's really quite awesome! There are lots of You Tube videos out there that show you how to make them. Just do a search for double slider cards. You can either use dies that are made for them, or create it yourself. Either way - they are lots of fun and impressive, I think! I used several Art Impressions sets to create this. They are all linked below for your convenience. 


And the view with both sides pulled out to reveal the entire scene. 


That's it for me today! Thanks so much for stopping by for a visit and until next time - stay crafty!!


Copic markers used:
E000, 00, 11, 21, 23, 33, 51, 53, and 55
G43, 46, 82, and 85
Y000, 00, 02, 11, 13, 17, 35, and 38
B000, 00, 32, and 34
R01, 11, 12, 20, and 85
BV000, 00, and 02
RV32 and 34
BG34, 49, 90, 93, and 96
W1 and 2
C3 and 5
V01 and 04


Sunday, January 12, 2025

Brighter Days Are Coming by Gennette Houghton


Happy New Year and welcome to Watercolor Weekend! I hope you all had a wonderful holiday! 

I love red barns in a winter scene, there is just something about red surrounded by white.  I started out using a ruler to create guidelines for a strip on my watercolor paper and then masked the edges with post-it tape. Using 5262 WC Mini Cabins Set, I stamped one of my favorite barns in, close to the middle and slightly offset, using 565/969 and stamping off once. I then used a pencil to create guides for the hillside behind the barn.  I put a wash of color in 177, and above in N52, for some texture I used the tree foliage from 5373 WC Large Tree Set. Over the 177 I added some 249, and over the N52 I used N49 with the foliage blending it out with some water. 5372 WC Mini Foliage pine tree was used throughout the background. Over the N52 background I used 228, and the rest I used 249 and softened them with water. Around the barn I used the pine tree from 5010 WC Tree Set 1 in 249. I used both of the small trees from 5372 Mini Foliage, and one from 5058 WC Church Set, using 228 on the first two and N49 on the third one.  

After pulling the color out on the barn, I used a mix of 856 and 969 for the walls, 969 in the doorways, windows and under the eaves.  Adding 565 for the shadows. I then stamped in the single tree from 4808 Covered Bridge Mini Set in the front, to the left in 879, and a small branch from 4964 WC Branches Set to the right for a sapling also in 879.  I used a light wash of 177, 947, and 526 on the ground around the trees in the foreground. I then stamped the grass from 5826 WC Large Tree Set 2 in N57, softening it slightly with water, also adding in some 565 over the ground area to create a snow effect. I then used Dr. Martin PH Bleed Proof White on the barn, trees and ground areas adding a touch more 565 to give the “snow” more definition.  I also added 526 in for the sky. After erasing all my pencil lines, I decided to use my ruler and the gray Twintone marker along the edges of the strip and blended it out slightly with water to make it stand out more.   Finishing it off by adding a sentiment from 5949 Encouragement Sentiment Set in black ink.


For my next card I used 5916 Woodland Castle Set in 565/969, leaving off part of the door frame and door knob, and stamped it off once. Using the stamp positioner, and masking the side of the door, to place in the mouse from 5599 Mini Mice and Squirrel Set with 565/969 in the doorway after stamping off once.  I then added the second mouse to the left, also in 565/969, after stamping it off once.  I used a pencil to sketch in some shingles on the roof and window panes on the windows without any.  For the house trim and window frames I used 969. 565,526,969 was used on the roof. 565 was used for the shadows under the roof line and window sills. 947 was used to create the look of bricks. 055,025,026 for the glow in the windows. N49 and a black micron on the mice with a touch of 025 on the back of the one in the doorway.  I used N52 and 947 on the chimney. I then added in the sky using a mix of 565 and 249. Masking off the house, I stamped in the branch from 4964 WC Branches Set in 879 on both sides, adding some leaves in 027, 947, and 969 from KH5951 Foxes Set.  

I then stamped in the dried flower from 4701 Clay Pot Set with 027.  I added in the grass from 5826 WC Large Tree Set in 027.  I pulled a little bit of the color out of the flowers and grass, leaving the leaves alone, and added some 969 for a path to the doorway.  A little 565 was used around the base of the house and then added some Dr. Martin’s Bleed Proof White throughout the scene for snow, defining it with additional 565.  The largest die from 5064 Circle Double Stitched Dies was used to cut the image out. Heat embossing the sentiment in white from 5949 Encouragement Sentiment Set, and then used a die from 5543 Journal Template Die Set to cut it out, mounting it with foam tape to complete the card. All other dies used were from my stash.  Thank you for joining me today, and I hope you enjoyed my cards! Until next time.  Create….Share….Inspire!


Sunday, January 5, 2025

Snowman and Fairy Scene by Karen Day

Hello Ai Watercolour fans!

I'm kicking off the 2025 Watercolour Weekends with a wintry valentine card - or just a generic winter birthday card if you like.  Here in Canada, it's still snowy way past Valentine's Day, so I decided to use 5060 - WC Snowman Set for my scene:


I stamped him in #N55 grey, as I didn't want a brownish cast at all, but since his twig arms are separate, I stamped them using #969, then pulled out the colour with a damp brush.  I used a pencil to sketch in the heart dangling from his arm, and added a bow & string.  I picked up some #847 that was on my palette to added layers of colour to the heart, keeping the center area lightest - and did the same on the small heart that I drew on his hatband.  Layers of #N55 and #N25 were painted on his hat and coal buttons to suggest that they are shiny and black.  #407 and #126 were painted onto his scarf and hatband for a bright pop of colour.  I used my #933 marker directly on his nose, just colouring the underside, and softened it with a damp brush.  To finish, I added a wash of #565 as the sky, and used it to add shadows to the snow and his body.  I like to echo a few of the colours used, so there are faint areas of #847 painted onto the snowman's side nearest the heart.
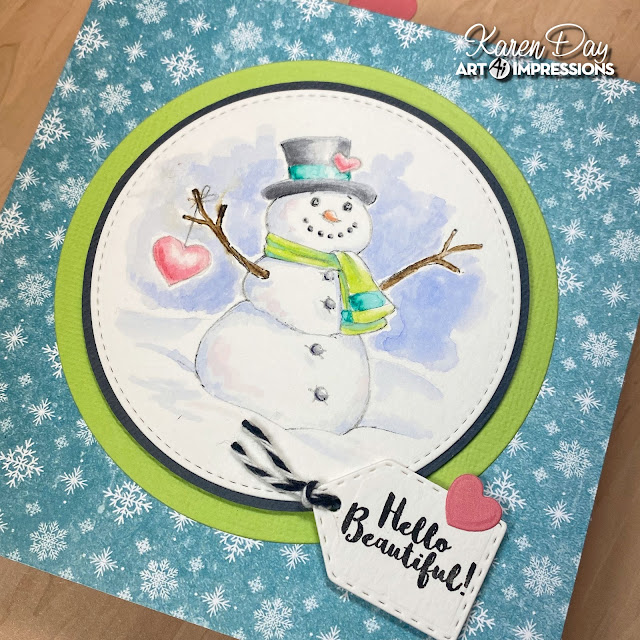
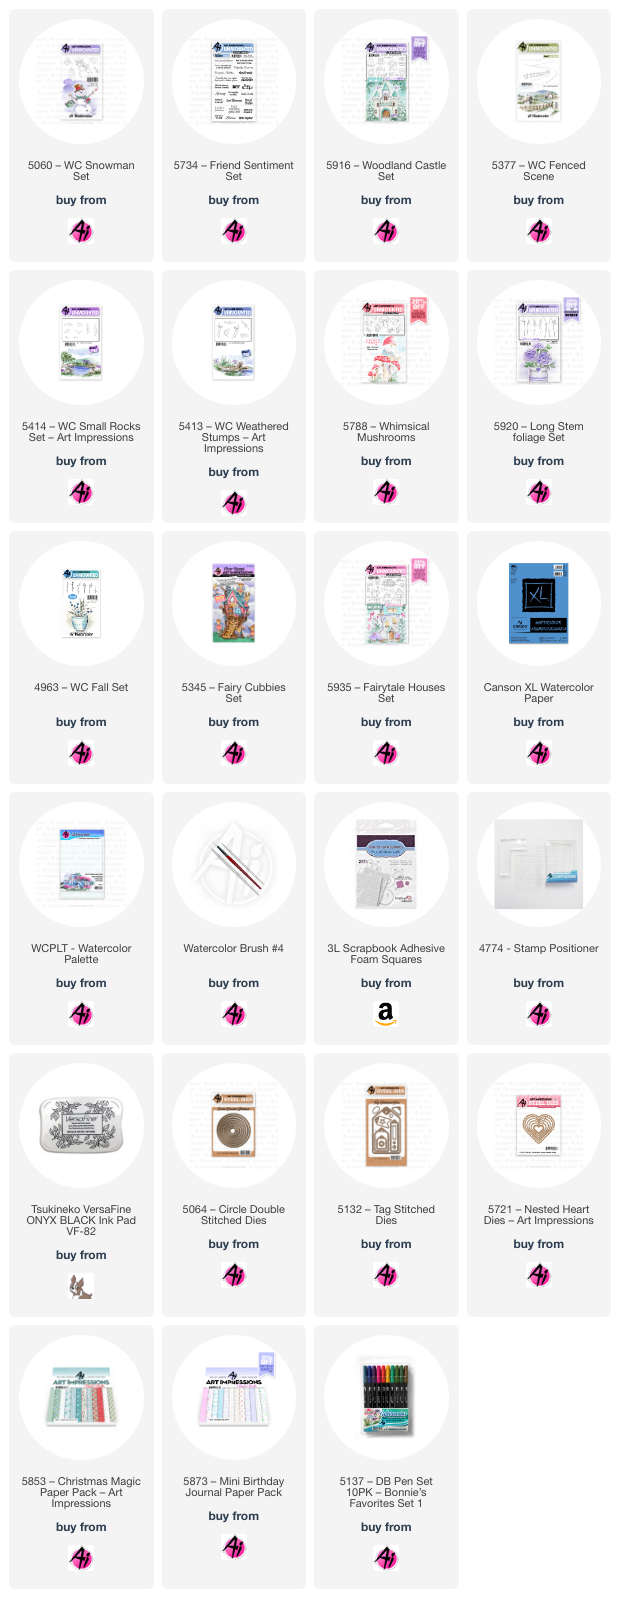
I used the 5064 - Circle Double Stitched Dies to cut him, out and matted him on a larger dark grey circle.  5734 - Friend Sentiments Set provided the sentiment, and was cut out with the small tag from 5132 Tag Stitched Dies.  A tiny heart from 5721 - Nested Heart Dies was added to the corner.  The background paper is from 5853 - Christmas Magic PP, and the finished card size is 5 1/4" square.

My second card was a little more involved!  Whimsical doesn't come naturally to me - I'm more of a realist when I paint, so I typed "Magical Fairy Houses" into Google images to get some inspiration.  I wanted a warm colourful scene - and I think I achieved it!  

I used two houses from the 5916 - Woodland Castle set, positioning them both on my block using the carrier sheet for 5377 - WC Fenced Scene to determine placement, and stamped them with #N55, then created masks of both houses.  With the masks in place, I stamped the Scene overtop, colouring the hills in #158, and the fence in #969.  I added two rocks from 5414 - WC Small Rocks Set around the houses in #N55.  The stump from 5413 - WC Weathered Stumps was added in #969 in the foreground, then toadstools from 5788 - Whimsical Mushrooms were added near the house, and behind the stump.

Before adding any colour to my scene, I created my sunrise sky by adding a fair bit of water as a base, then dropped in #991/885/565 while it was still wet, so that the colours blended together seemlessly.  With my mask still in place, I added the two eucalyptus sprigs from 5920 - Long Stem Foliage Set in #407 behind the larger house, and painted in the leaves using 407.  A sprig from 4963 - WC Fall Set was added behind the smaller house with #245.  I'm just going to list all of the marker colours used in the scene - not each location, so if you need any more info, just leave me a note in the comments.

Yellows: 993/991 Orange: 933 Blues: 565/403 Greens: 126/245 Browns: 947/969 Pink: 725 Purple: 676 Grey: N55.

I used two of the fairies from the 5345 - Fairy Cubbies Set, and stamped them with Memento Tuxedo Black ink on my Canson XL Watercolour paper.  I used Copic markers to do their skin and hair, due to the fine nature of the areas I needed to colour in.  They were cut out with their matching dies, and adhered to the scene with thin 3D foam adhesive.  Oh - and a little Wink of Stella was added to their wings for some glimmer!  The sentiment is from 5935 - Fairytale Houses Set, stamped in Versafine Onyx Black.

The scene was a little too large for an A2 card, so I matted in on black, and then used 3D foam adhesive to attach it to a 5 1/4" piece of paper from the 5873 - Mini Birthday PP. *I realized after photos were edited, that I forgot to add in the doorknobs!  So just imagine they're dark grey...  Happy painting!


Sunday, August 18, 2024

"Friends Like You Make the World a Better Place" Card - Two Ways by Diane Mason

Hello, and welcome back for Watercolor Weekend!


Do you have a friend who could use a little extra encouragement or someone you’d like to remind just how special they are? Today, I’m sharing two "Friends Like You Make the World a Better Place" cards that are perfect for just that.

The first card showcases a beautiful floral wreath using the newly released 5937 - My Trust Set paired with an older set, 5420 - Framework Set 1. The second card features our sweet little gnome friend sitting on a park bench, enjoying a beautiful fall day in his quaint little village. For this card, I modified the 5745 - SF Stone Bridge set and inserted a woodland home from the newly released 5916 - Woodland Castle Set. Both cards include the "Friends Like You Make the World a Better Place" sentiment from 5734 - Friend Sentiments, making them perfect for spreading some cheer.


For the floral wreath card, I started by placing the wreath stamp from 5420 - Framework Set 1 onto my Canson XL watercolor paper and lightly traced around the outer shape of the stamp with a pencil to establish the shape of the wreath. I then stamped the flowers from 5937 – My Trust Set onto Post-It tape to make masks. The masks required a bit of fussy cutting, but you can save them to use again with future projects. I’m one of those strange people who doesn’t mind doing a bit of fussy cutting. Once I had my masks ready, I placed my watercolor paper in my MISTI stamp platform and positioned the double flower stamp onto the wreath area to the bottom left, matching the curvature of the pencil line. (If you don’t have a stamp platform, you could use a clear block to stamp the image). I inked the flowers in 815 and the leaves in 177 and stamped them in place. I then removed the stamp from my MISTI, placed the mask over the double flowers, and repeated the process with the additional flowers to the right and left, adding masks after each new image.


With all the flowers stamped and masks in place, I added extra leaves around the center flowers. I placed the vine wreath over the masked flowers, aligning with the pencil line, and inked in 969. Next, I used a damp brush to pull color from the lines of the flowers keeping in mind the direction of the light source for the shaded areas. For these small areas, I used a number 4 round brush and a number 0 round brush. I applied the same technique to the leaves and the vine wreath. To enhance the contours and shadows, I added more color from my palette as needed. For the leaves, I added highlights with 133. I darkened some of the areas of the flowers with 835. In areas of the flowers where I might have been a little heavy-handed, I used a small amount of our best friend, Dr. Ph. Martin’s Bleed Proof White, to add highlights. Next, I carefully painted in a dropped shadow along the wreath and flowers in N52. Using a Strawberry Red (75) TwinTone marker, I added dots to the flower centers and darkened some areas to enhance the details. I also used a brown TwinTone marker to add details to the vine wreath.

The painting was die-cut with a square die from 5061 – Square Double Stitched Dies and matted and popped up with foam tape on a 4 ½ inch square card base. The green-striped patterned paper is from 5606 – Harvest Journal Paper Pack. I heat-embossed the sentiment “Friends like you make the world a better place” from 5734 – Friend Sentiment Set in white and partially die-cut the banner strip with a banner die from 5902 – Mini Scalloped Frame Dies. I used scissors to cut the rest of the extended area and mounted it onto the card front with foam tape.

For the inside of the card, I inked and stamped a flower and placed it in the lower right-hand corner. I think this design would make a nice card for a variety of occasions.

For my second version of the “Friends Like You Make the World a Better Place” card, I placed the sentiment on the inside. To create this whimsical scene, I modified the Scenic Foundations stamp 5745 – SF Stone Bridge by omitting the house and replacing it with one from the 5916 – Woodland Castle Set. I also added a sweet little gnome sitting on the bench to complete the scene.

This photo shows the original house image from the packaging and the one I replaced it with for a more whimsical look. 


The placement of the gnome on the bench took a bit of planning. On a piece of printer paper, I mapped out the gnome placement by first stamping the scenic foundations stamp (I accidentally inked the house, but it didn’t matter since this was just a mock-up). Then I stamped the gnome on the bench. I used my MISTI for the stamping. Next, I stamped the gnome onto masking paper and carefully cut out a mask. In the first photo, you can see where the masking needs to be done before stamping the scenic foundation. The gnome’s hand needs to appear behind the arm of the bench. To achieve this, I placed my mock-up back into my MISTI, positioned the gnome mask in place, and aligned the scenic foundation stamp. I inked just the arm of the bench and stamped it over the gnome mask.


I removed the mask and trimmed away the area where the bench arm had stamped onto the mask. Then, I inked the gnome with 565/969, using the mask as a guide to carefully add ink, leaving off parts of the sleeve and parts of the hand where needed. Next, I stamped off the gnome once before stamping it onto my watercolor paper, using the mock-up as a guide for placement.


I placed the mask over the gnome, positioned the scenic foundations stamp, and inked everything but the house with 565/969. Again, I stamped it off once before stamping it onto the watercolor paper. After removing the mask from the gnome, I used a pencil to draw in any missing details.


I traced around a rectangle die to establish the boundaries of the painting. Next, I added the house from 5916 – Woodland Castle Set and mushrooms from 5788 – Whimsical Mushrooms Set. Using a pencil, I sketched some paths, stepping stones, and the hillsides to the right of the house. Before starting the painting, I masked the edges with Post-It tape.


The colors I used throughout the painting are 856, 933, 993, 177, 249, 526, 565, 850, 947, and 969. I used brown, navy, and strawberry red TwinTone markers to add details. The stamps I used for the flowers and foliage are from sets 5009 – WC Mini Flower Set, 5372 – WC Mini Foliage Set, and 5126 - WC Foliage Set 4.

I stamped the "Friends" sentiment on the inside of the card using blue ink and added a stamped gnome to the bottom corner for a cute finishing touch.

Thank you for joining me for Watercolor Weekend! I hope these cards have inspired you to think outside the box and explore creative new ways to use your watercolor stamps to create unique designs. Until next time, Happy Painting!

For the Floral Vine Wreath Card:

For the Gnome Card:

Sunday, July 21, 2024

"Stay Hydrated and Fabulous" Card and "Hope Your Day is Magical!" Card by Diane Mason

Hello, and welcome back for Watercolor Weekend!

Today I have two cards to share, featuring three fabulous, recently released sets:  5928 – Stay Hydrated Set, 5916 – Woodland Castle Set, and 5915 – Woodland Fairies Set.

The first card features the Stay Hydrated Set. With the hot summer heat upon us, we can all appreciate how important it is to stay hydrated. This fashionable gal is looking fabulous and ready for her day with her big tumbler! It’s fun to coordinate her outfit with the background paper. I’ve watercolored this image, but she looks great paper-pieced as well!

Stay Hydrated and Fabulous Card: 

This card came together quite quickly. I used a MISTI stamp platform to stamp the image onto Canson XL watercolor paper. I inked the stamp image with Ranger Pebble Beach Archival Ink and stamped it off once onto scrap watercolor paper before stamping it onto my watercolor paper. If I happened to miss a spot, I would repeat the process. I like to use this ink when I’m painting people. This ink retains the fine details, is waterproof, and works well with skin tones. I also inked just the tumbler alone and stamped it onto a separate piece of watercolor paper to use later on this card.­­­­ I stamped the Hydrated sentiment onto this tumbler in Versafine Onyx Black Ink.

For her face, arms, and ankles I painted them with 850 and shaded with 912. For her pants, shoes, and sunglasses lens, I used N35 and shaded with N25. Her oversized shoulder bag was painted in 977 and shaded with 969. For her hair and earring, I used 025 and 026. For her white shirt, I shaded with a watery mix of N52 and a less diluted N52 for the darker areas inside her shirt. For her pink shirt, sunglasses frame, and lips I used 703. I added a little diluted 703 for her cheeks. For the background, I brushed in a watery mix of 526. I used 565 to add a shadow under her foot. With a 0 brush, I added white highlights to the lens of her sunglasses. I used a gray or black TwinTone to add back details where needed.

For the separate tumbler stamped image, I used 703 for the body. I then used a Silver Signo Gel Pen to color the brim/lid. I shaded the straw, lid, and tumbler with a small amount of 565. Next, I die-cut the painting with a rectangle die and also die-cut another slightly larger rectangle in black for a mat. I closely trimmed the tumbler image with a pair of scissors and used foam squares to pop-up the tumbler on the painting. The pink gingham background paper is from the 5892 – Easter S2 Paper Pack. All were attached to a black card base. I stamped the Liquid Therapy sentiment in Onyx Black onto watercolor paper and die-cut with a circle die from 5064 – Circle Double Stitched Dies and die-cut a mat from black cardstock with a scalloped die from 5543 – Journal Template Die Set and adhered to the card front with a foam square.For the interior of my card, I stamped the Stay Fabulous sentiment and the tumbler in Versafine Onyx Black ink onto watercolor paper die-cut with a rectangle die. I masked the edges of the body of the tumbler and stamped the animal print onto the tumbler, using Onyx Black ink. The tumbler was painted in the same way as the one on the front and adhered the rectangle to the inside of the card. This card is now ready to send to a girlfriend who needs to be reminded of just how fabulous they are! Now on to my next card…

Hope your Day is Magical Card:­­­­­

I think the new 5916 – Woodland Castle Set and 5915 – Woodland Fairies Set work great together to create a fun, whimsical scene. And they are super adorable sets with lots of options! This card was inspired by Bonnie’s recent Watercolor Wednesday LIVE video tutorial (Jun 12, 2024) showing how to place the wildflowers in the foreground to give your finished scene more depth.

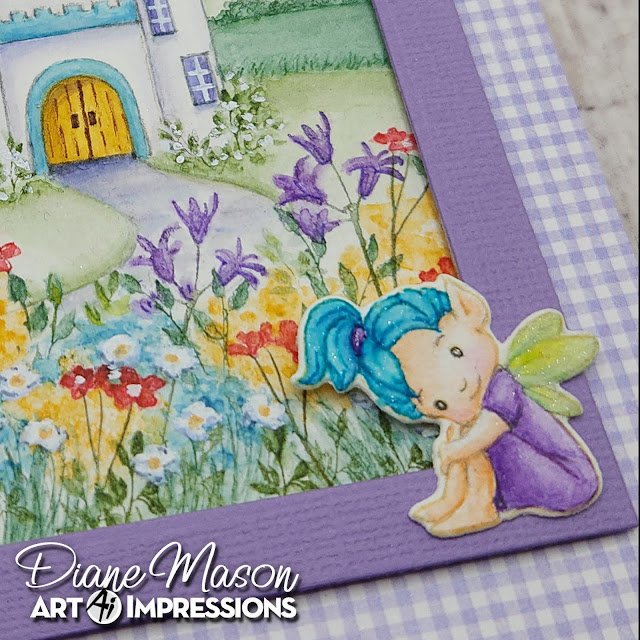
I started by die-cutting a piece of Canson XL watercolor paper with a rectangle die. With the same sized rectangle die, I die-cut another rectangle from purple cardstock and then die-cut it again with a smaller rectangle to create a frame. I laid the frame on top of my watercolor paper and lightly traced the interior with a pencil to give me a boundary to paint within. Then, I masked off the edges with Post-it tape. I inked the large castle stamp from the Woodland Castle set in 969 and 565, and stamped it off once before stamping it onto my watercolor paper. With the castle now in place, I made a mask to place over it. Using the 5379 – WC Winding Scene, I inked the top two hillsides and the one on the right just below in N79 and stamped into place over the masked castle. With a pencil, I sketched in the remaining hills. Next, I inked just a portion of the curving road in N79 and stamped it into place at the castle doors to create a path/road.

First, I brushed in a watery sky with 526. I pulled some color from the image to shade the castle and add contours to the turret walls. Next, I inked the line of bushes stamp from 5372 – WC Mini Foliage Set in 177 and stamped along the top hills. With a damp No. 4 brush, I dabbed the bushes. With color from my palette, I added more 177 to the top hills and pulled some color from the bottom edges of the bushes. I did the same process for the next set of hills below, but used 249 this time. With 177 again, I painted in the grassy areas around the castle and added tiny grass to the hillside edge.

For the flowers in the foreground, I inked the daisy bunch from 4052 – WC Flower Set 1 in 993 and stamped in multiple bunches. I did the same with 526. Next, I dabbed the flowers lightly with a no. 4 brush. Before adding any more flowers or foliage, I painted in a light base of 177 below the daisy bunches. Once dry, I added tall grasses from 5007 - WC Foliage Set 3 inked in 177 along the bottom edge here and there, and kind of bounced the grass up and down as I stamped so they appear more random. Next, I stamped in the tall purple flowers from 4052 – WC Flower Set 1 inked in 636 for the flowers and 249 for the stems. Then I added the red flowers from 5008 - WC Flower Set 3, inking the flowers in 856 and the stems in 177 and stamped them here and there throughout the scene. I added foliage to the wildflowers throughout, inked in 249 or 177. I chose foliage from 4051 – WC Foliage Set 1 and 5126 – WC Foliage Set 4. I also stamped leafy vines from set 4051 inked in 249 to the top corners and center to look like leafy tree branches in the foreground. I dabbed all the flowers and leaves with a damp brush.

I used 526 to paint the turrets, roof edge, balcony, and door trim. The flags, turret edging, and doors were all painted with 025 and shaded with 026. The windows were painted with 565, and I painted a shadow along the top of the door. And with a mix of 565 and 969, I added color to the path. I inked the tiny vine from 5372 in 177 and added foliage around the castle edges and lightly dabbed with a damp brush. With Dr. Ph. Martin’s Bleed Proof White and a no. 0 brush I added frames to the windows and dabbed in some tiny flowers near the castle and some larger dabs of flowers among the wildflowers. I also added some white to the red flower centers. Once dry, I added yellow centers to the white flowers with the bullet tip of 993. I added a tiny bit of shading under the white flowers with 565. Where needed, I added some fine details with a brown or gray TwinTone marker.

With the painting now complete, I removed the tape from the edges of the painting and erased any pencil lines. I adhered the purple frame to the painting with foam squares. I attached the purple patterned paper from the new 5939 – Fairy Garden Paper Pack and the painting to a white card base. I stamped the “Hope Your Day is Magical” sentiment onto Watercolor paper and die-cut the circle and mat using the same dies from the previous card and attached them to the card frame. Added a little bling to the tag.


For the tiny fairy in the corner of the frame, I used Ranger’s Pebble Beach Archival Ink to stamp the image. I colored her skin with 850 and 912. I added a tiny bit of 703 to her cheeks. I used 526 for her hair and 636 for her dress and hair tie. I painted her wings lightly with 133 and 526. I darkened her eyes with a black Micron pen and brushed a little Spectrum Noir Clear Sparkle Pen onto her hair and wings to make them shimmer. After I die-cut out the little fairy, I attached her to the bottom edge of the frame.

For the interior of the card, I stamped the “Wishing you the best day ever!” sentiment and little fairy in Versafine Onyx Black Ink onto a rectangular piece of white cardstock and adhered to the card base.

I love how this sweet and whimsical fairy card turned out and I look forward to making more cards with these adorable new sets. Thank you for joining me for another Watercolor Weekend! Until next time, Happy Painting!

For the "Stay Hydrated" Card:

For the "Hope Your Day is Magical" Card: