Showing posts with label Spinner card. Show all posts

Monday, April 1, 2024

Say It With Sentiments #4 April Guest Designer Challenge with Dori Mendiola

 Hello everyone!

We hope you all had a wonderful and relaxing Easter yesterday.

Last month, Dori M was our winner.

She created an adorable magic picture changer interactive card which led me to her
blog. As I looked through all of her work I fell in love! She went from being our April Guest Designer
to being asked to become a permanent DT member. Fortunately she said yes. You will begin
seeing her work each week later this month.

Before we share Dori's April inspiration card let's see who we've selected to be our May Guest Designer.  The challenge theme was Timber. Use trees, branches, stumps, bushes etc.


We LOVED all of the entries but we thought that #8 Diana S. stood out this time.
Maybe it's her beautiful pink cherry blossoms. They'll be here before you know it.
(At least where I live)


Diana will be our Guest Designer for May.
We look forward to seeing what she creates for her challenge feature.


Diana, please contact Leah at Feedback@artimpressions.com
to claim a free stamp set of your choice and she will give me your email address so that we can 
begin brainstorming for our May challenge when you will be our Guest Designer!

Now for our Lucky Random Winner who will receive the
 Exclusive Mouse Freebie EXW5539 from 2022.


#5 Rhonda F.


Congratulations Rhonda!
Please contact me at Renee@artimpressions.com to claim your free stamp.

---------------------------------------------------------------------------------------------------------------------


Now to introduce our April Guest Designer.

As we said, Dori was selected but once we saw her amazing work?
We just HAD to ask her to be a full time designer. Here is her Guest Designer card for our "Say it with Sentiments" challenge. From here on out, she will be an official Art Impressions Daily Design Team Member!

  Happy April everyone.  My name is Dori and I am thrilled to have been chosen to be the Art Impressions' guest designer for April.  I was first introduced to Art Impressions by Sharon Caudle, AI design team member, back in 2014, when I took her copic class at a local scrapbook store and she used an image from the AI Girlfriends stamp line.  They are so funny and reflect fun times with your friends.  Now, my girlfriends and I have aged and the AI Laugh Lines stamp sets are more representative.  Ha Ha!   I love all of the Art Impressions stamp sets and they are my “go to” when making cards for friends and family. 


  My theme assignment for April is “Say it with Sentiments”.  I have been wanting to make a reveal wheel card for the longest time, so I thought it would be perfect for this months challenge.  It’s very simple to make and no special dies are needed. 

To make the mechanism, 


I cut one 1” circle,  three sawtooth edge circles (you can use a circle or scallop edge circle) approx. 4” in diameter – one from copy paper, one from colored cardstock and one from heavy weight cardstock.  If your colored cardstock is thick and sturdy, you can eliminate the third piece, otherwise, glue the heavy piece behind the colored cardstock for stability.  This is the wheel so you want it to be strong.  Take the ‘copy paper’ circle (template) and fold in half and then half again to make four quarters.  Make a small hole where the folds cross together (center point).  Place template over cardstock circle and make similar hole.  Take your template and cut your shape in all four quarters, near to the center.  I used a balloon, but you can use a star, circle, speech bubble, etc.,  whatever fits in each quarter and also fits your sentiments or image.


Place your colored cardstock in your stamped platform (using a sticky mat is helpful) and place the template over top.  Place your stamps within the die shapes and close the platform lid.  Remove the template and stamp your sentiments.  I used sentiments from the “Birthday Laugh Lines” and the “Be Happy Laugh Lines” stamp sets.  Take the 1” circle and make a small hole in the center (does not have to be exact).  Place a brad up through the small circle and then through the wheel circle.  Your mechanism is finished and ready.

For the card, I stamped the man from the “Birthday Laugh Lines” on a 4.5” x 6”  piece of cryogen white cardstock using memento black ink and colored him with copic markers (see colors below).


 I then die cut the balloon shape over the top of the stamped balloon image.  I lined up the reveal wheel behind the balloon hole only to determine where to place the largest rectangle die on the cryogen cardstock.  I taped the rectangle die in place, removed the wheel, and ran it through my die cut machine.  I then cut a partial circle on the side of the cryogen to match up with the turn part of the wheel.  Optional: Mat the image and cut corresponding partial circles to line up.  Make sure that the sentiments do not show through the partial circle when turning.


Hold the wheel where you want it and turn the image (and wheel) over and place foam tape on the back side of the small circle and around the edges of the back side of the colored image piece, making sure not to place any foam tape on the wheel.  Remove all the tape coverings and carefully turn back over and place on your card background.  Test your wheel and you are now ready to put the finishing touches on your card.    

 
  I hope you enjoy my card and decide to play along with this challenge.  It truly is fun!! 


Products used: 

  Copics:  

Skin – E13, E11, E01, E00

Cane and shoes – E37, E35, E33

Pants – B26, B24, B23, B21

Hat – B24, B21 & YR07, YR65

Shirt – YR07, YR65, YR61

Ground and hair – N3, N1 and N0


-------------------------------------------------------------------------------------------------------------------
I also have a little bonus prize!

For as long as I have duplicate stamps I will choose a random winner.
These will be for U.S. residents only since these will be mailed by me personally
and not Art Impressions.

This month I have the Exclusive Mouse Freebie from 2021.
You will be automatically entered to win when you upload your project to the challenge.


Good luck everyone!


Here is the fine print:

✻ Please make a new card or handmade crafty creation.
✻You can make any item you wish; this is not limited to cards!
✻ Limit two submissions per person. 
✻You MUST use Art Impressions stamps or dies! You may use other companies products but the main focus should be on Ai items.
✻If you win, you will receive one free stamp set of your choice. In return you will create a brief write up explaining how you made your item and email it to me. (Reneé) and you will mail your project to Art Impressions at your expense. (cheapest method possible is fine) International winners may submit photos through email. We will share your creation on Art Impressions social media.
 ✻Please include your first name and last initial on your submission.
✻We love to comment on your entries, but keep in mind if you use a private group or a platform that you need to sign up for, we probably won't be able to.
✻ The Ai Challenge is open to everyone, international submissions are welcome!
✻ Include a link back to the Ai Blog or grab our button on the top right of our sidebar!
✻ Share the Ai love if you can, by clicking and commenting on your fellow crafters.
✻ Make sure to get your link up by the deadline to enter your creations.
✻ Good luck and happy crafting!


You are invited to the Inlinkz link party!

Click here to enter

Wednesday, November 20, 2019

Penguin Wave by Niccole

Hello Ai fans!!


Like I said last week ... we have an exclusive stamp set only available at Simon Says Stamp called SSS Exclusive Holiday Flip Card - 5207.  I LOVE this set.  It is so fun! And what a bonus ... it's a Flip Card! Although this week I am not showing you another flip card.
I am showing you a spinner card.  Yes, a spinner card!  When you have a front and back identical stamped images, it is a MUST in my opinion to make a spinner card! 
No you are not seeing things LOL and no it is not a mistake.  I am showing you the image rolled over so you are seeing the back side.  See how they fit perfectly together?  
I cut two rectangles using the Rounded Rectangle A2 Double Stitched Dies.  I cut the smaller one from the red and black paper.  I used one bigger along with the smaller one to make a frame with the turquoise paper.  
I sandwiched the thread between the two images and the frame so everything is hidden.  You can twirl it to make it spin when it opens or you can leave it and when it opens it waves at you.  Both are adorable! I finished it off with a few crystal gems since I did not add a sentiment.
Here is a close up of the adorable colored penguins.  Aren't they the cutest little penguins you have every seen?  You could color these in so many combinations.
Here is a video of the spinner in action.  What do you guys think?  It is really not hard at all.  People will think it took forever to make, when in reality the hardest part is getting your frame and card base to line up LOL
Here is one more picture of the card.  I absolutely LOVE how this card turned out.  I love that it is not your traditional Christmas/winter colors. I love that this set is so versatile.  I have shown you a flip card and a spinner card, but yet you still could make a standard card as well ... oh the possibilities!

Thank you for stopping by today!  Please head on over to Simon Says Stamp to pick up this adorable SSS Exclusive Holiday Flip Card before it is sold out.  It will not return once it is sold out.

Copics used:
BG11, BG45, BG49
C1, C3, C5, C7, C9
G07, G09
N0, N3, N5, N7
R21, R22, R24, R29
W00, W1, W3
Y13, Y18

Until next time ... Hugs & inky fingers!

Friday, November 8, 2019

The Stamping Village Holiday Seals Spinners | By Jessica Shier

Hello Ai fans!

It's Jessica! I'm back today with some more inspiration using The Stamping Village Holiday Seals stamp set, there is also a card tutorial video below. This time I'm making some interactive spinner cards. These cards are super fun to receive!


For my spinners I'm using the Art Impressions penguin and the Pink and Main cocoa (or coffee) mug. I stamped both images on to a piece of Neenah 80lb card stock using Copic safe black ink. These images are quick to color, even though I doubled my work by stamping each image twice.

You can check out the video below to see the entire process and I'll also have the Copic Markers I used listed below.


You can find more information about The Stamping Village Holiday Seals stamp set and the first video I did using this set for a video hop on the Art Impressions Youtube channel here.  Please note that the giveaway has expired but there is still a ton of inspiration!


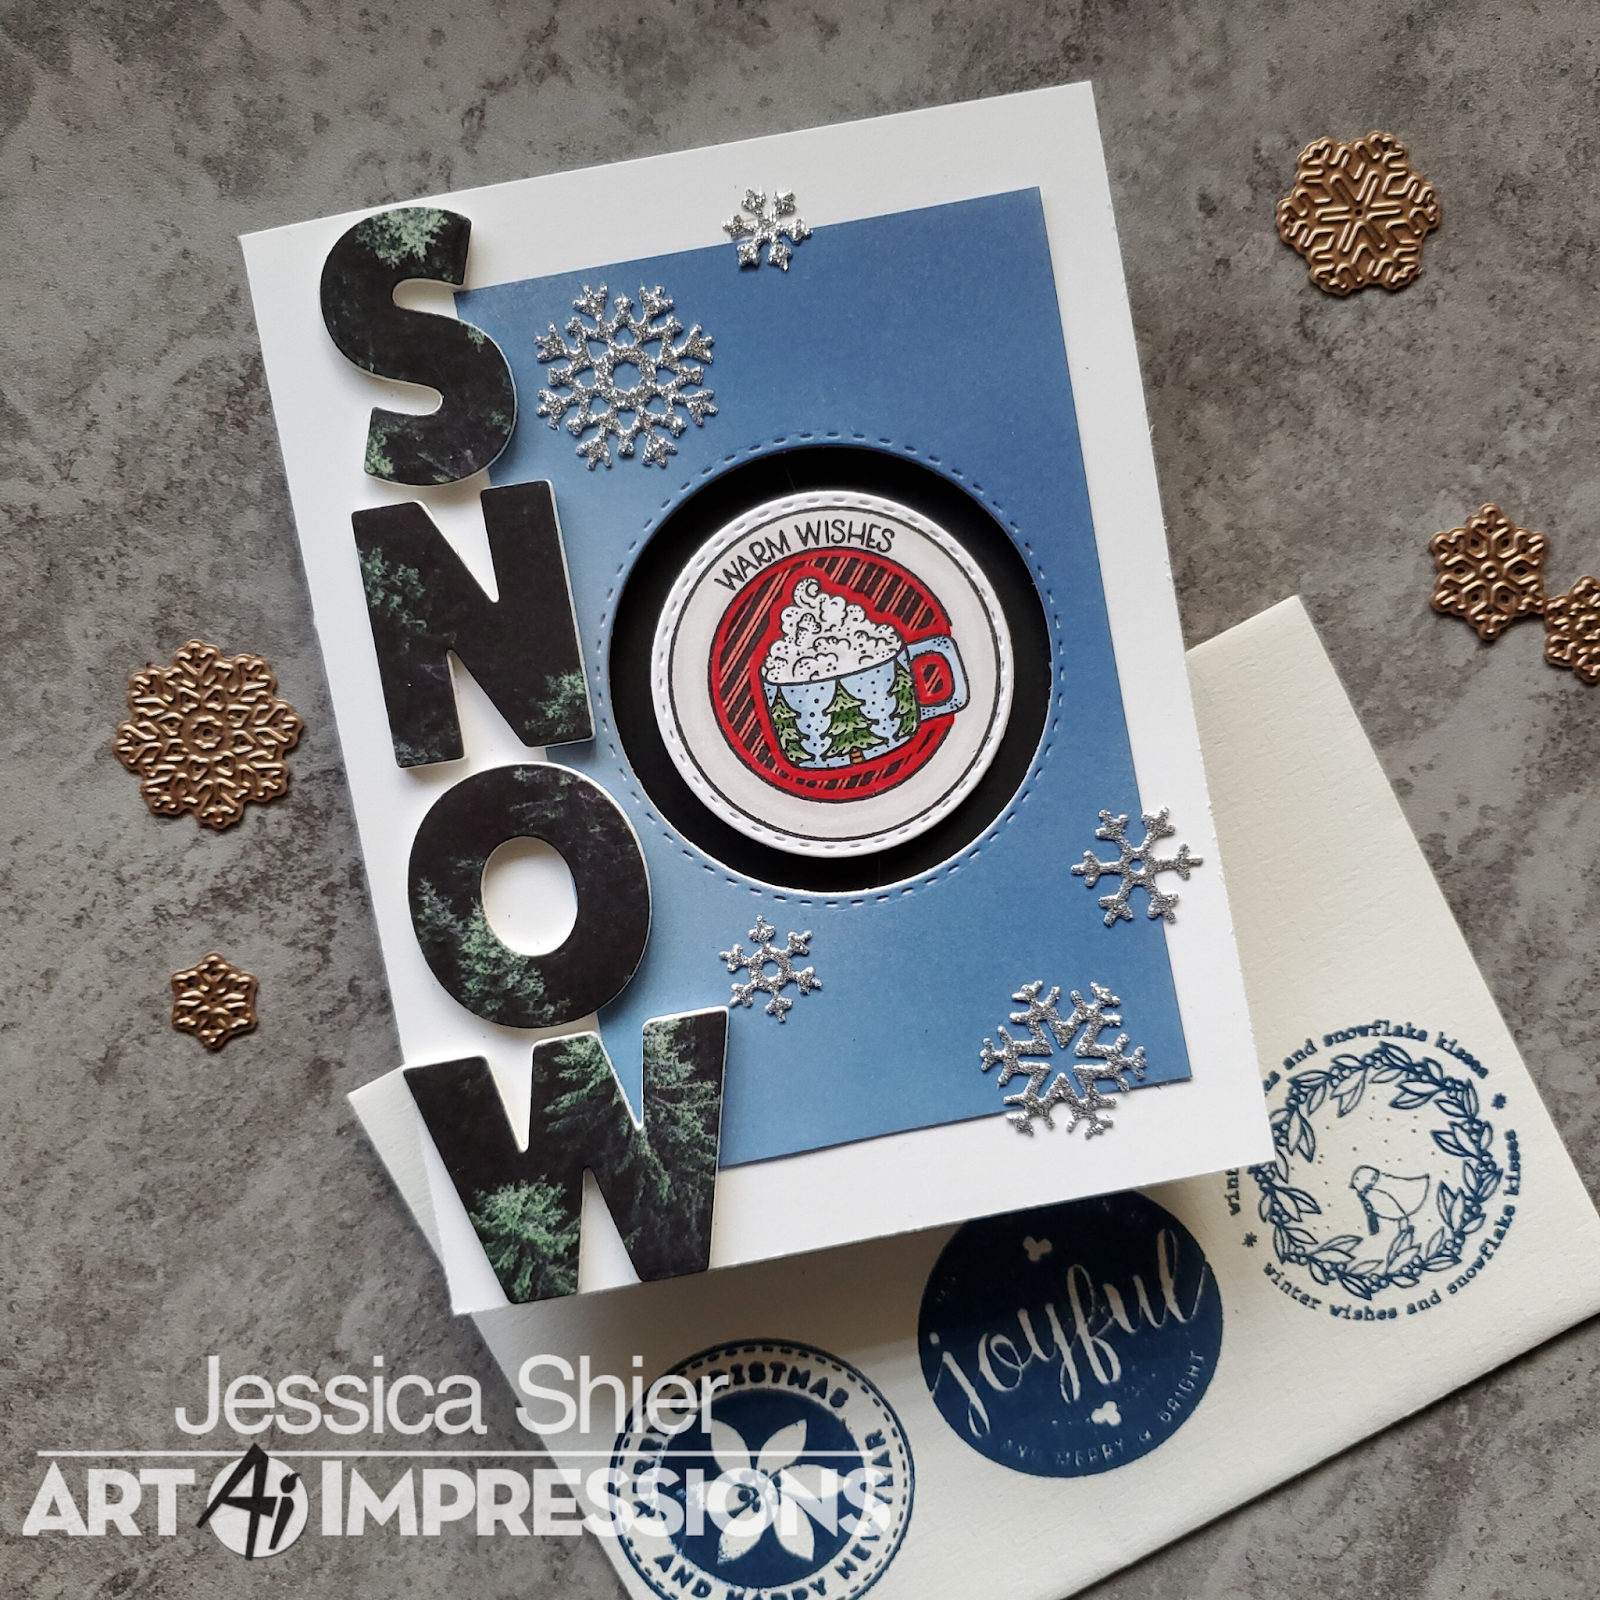
Using one of the smaller circles from the Art Impressions Circle Double Stitch die I cut out each colored Holiday Seal. Then used the next largest circle die on the blue Distress Oxide ink card stock and on the front of a A2 cardbase. For these cards I am using a side fold card base. 

I sandwiched a piece of clear thread between the two holiday seal circle images and centered those in the larger circle die cut on the front of the card. I add dry adhesive below and above the card front circle die cut so that the penguin and mug images would be suspended there. Then I layered the Distress Oxide ink blended piece over the top. 


I used a lovely piece of forest pattern paper and die cut the word "snow" twice from that and also twice from some white craft foam and adhered those together. Then I added those to the left side of the card front. For some added shimmer I die cut the six snowflakes from the Art Impressions Snowflake die set and adhered some to front of the card and a few to the inside of the card with a heat embossed sentiment from the Penguin Cheer set. 

To prepare your card to be received by your recipient of choice, just write your sentiment like normal being aware of the circle die cut on the front. Then twist the holiday seal image a dozen times or so, gently, close the card and place in a envelope. When the person receiving the card opens the card to read your message the image with twirl. Super cute right!?

Copic Markers Used:
W6, C5, W3, Y13
YG67, YG63, YG61
R29, R14
W1, W0

Thank you all so much for joining me today! Happy Stamping! 


Wednesday, March 27, 2019

Easter Blessings by Niccole Kulig

Hello Ai fans!

Today I am stopping by to share a card I made using the Mini Bunny Spinner stamp set from Art Impressions.  With Easter approaching in less than a month I thought it would be perfect to send to my Mom for Easter Blessings.

As you can see I made another mini spinner card.  I just love how interactive they are, and really they are pretty simple to make. 

For this one I offset the opening to the right of my card using the Oval Double Stitched Dies. This is where my spinning bunny is going to go. I cout out of both my card base and brown card stock. This allows for the thread to be hidden between the two layers of  paper. 

To finish off my card.  I used one of the Flagged Double Stitched Dies. I stamped my sentiment Easter Blessings from the Sweet Eater set and attached it to my cards. 

Until next time ... Hugs and inky fingers! 


Tuesday, May 3, 2016

Mini Squirrel & Racoon Spinners by Karen Day

Hello Ai fans!
We know you all love the line of Ai Spinners... so that means you're going to adore the new Mini Spinners!!  These are so cute, and they make up in a jiffy.  Here are Mini Squirrel Spinner Set (Sku #4735) and Mini Racoon Spinner Set (Sku #4733):
 Now, the mini's all come with a front and back image, a small image and a sentiment.  The small images are symmetrical, so they can be used as both the front and back.  The set includes dies to cut out both of the images.  So EVERYTHING you need to make adorable spinner cards is included!  You also might notice that the images are all drawn so that they are reaching up, so I've made it that my squirrel is reaching for his acorn, and my raccoon is reaching for the cupcake.
For the raccoon card, I used one long piece of sewing thread to sandwich between both images, again - so that he is reaching for the cupcake.  It's quite fun, because the two images don't spin exactly the same, so it really looks like he's chasing the cupcake.  Since the images look great front or back, I always make my spinner cards pretty on the inside as well:
 You wouldn't believe how hard it is to photograph these!!  They don't sit still - I'm sure it would be quite funny to watch me struggle to get a good photo.  There are six new spinners available in the Ai store - you can find them all here.
Copics used: Browns - E57, E55, E53, E51, E50, E47, E44, E43
Reds - R24, R22, R20
Blues - B01, B00, B000
Greens - G43, G40
Yellow - Y15
Greys - W5, W3, W1, W00


Tuesday, April 12, 2016

Robe Spinner by Karen Day

Hello Ai fans!
It's time for another Ai Spinner card!  I am using Robe Spinner (Sku #4677):
 I don't have the dies yet, so my gal is just fussy cut out, then glued together over a piece of sewing thread.  BUT... you can find the Robe Spinner Die (Sku #4696) here in the Ai store to make assembling your card even easier!  And if you're not wanting to make a spinner card, I made a flat version of my card using just the front image:

 Copics used: Hair & Skin - E57, E55, E53, E00, E000, E11, R20
Purples - BV08, BV04, BV02, BV01, BV00, BV000
Greens - G46, G43, G41
Pinks - R85, R83, R81