Showing posts with label Rounded Rectangle A2 Double Stitched Die. Show all posts

Tuesday, March 14, 2023

Celebrate Big by Nina

 Hello Art Impressions fans, thanks for joining Ai blog today. I am Nina and am so excited this card I made mixing and matching some of Art Impressions sets from our new release.


I used the new Happy Spring Flip Card Set and the Birthday Journal Set from our 2023 new release. 

I just happened to have these two sets next to each other on my desk and was fascinated by how well they would go together as the cake pieces size fits perfectly to be carried by the two of the four bunnies :)

So I immediately started by stamping the images from both the sets with Memento Tuxedo Black Ink and my Mini Misti and colored them with my Copic Markers.

I cut the images and backed them with foam tape, I used thinner foam tape behind the bunnies and thicker behind the cakes to give the dimension that the bunnies are actually carrying them.

For the background I cut the panel using Ai Double stitched rectangle dies. I pressed fossilized Amber on my glass mat and sprayed the glass mat with water to dilute the ink and pressed the background panel against the glass mat multiple times until I was pleased with how it looked.

I backed the background panel with foam tape as well and attached a grassy hillside for my bunnies to stand on and then I attached the bunnies and then the cakes.


I die cut the word BIG from letter die set from my stash and added the alphabet stickers to write "Celebrate" and decorated with enamel dots from the same Copic palette.


Monday, December 12, 2022

Joy of Christmas by Sharon Caudle

Hello AI Fans!


I love this card I'm showing you today.  This snowman exudes such joy that I can't help but smile every time I see him.  Bonnie is so talented in conveying emotions through her wonderful characters! This adorable cutie pie and sentiment are from #5041 Snow Friend Set. I can't help it, I adore him!!  I stamped him onto some Cryogen White paper which has a little sparkle to it, and then colored him with Copic markers. I cut the image out using the #5062 Rounded Rectangle A2 Double Stitched Die Set. For the mat behind him, I cut out another piece the same size in the gray paper and just offset it from the image panel. To balance out the card, I used three different beautiful snowflakes from 5353 Large Snowflake Dies and topped them off with some Diamond Stickles. 


Thank you so much for taking the time out of your busy schedule to stop in and take a peek at my card! Until next time my crafty friends!! 

Copics used:
Y08, Y35, Y38
YR12, YR14
C1, C2, C3, C4, C5, C6
R12, R22, R24, R27
T1, T2
B000, B04
YG07


Saturday, November 5, 2022

Sporting My Christmas Blues by Janet


Happy Saturday friends! I hope you're finding some crafty time this weekend to do a little holiday crafting, whether it be Thanksgiving or Christmas. Gone are the cute little ghouls and spiders and bats. On to pretty, peaceful, or cute. I'm ready!


As it happens, I've been thinking about outside Christmas decorating. My husband and I decided to put up our decorations the week of Thanksgiving this year to get a head start. So when I turned to making a card today, I naturally thought of the Front Porch Line. Usually, I'm a traditional red, green and white girl but when you're cardmaking, you can do any colors you like! So I decided to try an all-blue theme. I really love how it turned out.

To begin this one, I first cut out a 50662 - Rounded Rectangle A2 Double Stitched die out of Copic-friendly cardstock and stamped it with the main image from the 5512 - Front Porch Set. Next, I colored the door scene very simply using light grays and blues. Finally, on the stoop, I used some lighter warm brown tones. It looks dark but only because the blues are so soft. 


Next, I stamped most of the images from the 5489 - Front Porch Christmas Set and colored the images with blue tones. I wasn't sure if there was such a thing as blue Poinsettias, but according to Google there are, and they looked beautiful! So blue Poinsettias it is for my porch. Next, I cut open the door and slipped the tree image behind so that the tree with its blue lights shows when it is fully opened. You can see a peak of the tree in this photo. 


To act as a mat, I used the largest 5062 - Rounded Rectangle Double Stitched Die, and finally, I cut a snow-inspired mat out of graduated blues and a bit of pink. The finished panel is glued to a white A2 card base. I used the 5566 - Christmas Sentiments Set on light blue cardstock and cut it out with a flag die from the 5543 - Journal Template Die Set


I love how this card's blue colors give the card a calm and serene look. I don't have any snow images on this, and yet it feels wintery just the same. 


Thanks for stopping by today for a little creative fun. Be sure to visit the Ai Store for lots of additional inspiration.

Wishing you a very crafty day!

Janet Facebook Instagram - YouTube - Pinterest 

Monday, August 15, 2022

"At least I wore a cardigan!" by Sharon Caudle

 Hello AI Fans!

I'm here with you today to show you the card I created for the Pretty in Pink challenge going on right now on Art Impressions Blog.  I don't know if any of you watch Tik Tok, but a while back, I saw a video where some friends thought it would be really funny to dress up their husbands in matching shirts for a party (without the men knowing about it of course). So while I was thinking about what I wanted to create, I came across my #4474 Old Guys Club Set and the light bulb came on! I just love the grumpy look on these guys, so I thought I might as well give them something to be grumpy about, right? LOL!  I stamped the image onto Cryogen white paper and then colored them us using Copic markers. I made the card super simple by using the largest #5062 Rounded Rectangle Double Stitched Die set.  I simply folded my cardstock in half and then placed the top of the die just above the seam of the fold and ran it through my die cut machine.  Voila - a folded shaped card!  I always cut another full piece of either the same cardstock or the patterned paper I want to use and glue it to the front of the card base.  Doing that hides that flat fold that doesn't have stitching. Then I used the next size down to cut out my image panel. The sentiments were created with my computer and then cut out with some word bubble dies from my stash.   


Hope I gave you a little chuckle today! Sometimes we need that on Monday! Thanks so much for stopping by and hope you have a crafty day! 


Copics used:

E000, E00, E11, E13, E15, E35, E37, E70, E71, E74

R81, R83

YG21, YG23, YG67

T1, T2

B000


Saturday, February 26, 2022

Koala-tea Party by Janet


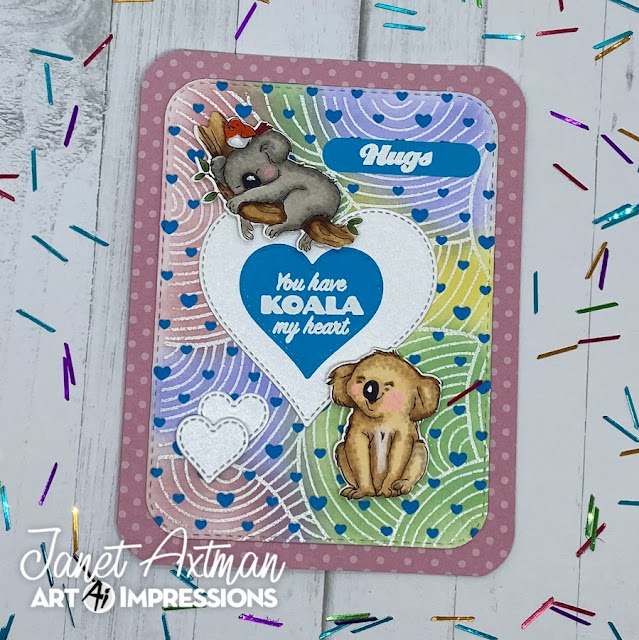
Hello AI fans! It's Janet and today I have a trio of Koalas from 5349 Koalas Set. I've used a swirled heat embossed background that I colored up with distress oxide inks. It's the perfect casual backdrop for the adorable koalas in this set. 

In the first card, I colored two of the koala images and used the included dies to cut them out. I cut out the stamped and inked panel with the largest Rounded Rectangle Double Stitched Die. Then I used a cover plate to cut out the tiny hearts. Behind the panel, I placed blue cardstock creating a confetti of  blue hearts in the background. Then I arranged the two koalas and several hearts as well as the two sentiments on the panel. The finished piece was then glued on the card base. 


My second card uses one of the two large koala images from the set. This is a perfect image for anyone who is a tea or coffee lover. What a fun way to wish someone a happy birthday! The confetti that I used on the sentiment is also included in the stamp set. 


Thanks for stopping by today. I hope you enjoyed this little trip into some Koala-tea time! See you next time!

Happy Creating!
Janet YouTube - Blog - Facebook - Instagram - Pinterest 

Tuesday, June 29, 2021

Spring Chicken Birthday Card by Jil Lebel


Hello Ai fans!

I used the Spring Chicken stamp set for another fun Birthday Card
I started by stamping the image onto Spectrum Noir Ultra Smooth card stock with Gina K Black Amalgam ink and colored them with Copic markers.  The colors I used will be listed at the end of this post.  I stamped the hay stamp from the Animal Nativity Set. several times at the feet of the chicken using Coffee, Orange Blossom and Sunflower Archival ink. I then cut the image out with Spellbinders Labels 4.
The card base is Kraft cardstock.  I stamped it with the chicken tracks using Coffee Archival ink.  I then added a layer of patterned paper that was cut with the Rounded Rectangle A2 Double Stitched dies.  I then added the colored layer over it with foam tape.


Copic Colors Used:
White - C3, C0
Brown - E35, E33, E31
Tan - Y17, E31, E30
Red - R27, R05
Rose - R85, R83, R81
Green - YG07, YG06. YG01
Yellow - Y17, Y11


Thanks for stopping by and Have a Great Day!

Tuesday, April 20, 2021

Cozy Cat Cubbie Hidden Message Card by Jil Lebel


Hello Ai fans!

I used the Cozy Cat Cubbie stamp and die set. I used the tiny kittens to add to the openings of a hidden message card. Every time the wheel is turned, a new cat shows in the window. I used the Freebie Cat stamp.  Did you know you can choose a freebie stamp with your order?
This entire card is based off of the Hidden Message dies from Diamond Press.  It comes with all of the dies to make this a simple process.  In the past I made my hidden message cards from scratch. I cut the circle part out of Spectrum Noir Ultra Smooth paper.   The set came with a template to show where the five openings would be as the wheel is turned. I traced those onto the wheel very lightly with a pencil. 
I stamped the images onto the wheel piece with Gina K. Amalgam ink and erased the pencil lines. I also stamped the freebie cat onto a piece of the same paper and cut it out with my scissors.  I then colored them with Copic markers.  The colors I used will be listed at the end of this post.
I cut out the main layer of the card with the dies.  I cut a piece of Simple Stories patterned paper and white cardstock  so it is sturdy. I cut another piece of patterned paper a bit smaller than the main piece.. I then glued everything together.  so it is sturdy. I cut another piece of patterned paper.
I cut another piece of Spectrum Noir paper with the rounded Rectangle A2 Double Stitched Dies.  and stamped the freebie cat and sentiment with Versafine Clair Nocturne ink. I attached the colored cat onto it.  I added in the wheel following the directions on the dies.  I then added foam tape to it and stuck it all to a white A2 card.
Copic Colors Used.
Gray - C5, C3, C1, C0
Tan - E35, E33, E31
Black - C7, C5, C3
Cream - W5, W3, W1, W0
Orange - YR27. YR24. YR23
Green - YG03

Thanks for stopping by and Have a Great Day!

Thursday, February 4, 2021

Bunny Mail cards by Crystal


Hi AI fans! Since we are now into February it is time to make Valentine's day cards. I love making Valentine's day cards so much. This week I played with the Sending Love Cubbies stamp set. I love this set so much that I had to make two cards. I stamped all of the images twice onto water color paper with Versafine black ink. I painted all of the images with water color markers. After all of the images were dry I ran them through my die cutting machine with the coordinating dies. 


For the first card I used some green and blue pattern paper to look like grass and sky. I layered the scene onto some pink pattern paper. Die cut a piece of white card stock with a double stitched rectangle die and stamped the sentiment "Some Bunny loves you!". I then adhered the whole panel to a 5 1/2" X 4 1/4" card base.  

I used solid blue and green card stock for the sky and grass on my second card. I layered that onto some pastel stencil back ground that I had left over from another project. I trimmed a piece of white card stock down and stamped the sentiment "Sending you Love Special Delivery. I then adhered the whole panel to a 5 1/2" X 4 1/4" card base.  


Happy Stamping!


Thursday, January 21, 2021

Winter Wonderland by Crystal


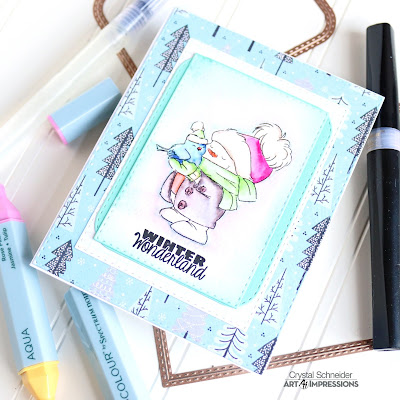
Hi AI fans! Still winter here, I'm ready for spring. I grew up in MN now I have moved south and we don't get much if any snow which I can handle. I do love snowmen they are so cute. I had so much fun playing with this Chubby Snowmen stamp set this week. 


Not sure why I have been stuck on water coloring lately, maybe because it is faster then alcohol markers for me. I stamped the image in with Versafine black ink which is water color safe and will not smudge. I would let the image dry for a little bit since it is a pigment ink it can take a little bit to dry. This set does come with matching dies but I just ended up die cutting the image and sentiment "WINTER Wonderland' with a double stitched rectangle die. I matted it onto a couple layers of card stock then onto a pattern piece of paper. 


Happy Stamping!


Monday, December 14, 2020

Sweet Animal Nativity with Bri Firth

Hello Ai Fans! Today I am sharing my creation for the Reasons for the Season Challenge. For more information on this challenge check out the announcement here. My project features the Animal Nativity stamp set. This card is also featured on my personal blog, check it out here

I used two different shades of wood grain paper and some ink blending to create the barn themed background. I used Mustard Seed, Fossilized Amber, and Rusty Hinge Distress Oxide ink to create the hay-covered colored floor. I used Vintage Photo distress ink to create an ink splattering effect on the ink blended cardstock. I used a stitched slimline die to create the smaller layer on the front of the card. 


I colored all of the images with my Copic Sketch markers. I used Warm grays to color the sheep and the donkey, E40's for the bunnys, E30's for the camel, and E50's for the cow. I listed all of the markers I used at the end of this blog post. 


I stamped the sentiment with pigment black ink onto a piece of cardstock that I ink blended with Fossilized Amber Distress Oxide ink. Then I cut out the sentiment with the Rounded Rectangle Double Stitched die set. I distressed the edges with Vintage Photo Distress ink.

Check back next week for more Ai inspiration made by me!


Copic Markers I Used
C: C00, C1, C3
W: W0, W2, W4, W6, W8
E: E0000, E000, E00, E21, E11, E04, 
E13, E15, E17, E18, E23, E25, E27, E29
E30, E31, E33, E35, E37, E39, E40, E41, 
E42, E43, E44, E50, E51, E53, E55, E57, E59
RV: RV000, RV00, RV11. RV13
R: R30, R32, R35, R37, R39
YR: YR23, YR24, YR27
Y: Y00, Y21, Y23, Y26, Y28
B: B0000, B000, B00, B01

Sunday, November 1, 2020

Animal Nativity by Reneé Matarese

 Hello Ai fans!

Today I'm sharing the absolutely adorable 5350 – Animal Nativity Set.
I used the 5062 – Rounded Rectangle A2 Double Stitched Dies to cut the frame.

I popped up the outer layer to make it look like the little animals were peeking in.
The straw was made from raffia that I just cut into strips and glued down.


There's a couple more of the sweet little critters and a sentiment on the inside.
Even though this is a Christmas set...think outside the box.  I'm already thinking of how I can use the sweet bunnies and maybe the lambs for an Easter card.


Copics used:
T1, T4, C00, B000, Y21, Y38,
RV00, E000, E41, E55, E81, E93