Showing posts with label 6048 Scalloped Rectangle Dies. Show all posts

Saturday, March 21, 2026

Hello Sunshine! by Janet

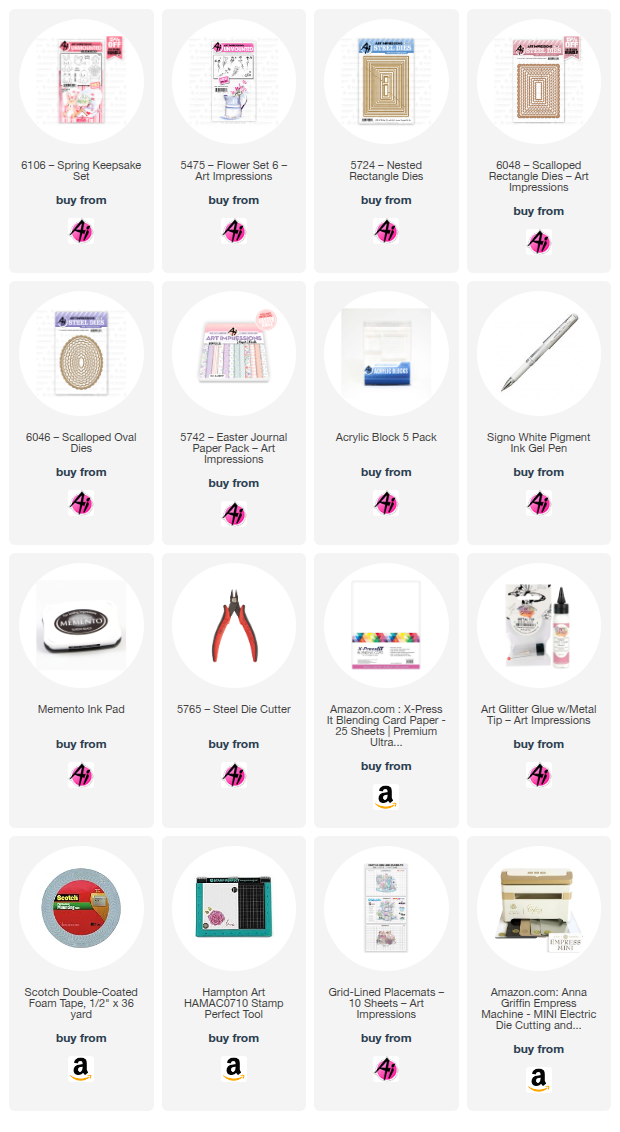
Today I've created a fanciful spring card with a pink bunny, spring tulips and cheerful paper patterns. The fun fold makes this card perfect for the current 3D challenge on the Ai blog. It's a horizontal double z-fold card that is perfect to showcase the beautiful paper patterns in the 5742 - Easter Journal PP.

The scallop shapes decorating the front and interior are from the 6046 - Scallop Oval Dies and 6048 - Scalloped Rectangle Dies. The sentiment piece inside is made with 5724 - Nested Rectangle Set.

The cute bunny and watering can are made with the 6106 - Spring Keepsake Set. The sentiment is also from the set. To make the main front piece, I stamped the watering can first and then I stamped and cut out the bunny and mounted it on foam tape so that it has dimension and appears closer to the front than the watering can. Copic markers were used to color these pieces. I used a Signo Pigment Ink Gel for the white accents. 5745 - Flower Set 6 was used to stamp the tulips in the watering can and adds some simple decoration to the interior sentiment piece.

While this card opens up widely, it still folds up to an A2 size and fits nicely into an envelope for mailing. It stands up well and has a big presentation. I had a lot of fun making it and I hope you have been inspired by the adorable images and spring colors and patterns in my project. 

Thanks for joining me on the blog today. As always, find your favorite stamps, dies, papers, and accessories at the Ai Store!

Happy Crafting!

Janet YouTube - Blog - Facebook - Instagram - Pinterest   

Sunday, March 1, 2026

Sweet Frogs! by Simone Carr

 Hello Ai fans!


Welcome to my first Watercolor Weekend!

I can’t even tell you how excited I was when I saw the new Story Tile Template Die and stamp set release! The Story Tile Template Die works beautifully with so many sets you may already own, making it such a versatile addition to your collection.
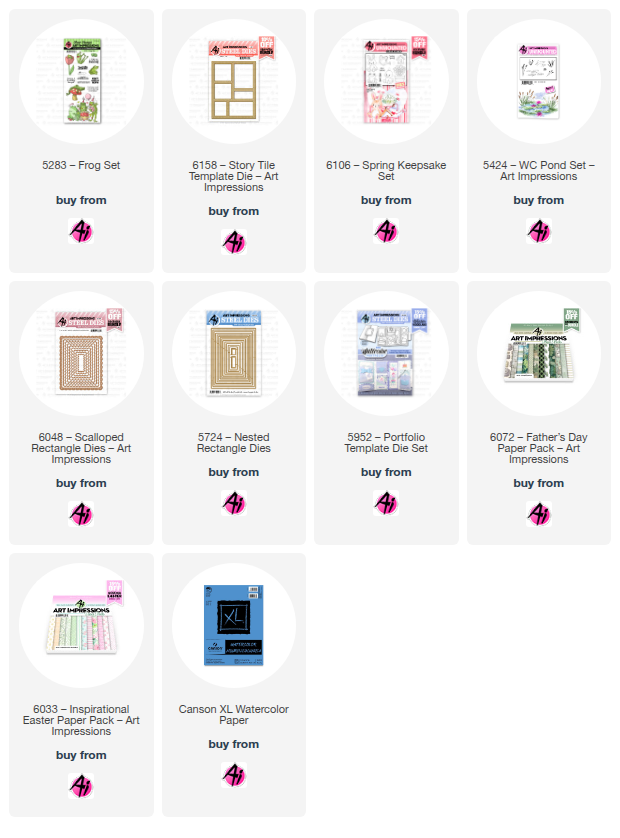
Let me show you what I created. For my first card, I used the Frog Set (5283). 
I ran the Story Tile Template Die through my cutting machine twice using Canson Watercolor Paper. Before stamping, I laid out my images on the tiles to see how they would fit and to decide on the overall layout. I highly recommend this step since the tiles only fit together in a specific way.
Once I was happy with the placement, I stamped the images using Archival Ink Shadow Grey and began coloring.
For the frogs, I started with 173, then added 195 in the shadow areas. To deepen the shadows further, I used 177, and finished with 133 for highlights.
The tulips were colored with 933, intentionally leaving some lighter areas, followed by 925, and darkened with 905 where needed.
For the leaves, I used 177, again leaving some lighter areas for dimension.
The daffodil was colored with 025, followed by 985, and 933 for the center.
The mushroom stem was colored with 992, with 912 and 565 added for shading. The mushroom top was colored with 856 and shaded with 565.
I used 526 for the sky, and a black TwinTone marker for the eyes and to add definition wherever needed.
To assemble the card, I glued two frames together for added dimension, then cut a third frame from 6033 Inspirational Patterned Paper and adhered it on top. The layered frame was attached to an A2 card base, and finally, I glued the tile pieces into place to complete the design.
Materials Used
Stamps & Dies
• 5283 Frog Set
• 6158 Story Tile Template Die
Paper
• 6033 Inspirational Easter Patterned Paper
• Canson Watercolor Paper
Tombow Markers
• 933, 925, 905 – Tulips
• 025, 985, 933 – Daffodil
• 177 – Leaves
• 133, 173, 195, 177 – Frog
• 856, 992, 912, 565 – Mushroom
• 526 – Sky
Bonus Card – Materials Used
Stamps & Dies
• 6106 Spring Keepsake Set (Frog)
• 5424 Pond Set
• 5283 Frog Set (The Fly)
• 6048 Scalloped Rectangle Die
• 5724 Nested Rectangle Die
• 5952 Portfolio Template Die Set
Paper
• 6072 Father’s Day Patterned Paper
• Canson Watercolor Paper
Tombow Markers
• 173, 195, 098, 131, 177 – Frog & Lily Pad
• 177, 947 – Cattail
• 565, 526 – Water & Sky

Thursday, February 26, 2026

Nurse's Prescription by Dori Mendiola

Happy Thursday AI Friends!

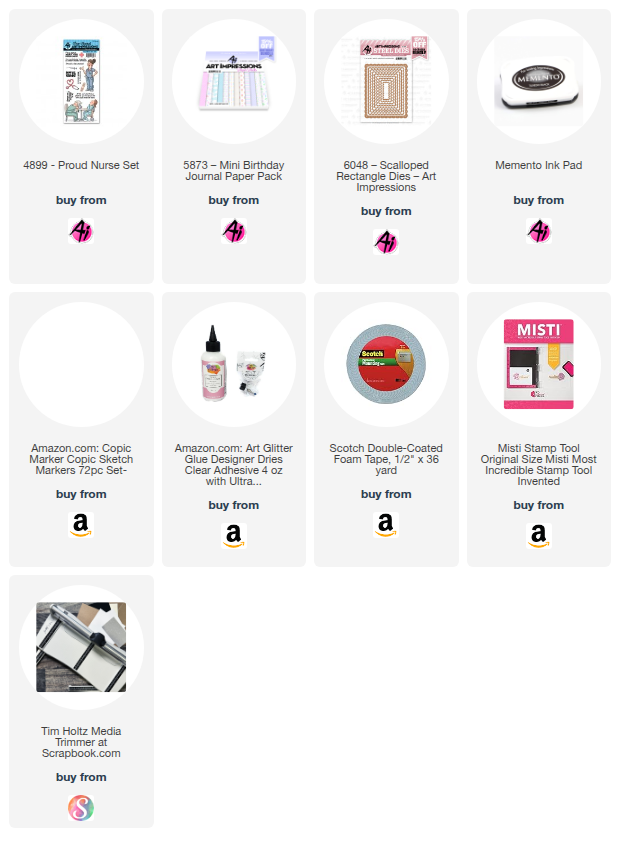
Today I have a fun card using the #4899 - Proud Nurse stamp set.  A friend of mine is a nurse and I knew she would appreciate this birthday card and the funny sentiment included in this stamp set.  She may use that line for some of her patients.  LOL!


I made this a fun fold card using a magnet for the closure.  I hid it under the paper layers so you only hear the snap when it closes.  What is it about that sound that makes it so fun to open and close the card?  šŸ˜‚

To make the card base, I cut a piece of 5 1/2" x 7 1/4 " heavy cardstock.  I scored it along the 7 1/4" side at 3" and 6".  This will make it an A2 card size.  Fold and burnish each score line in opposite directions.  Create your mat panels for each of the sections.   I used the #5873 - Mini Birthday PP for the pattern paper panels.    

For the front panel, I stamped the image onto copic friendly paper with Memento black ink and colored with my copic markers listed below.  I then die cut the panel using the #6048 - Scalloped Rectangle dies as well as the larger pink panel.  The blue panel in the middle is cut to fit between the two scallop rectangles.   I adhered the matted image panel to the folded right side only of the card.  The left side of the card will close under the image panel.


The sentiment on the left side of the card is from my stash.   I figured that went perfectly with the front sentiment, plus I got to include myself in on the wine splurge.  LOL!

Thanks for joining me today!  Have a great day and keep creating!

Copics used:  E000, E00, E01, E11, E21, E23
C00, C1, C3,  Y12
R20, R81, R83, R85
B000, B12, B14

Tuesday, February 17, 2026

Springtime Keepsakes by ReneƩ Matarese

 Hello Ai fans!

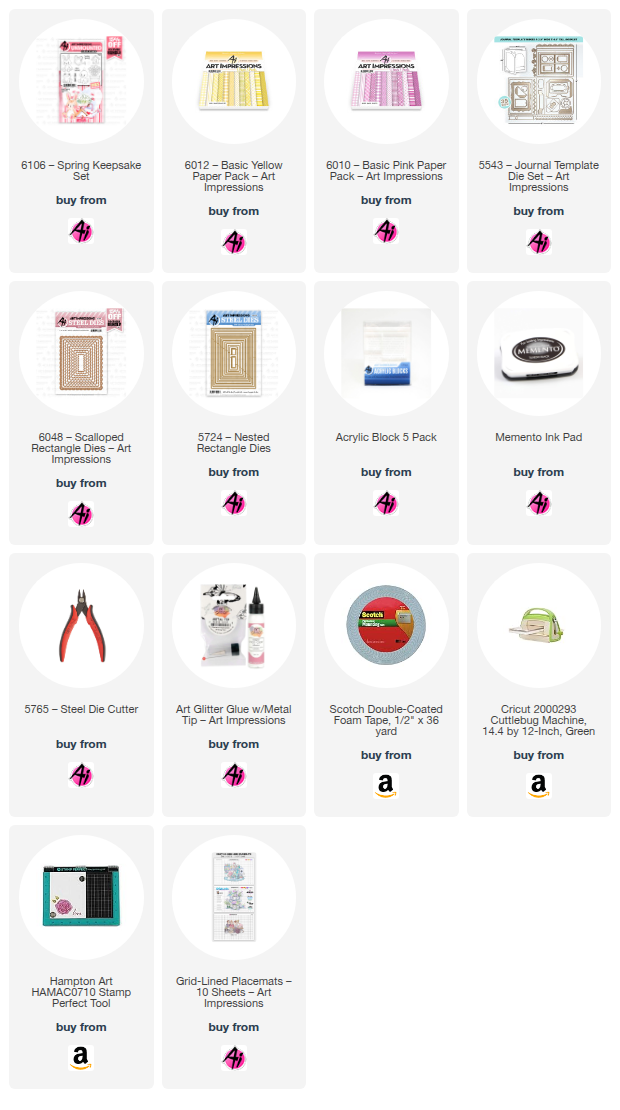
Today I have two cute cards to share with you.

One, is what I intended, and one...well, have you ever done something really stupid silly
only to shake your head and say "What was I thinking?" If you have, then you're not alone.

My "boo boo" card is this one. The duck. He was meant to be a lift flap card just like my pink one below but...nope. I made sure THAT didn't happen...lol!

I created the flap, decorated the inside and then remembered I had this new, really cute yellow pom-pom ribbon. Wouldn't that be cute with this card? It sure would. So, without thinking, I threw down some glue strips and stuck in on. Super cute right? But then...yep. You certainly can't open it anymore.

I just shook my head and chalked it up to a learning experience. Oh well.

For my next card, you can see what the duck was also supposed to look like.

This time I used the adorable bunny.


Here is the inside with the flap open.


I hope you like these and I hope that my little mistake will feel better about something you may have done in the past. We all make mistakes and you really can move on with what you have. Most of the time, you're the only one who will notice.

Have a great week everyone!

Copics used:

Y06, Y17, Y38

RV00, RV0000, RV21, RV93, E31, E40, E53

Thursday, February 12, 2026

It's in the Mail Challenge #421 Week #1

Hello Ai fans!
Welcome to our It's in the Mail Challenge!
This time, we're all about envelopes, postage stamps (or postage stamp dies) and mailboxes.

Stamps, dies, embossing folders, embellishments.
As long as your handmade project contains a mailbox or envelope of some sort, along with stamps, dies or paper from Art Impressions, then you might be the next winner of a free stamp set from Ai.

As we announced before our last challenge...

Please take note,
we have a new requirement.
We're not a large corporation like Simon Says Stamp that sells MANY brands.
Art Impressions is a family run company that designs ALL of their own stamps, dies and designer paper.
Therefore, moving forward, we're going to ask that you use some sort of Art Impressions product on your challenge entries. Everything else remains the same. Please see the full list of rules below.

After checking out the absolutely adorable baby bear card from our Featured Designer Janet, scroll down to see who won our last challenge.

------------------------------------------------------------------------------------------------------------------------


Hello and welcome to the feature post for the, "It's in the Mail Challenge." It's a Slider Double Pop-Up Easel card. Although I own a die set for this style of card, I wanted to show you how to make one without anything special. The twist on the card is that it has two stand up panels instead of just one. I want to credit Connie Stewart of Simply Simple Stamping for the measurements and inspiration for the project I'm sharing with you today.

Follow along with my instructions below. If you have questions or get stuck on anything, leave your question as a comment and I'll respond.

To start this one, I stamped, colored and cut out the baby images from 6103 - Baby Keepsake Set. Then I worked on the scalloped background by cutting it out with 6048 - Scalloped Rectangle Dies. This is the only die I used for the card base and it's for decoration. You can cut it without a die if desired but it looks awesome with it. The size is approximately 2 1/8" x 3 1/4." I stamped the mailbox with 5575 - Mailbox and Birdhouse Set and colored it and the grassy scene with Copic markers.

Once all of the elements were ready, I tucked the baby items into the basket and glued them to the basket to hold them in place. A nice feature of the 6102 - Baby Keepsake set is that the die slices open the top of the basket so you can load it up with accessories. It can also be used on it's own if desired too so it's very versatile.

Once the elements above are ready, I set them aside to work on the pieces of the card. Cardstock cut and scored as shown forms the base of the card that will support the pop-up mechanisms and mats. To make this card have more interest, I incorporated patterned papers from 6057 - Baby Girl Paper Pack. The patterns are so soft and sweet. They also have some heft to them so you can use them for interactive cards and not worry that they won't withstand the workout these cards have to sustain. 

Next cut and score this set of mats and strips. 

The first step is secure the baby girl patterned paper to the 9 1/2" pink strip. The pencil mark is just to help you see that this strip is centered to the patterned paper. Note that in the second picture I used a narrow oval punch to cut the notch shape that makes the tab opening.


The next part of the instructions makes the slider part of the card. The pink 3 3/4" x 3 1/4" piece is the sentiment area. Just to jazz it up a little, I stamped a message, blocks and booties on it. This will appear at the bottom of the card when the tab is pulled so as a little surprise to the recipient.
Once set, go ahead and pull the tab. It should reveal the message and make the Oh Baby card panel pop up.
Now comes the twist. Grab the 5 1/2" x 1 1/2" pink strip with the four score lines. Fold where scored to form a box at the bottom. Glue the last fold to secure the box shape. This is the second pop-up mechanism for the card.


Once the glue is set, activate the slider mechanism by pulling the tab. The tab forces the middle panel to stand up and the pop-up mechanism connected to the middle and front panels helps it stand. This action also creates a space between the 1st and middle panel. It's a cool 3D effect with two stand-up panels instead of the typical single panel. 


Below is the completed card in its closed position. It doesn't fold completely flat, but it's close and it will fit in a mailing envelope without a problem. I added another of the Oh Baby papers to the pink strip as both a mat and a sentiment. I used my scissor to trim the patterned paper to match the tab opening and glue it in place. This is an optional step. If you want to do this, you should do it before adding the box mechanism and top mat in case the box ends up being glued on it. This same area will fit a sentiment banner if you would prefer that.


And there you have it! I think this design is very nice and I plan to make more of this style in different themes. I hope you'll give it a try. 

Now it's your turn! Submit a card that has any reference to mail using Ai Stamps and get a chance to win free stamps. Wishing everyone who participates good luck.

Thanks for joining me on the blog today. As always, find your favorite stamps, dies, papers, and accessories at the Ai Store!

Happy Crafting!

Janet YouTube - Blog - Facebook - Instagram - Pinterest  

Thank you Janet for the sweet card and the wonderful tutorial.

Now, let's see who won our Love, Love Me Do challenge.

For our Top Spot we selected:
Consuelo G.

5820 KH – My Favorite Birds Set


Please contact Leah at Feedback@artimpressions.com
to claim a free stamp set of your choice!!

Be sure to grab your winner's badge to display on your social media.

Our Lucky Random Winner was:

#8 Bonnie W.


Please contact Leah at Feedback@artimpressions.com
to claim a free stamp set of your choice!!

Be sure to grab your winner's badge to display on your social media.

Congratulations to both of our winners!

Now for our new challenge!


 ✻ Please make a new card or handmade crafty creation using either stamps, dies and or designer paper from Art Impressions. You can make any item you wish; this is not limited to cards! (unless specified)

✻ Limit two submissions per person.
 ✻Please include your first name and last initial on your submission. You may include your entire last name, but it's not necessary.
✻We love to comment on your entries, but keep in mind if you use a private group or a platform that you need to sign up for, we probably won't be able to.
✻ The Ai Challenge is open to everyone, international submissions are welcome!
✻ Include a link back to the Ai Blog or grab our button on the top right of our sidebar!
✻ Share the Ai love if you can, by clicking and commenting on your fellow crafters.
✻ Make sure to get your link up by the deadline to enter your creations.
✻ Good luck and happy stamping! 

You are invited to the Inlinkz link party!

Click here to enter

Monday, February 9, 2026

Cold hands...warm heart by Sharon Caudle

 Hello AI Fans!

Do you celebrate Valentine's Day? I just love all the hearts and smooches in pinks and reds!  I'm just a big old sap! LOL! So I have another  super simple Valentine card to show you today, and this one I used the fun #6107 Snowman Hugs Set. I just love this image out of set! I created the card base with the new Scalloped Rectangle Dies #6048. I stamped the image onto a Copic friendly paper and then colored it using Copic markers which are listed below. Other than rounding the corners of the papers, I simply added a bow using red silk ribbon along with a couple little red hearts to show the love. 


So that's it for me today! Thanks so much for stopping by for a visit and until next time - stay crafty!!
Copic markers used:
R22, 24, 27, 81, 83, and 85
E21, 23, 97, and 99
C1 and 2
Y23 and 26