Saturday, July 31, 2021

Watercolor Weekend Roundup Final Summer 2021 New Releases!


 Hello Ai fans!

It's time for another Watercolor Weekend Roundup!

These are the 1st and 3rd weekend of every month but we make exceptions like today when we have new releases.  Our WC Design Team always has something special to share with you.  Today it's the last of the summer 2021 watercolor new releases!

Check out all of their fabulous inspiration below!


We'll kick things off with Karen!

's been a great few weeks slowly releasing the new Art Impressions Watercolor stamps on the Ai blog.  We've reached the end!  The last 4 sets will be available for purchase on the Ai website (here!) today.  I made a slimline card using two of the new sets:

There are 3 new Silhouette sets, this is 5428 - WC Silhouette Horses, and the fences are part of 5416 - WC Vintage Car Set.  The barn is from the previously released 5262 - WC Mini Cabins Set, trees are 5372 - WC Mini Foliage, and the fence is from 5371 - WC Barn Set.  The rocks are the new 5415 - WC Rocks Set.

I started by stamping my barn and fences, to determine where everything would go, and then I sketched in the mountains, hillsides and driveway.  I then painted them all in with a light wash, as I knew I'd be stamping overtop, and didn't want to have to paint around the small images.  With my stamp positioner, I added in the two horses, being careful to place the slightly larger one in the foreground, and the smaller horse slightly back.  I added in the rocks and trees, darkening them with several different colours.  To brighten things up, I added grasses and a few dots of yellow as wildflowers, and painted in the barn.  Finally I used my #565 Tombow to add shadows where needed.

By the way, these are very well behaved horses that don't leave through the open gate...


Thanks Karen!

Did you catch the new releases on Wednesday with Bonnie and her tutorial?  If not you can always find them on Facebook, Pinterest and YouTube.


 Now we have Tricia...

Who is as excited as I am about the next NEW Watercolor Release from Art Impressions?  It is bulging again!  This week the new Silhouettes (including deer, horses and skaters) and the Vintage Card set. I am so excited as I see all the possibilities for Christmas Cards, Winter cards, masculine cards and cards for any occasion. 


Here is how I made this card project.


I started out by inking the WC Stone Creek Scene with N89.  This is a really light gray.  I wasn’t sure where I wanted to place the deer so I wanted to make it as light as possible.  I went back in with some green along the lines to darken them up.


At this point I wasn’t sure how I wanted to place my deer, so I stamped them all onto some post-it tape and cut them out.  I used the masks to move the deer around until I was happy with their placement.  I inked the deer with brown and lifted each one individually so I could make sure they were where I had them.  You could use a positioner but I just decided to wing it (except for the one with his head in the water, he needed to be positioned). 


Using my small brush (#1), I added some color from my palette to the rocks.  Make sure to start pulling the color from the bottom and leaving a highlight on top to give them dimension.  I added some additional brown and blue to them to give them some added interest.  I finished them up by using my twintone marker to darken some of the rock shadows.  I added blue and purple to the water making sure that my brush strokes followed the lines of the banks. It is dark on one side fading out to a lighter color.  I also added some 569 to get some shadows into the water.  The areas in front of the rocks would be really dark. 


Using the masks I created at the beginning, I covered the two upper deer and inked up the tree line from the Mini Foliage set.  I followed the gray line that was created by the Stone Creek stamp. I added water to soften the lines.   I also pulled some of the color out into the hills making sure to leave it light at the center.  I added some additional green from my palette to the ground, but I didn’t go all the way out, I stayed where the deer and water are.  I added some green shadows under the deer.  Next, I inked the small pine tree from the Mini Foliage set (I love this set!) and stamped it on either side of the card to create a forest illusion ðŸ˜Š.  And as you know, we almost always use the small grass in our paintings and this is no exception.  I stamped it a few places around the rocks and river bank.  I went back in with some additional dark green to highlight the river bank.


For the sky I added some blue from my palette (watered down) and dropped it in several places pushing the color around.  I then use a paper towel to dab and pull some of the color up. I like to leave the hard edges sometimes and soften others.  I took a bit of blue and brown (gray) and added that in the same fashion after the first layer was dry.


I added some water to the deer to soften them, if you push the paint towards the areas that would be the darkest, it creates a nice shadow.  Once they were dry, I darkened some of the undersides of them.  To finish the scene, I thought it needed some trees, Using the tree branch from the Mini Foliage Set (Shocking right) and just stamped it in a few spots, no water required.  I signed and dated. 


This project took a little more time but it was worth it.  This makes a perfect card for any occasion including men’s birthday (perfect hunter card!...maybe).  Check out my blog if you want to know how I created the card itself.  I hope you are all doing well and I really appreciate you spending your time with us.  Make sure to use the #aiwatercolor on Instagram and tag us to make sure we see what you are creating.  I can tell you I am so impressed by each and every one of you and so humbled by your love and appreciation.  Keep painting and sharing…we LOVE it and you!


Have a crafty day!


And last but not least, Dot!


Hello,

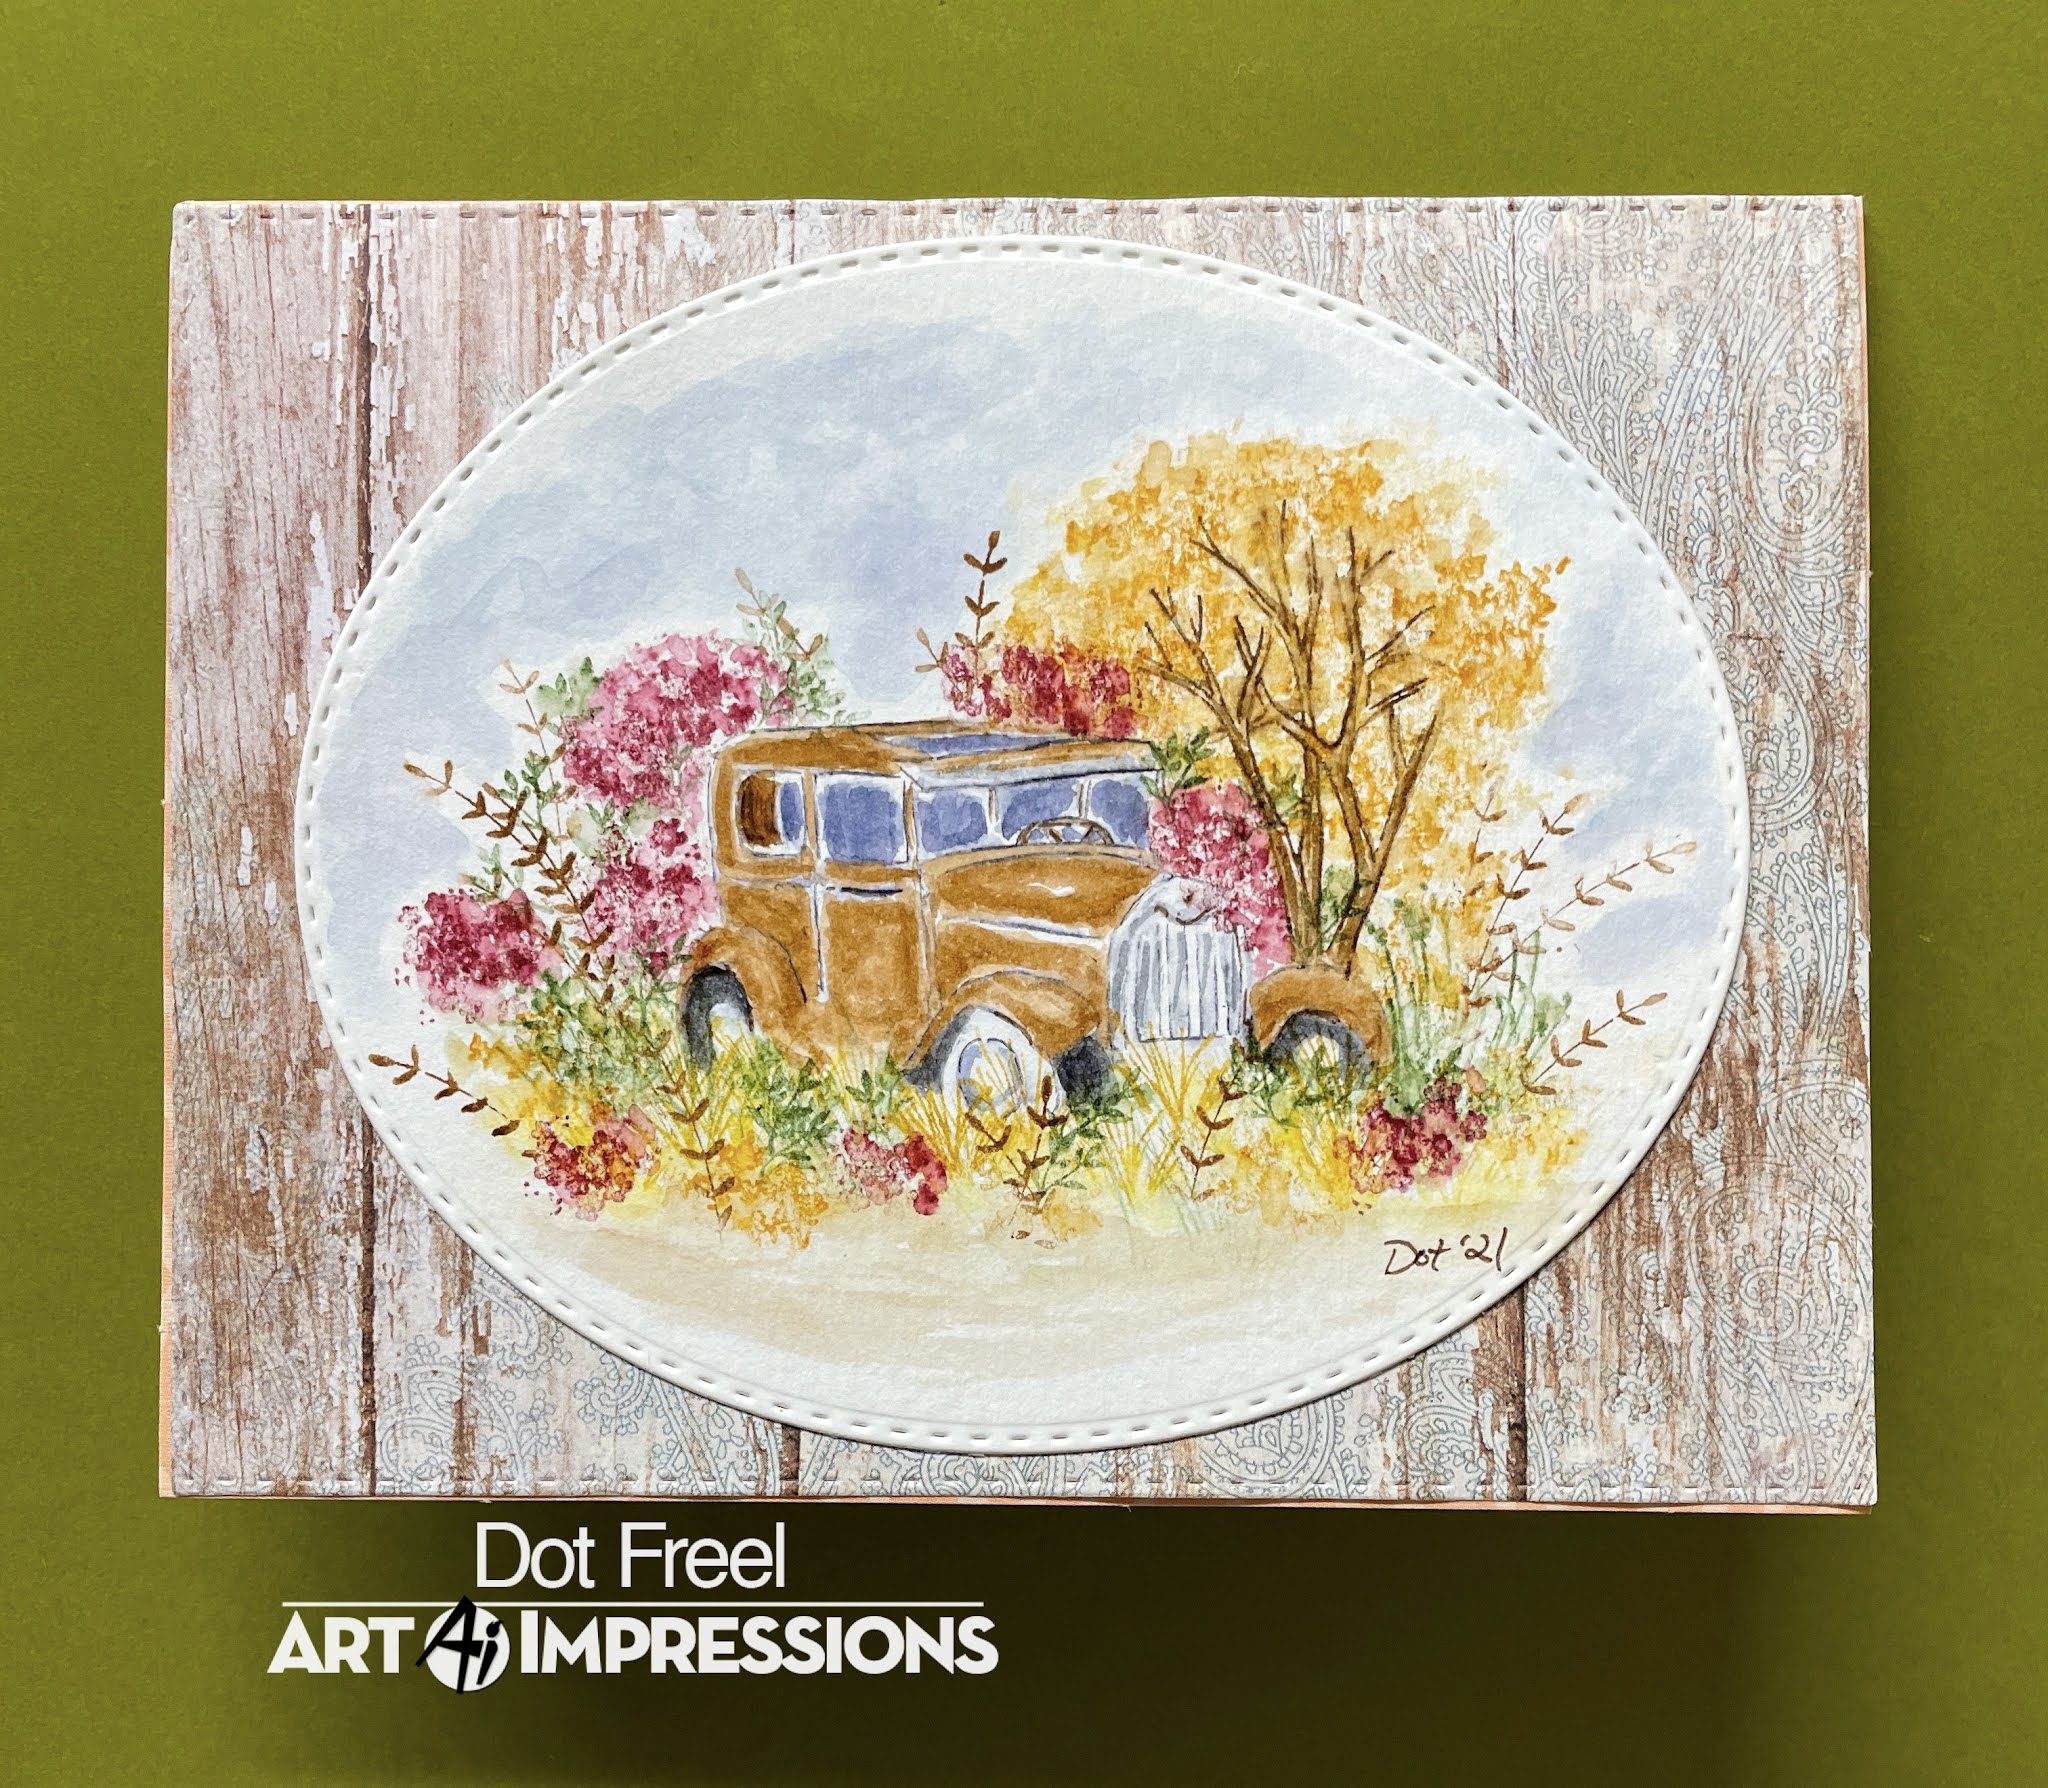
This is the last of the new Watercolor Releases from Art Impressions for the summer. I made a fall card using the brand new 5416 Vintage Car Set. To make it, use the Tombow 979 and 565 to ink the car, stamp it off first then stamp it on your watercolor paper and pull the color out of the lines. I colored the tires in N35, the windows in 565 and the body of the car in 947. The tree is from the 5373 Lg Tree Set and I inked it in 969 but forgot to stamp it off. I wish I would have since it's a little dark for yellow and orange leaves 025, 933. I used 158 for the green foliage from the 4875 Garden Wagon Set and 4867 Foliage Set but you can use whatever foliage and flowers you have for pretty much any scene. I used 837 for the red flowers from the 4052 Flower Set. The tall leave stems are from the 5126 Foliage Set 4 inked in 947. The yellow grass is inked in 025 and 933 from the 5196 Desert Set. The sky is 565. I used the 5065 Oval Double Stitched Dies and the 5063 Double Stitched Rectangle Dies. Hope you give it a try!


A Visit to Fall and a Reverse Stencil Technique by Janet Axtman


Good morning everyone! It's the last day of July and the very beginning of the dog days of summer. My mind turns to thoughts of cooler weeks ahead and yes, you guessed it - Pumpkin Spiced coffee! Being in a fall kind of mood, I decided it would be fun to make some tags to put on upcoming fall birthday presents and bags.

These tags were cut using the Tag Stitched dies set. It's is a great set with the large tag and several other smaller tags and decorative shapes. I also cut tag hole reinforcement donuts from the set.   

Before cutting these tags, I inked up two A2 sized white cardstock panels using a stencil and a multi-striped colored ink pad. In the tag on the left I swiped the ink pad vertically so that the ink would deposit in the blank areas of the stencil in color stripes. Then I flipped the inked up stencil on another blank piece of white cardstock and ran my brayer over the top to get a sort of letter press image from the stencil. This resulted is a reverse and lighter imprint you see on the right tag. Doing it this way made the most of the stencil and the ink I had used.

For these tags, I selected images from the Feast Mode Set. I stamped the fox, squirrel and flower sprays on marker paper and colored them with Copic markers. I fussy cut all the images except the squirrel and arranged the fox on a tag, placing foam tape behind the main fox image. I glued the loose leaves around the fox similar to how the leaves are shown in the stamped image. Last, two of the flower sprays were arranged together at the top.


I stamped and heat embossed two sentiment strips in gold using stamps in the set. I placed these at the bottom of the tags. I also cut a hexagon out of white cardstock using the Hexagon Double Stitched Die Set to use as a mat for the squirrel.

I cut the squirrel image out using a hexagon die and attached it with foam tape to the tag. Then one single flower spray was added to the top. After I did all this, I thought it would also have been cute to stencil golden rays coming out from behind him. If I do this again, I'm going to try that. He'd look a little like a squirrel super hero that way!


Once all this was complete, I added the hole reinforcement donuts in the same cardstock as the sentiment strips. I found a perfect orange ribbon piece in my stash, pulled it through each tag's hole and secured it with a piece of cream and dark purple bakers twine. 

I hope you enjoyed this quick visit to fall themes. It's around the corner and I'm looking forward to the cooler weather, beautiful fall colors, and most of all Pumpkin Spiced coffee! As always, I invite an additional stop at my blog for more details on all the products used for this project.

Happy Creating!

Janet YouTube - Blog - Facebook - Instagram - Pinterest

Friday, July 30, 2021

Farm Living Card by Tasha!

Happy Friday Ai Fans!
Tasha here sharing a card created with the cute #5180 Ai Barnyard Animals Cubbies Stamp Set! I'm from Wisconsin and we have tons of farms here, so I could not wait to make a card using all these sweet barnyard animals!


All the images were stamped with black hybrid ink and colored with Copic Markers. I used the coordinating dies to cut the barn and little animals out. I love all the windows and think it's so cool that the barn doors open!


The sky was created by ink blending dark yellow and orange on to yellow paper with a sunburst stencil. The sun rays look awesome behind the barn! I also added distress ink on top of the grass to allow the stitched edges to show up more. 


After I decided on the placement, I glued all the animals on to the center card. The ones hanging out of the windows are taped down making it easy to keep them in the right place. I also added a fence on each side of the barn for more detail.


Lastly, I stamped the sentiment "Hay There" with the same black ink and added two paper layers before adhering it to a white card base. This little scene is so happy and would be great to send to anyone, anytime of the year! 

Thanks for checking out my card and I hope you have a great day!


Thursday, July 29, 2021

Week 2 of Funky Fold challenge #308

 Hello Ai fans!!

Welcome to week two of our Funky Fold challenge.

We've seen some wonderful cards from our fans and can't wait to see more!

Our design team has some inspiration for you!

Jil used several of the 2021 freebies.


Crystal used 5267 – Floral Invites.


Tasha used  SC0677 – Wine Divas


Pull out your stamps and getting folding! 
You could be the lucky winner of three Art Impressions stamp sets!

Feeling Funky!!  Yes we are!  Create any card using a fun or funky non traditional fold.

We want you to join our challenge! It's so fun to look through your unique creations! We pick a "Top Spot" entry to receive 3 Ai stamp sets of their choice! Not a bad deal, right?? But you can't win if you don't enter, so let's see your projects!! Play along with our "Funky Fold" theme and follow our rules to enter.


Here are the Challenge Rules...
✻ Please make a new card or creation. You can make any crafty item you wish; this is not limited to cards!
✻ Limit two submissions per person. You will receive extra votes if you use Art Impressions stamps!
✻ The Ai Challenge is open to everyone, international submissions are welcome!
✻ Share the Ai love by clicking and commenting your fellow crafters.
✻ Make sure to get your link up by the deadline to enter your creations.
✻ Good luck and happy stamping!

You are invited to the Inlinkz link party!

Click here to enter

To Someone Sew Nice by Crystal


Hi fans! This week I played with the MB Sewing Room stamps set. I did something different with this set and did not use the Matchbook Template set and made a standard A2 card. I stamped everything onto smooth white card stock with Memento black ink. 


After everything was colored in I die cut everything out. I used Kraft card stock as the ground of the sewing room and stripped pattern paper as the wallpaper in the room. 


I matted the room layer of my card onto Kraft card stock then matted that onto pattern paper. I stamped the sentiment "To someone sew nice" directly onto the Kraft card stock. 


Happy Stamping! 


Wednesday, July 28, 2021

New WC Release and Watercolor Weekend sneak peek!

 Hello Ai fans!


Today Art Impressions launched the last of their summer 2021 new

watercolor releases.

It's a bittersweet day...but now...you have time to CREATE!!

Watch those videos that Bonnie has been sharing the last 6 weeks.
Look through the past Watercolor Weekend posts for our WC Design Team cards
for tons of inspiration. 


There's also a great new little tool available in the Art Impressions store.
This sand eraser is perfect for your watercolor cards and more.


Here's a little new release sneak preview from Karen and Dot.


Check back on Saturday for our Watercolor Weekend Roundup for even
more inspiration!


Get creating!!  And when you do make sure you
#artimpressions so we can see your amazing work.

You can see Bonnie's amazing tutorial video on the Art Impressions Facebook page.

Facebook Live | Facebook